HP DUST COLLECTOR MODEL G8027 INSTRUCTION MANUAL COPYRIGHT © MAY, 2005 BY GRIZZLY INDUSTRIAL, INC. WARNING: NO PORTION OF THIS MANUAL MAY BE REPRODUCED IN ANY SHAPE OR FORM WITHOUT THE WRITTEN APPROVAL OF GRIZZLY INDUSTRIAL, INC.
WARNING Some dust created by power sanding, sawing, grinding, drilling, and other construction activities contains chemicals known to the State of California to cause cancer, birth defects or other reproductive harm. Some examples of these chemicals are: • Lead from lead-based paints. • Crystalline silica from bricks, cement, and other masonry products. • Arsenic and chromium from chemically treated lumber. Your risk from these exposures varies, depending on how often you do this type of work.
Table of Contents INTRODUCTION ............................................................................................................................... 2 Foreword .................................................................................................................................... 2 Contact Info ................................................................................................................................ 2 Machine Data Sheet............................................
INTRODUCTION Foreword Contact Info We are proud to offer the Model G8027 1 HP Dust Collector. This machine is part of a growing Grizzly family of fine woodworking machinery. When used according to the guidelines set forth in this manual, you can expect years of trouble-free, enjoyable operation and proof of Grizzly’s commitment to customer satisfaction. If you have any comments regarding this manual, please write to us at the address below: We are pleased to provide this manual with the Model G8027.
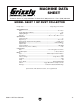
MACHINE DATA SHEET Customer Service #: (570) 546-9663 • To Order Call: (800) 523-4777 • Fax #: (800) 438-5901 MODEL G8027 1 HP DUST COLLECTOR Design Type ................................................................................ Single Stage Floor Model Overall Dimensions: Base .............................................................................................................15'' x 251⁄2" Height (With Bags Inflated) ...........................................................................
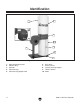
Identification 2 1 9 3 10 4 5 8 6 7 Figure 1. Model G8027 Identification. 1. 2. 3. 4. 5. -4- Upper Bag Support Rod Filtration Bag Collector Collection Bag Collection Bag Support Rod 6. 7. 8. 9. 10.
SECTION 1: SAFETY For Your Own Safety, Read Instruction Manual Before Operating this Machine The purpose of safety symbols is to attract your attention to possible hazardous conditions. This manual uses a series of symbols and signal words which are intended to convey the level of importance of the safety messages. The progression of symbols is described below. Remember that safety messages by themselves do not eliminate danger and are not a substitute for proper accident prevention measures.
Safety Instructions for Machinery 7. ONLY ALLOW TRAINED AND PROPERLY SUPERVISED PERSONNEL TO OPERATE MACHINERY. Make sure operation instructions are safe and clearly understood. 8. KEEP CHILDREN AND VISITORS AWAY. Keep all children and visitors a safe distance from the work area. 9. MAKE WORKSHOP CHILD PROOF. Use padlocks, master switches, and remove start switch keys. 10. NEVER LEAVE WHEN MACHINE IS RUNNING.
Additional Safety for Dust Collectors 1. MACHINE USE. DO NOT use this dust collector to pick up liquids and metal scrap including, but not limited to, nails and filings. Also, DO NOT pick up material which cannot safely pass through the impeller, such as solid wood scraps. 2. KEEPING FINGERS SAFE. DO NOT place your hands or tools near the open inlet during operation for any reason including, but not limited to, unclogging material and testing suction.
SECTION 2: CIRCUIT REQUIREMENTS 110V Operation Electrocution or fire could result if this machine is not grounded correctly or if your electrical configuration does not comply with local and state codes. Ensure compliance by checking with a qualified electrician! Serious personal injury could occur if you connect the machine to the power source before you have completed the set up process. DO NOT connect the machine to the power source until instructed to do so.
SECTION 3: SET UP This machine presents serious injury hazards to untrained users. Read through this entire manual to become familiar with the controls and operations BEFORE starting the machine! Items Needed For Set Up Items Needed for Setup Qty Wrench or Socket 8mm ..................................... 1 Wrench or Socket 10mm ................................... 1 Wrench or Socket 13mm ................................... 2 Phillips Screwdriver #2 .....................................
Inventory Site Considerations B A J Working Clearances Consider existing and anticipated needs, size of material to be processed through each machine, and space for auxiliary stands, work tables or other machinery when establishing a location for the machine. See Figure 4 for the footprint dimensions of the Model G8027. I D C 28" E G H F Figure 3. Main box items. 16" After all the parts have been removed from the two boxes, you should have the following items: Qty Box Components (Figure 3) A.
Hardware Recognition Chart
Base and Supports Components and Hardware Needed: Qty Motor/Impeller Housing ......................................1 Collector .............................................................1 Base ...................................................................1 Rubber Gasket ...................................................1 Swivel Casters ....................................................4 Collection Bag Support Rods ............................ 2 Upper Bag Support Rod ...............................
5. Install the rubber gasket onto the motor/ impeller housing opening. 6. Install the collector onto the motor/impeller housing with six M6-1 x 15 hex bolts, as shown in Figure 8. 8. Install the upper bag support onto the collector, as shown in Figure 10, using two M4-.7 x 8 Phillips head screws. Collector Motor/Impeller Housing Figure 10. Installing upper bag support. Collector Support Bolts Figure 8. Installing collector onto motor/impeller housing. 7.
Collection and Filtration Bags 3. Bag clamp springs should be located between the belt and latch (Figure 13); if not, the bag clamp will not work. Adjust the springs if needed. Components and Hardware Needed: Qty Collection Bag ....................................................1 Filtration Bag ......................................................1 Bag Clamps ........................................................2 Springs Latch To install the collection bag: 1.
Collection System General The Model G8027 is designed to be a singlemachine dust collector. Locate the dust collector where it will not interfere with the workpiece being processed, and no more than 10' of ducting is used, otherwise the CFM will be reduced. To solve dust collection questions, Grizzly offers a guide book entitled Dust Collection Basics that will help you design your system.
Ensure that the entire system is grounded. If using plastic blast gates to direct air flow, the grounding wire must be jumped (Figure 15) around the blast gate without interruption to the grounding system. Plastic Blast Gate Copper Ground Wire We also recommend wrapping the outside of all plastic ducts with bare copper wire to ground the outside of the system against static electrical build up. Wire connections at Y’s and T’s should be made with wire nuts.
SECTION 4: OPERATION Operation Safety ! Disconnect power to the machine when performing any maintenance, assembly or adjustments. Failure to do this may result in serious personal injury. Keep loose clothing rolled up and out of the way of machinery and keep hair pulled back. Test Run Once assembly is complete and adjustments are done to your satisfaction, you are ready to test run the machine. Turn on the power supply at the main panel. Turn the dust collector ON.
SECTION 5: ACCESSORIES H2499—Small Half-Mask Respirator H3631—Medium Half-Mask Respirator H3632—Large Half-Mask Respirator H3635—Disposable Cartridge Filter Pair P100 Wood dust is now considered a known carcinogen and has been linked to nasal cancer and severe respiratory illnesses. If you work around dust everyday, a half-mask respirator can be a lifesaver.
H2443—Universal Adapter Seven-step adapter provides a multitude of dust collection reducing options. Simply cut away unneeded steps with a hacksaw. Outside diameter step sizes include 1”, 2”, 2-1/2”, 3”, 4”, 5” and 6”. Wall thickness is 1/8”. G2525—Dust Collection Basics This incisive book skillfully guides the woodworker through all the steps necessary in the design and construction of an efficient central dust collection system and tells you what you need to know for easy installation.
SECTION 6: MAINTENANCE ! Schedule Disconnect power to the machine when performing any maintenance, assembly or adjustments. Failure to do this may result in serious personal injury. Keep loose clothing rolled up and out of the way of machinery and keep hair pulled back. Wear safety glasses during the entire operations process. Failure to comply may result in serious personal injury. Regular periodic maintenance on your Model G8027 Dust Collector will ensure its optimum performance.
Bag Cleaning Always wear a respirator or dust mask and safety glasses when emptying the storage bag (Figure 25). Small dust particles can escape the bags during emptying, causing them to become airborne and easily inhaled. This microscopic airborne dust is extremely unhealthy to breathe and can cause serious health problems. Grizzly offers replacement collection bags (G5051 and G5559) for your Model G8027 Dust Collector. To empty the collection bag: 1.
Troubleshooting SYMPTOM POSSIBLE CAUSE CORRECTIVE ACTION Motor will not start, or it growls on start up. 1. Power supply fuse or circuit breaker 1. Disconnect power, and inspect circuit for electrical shorts and repair. Replace circuit breaker if it is old has tripped. or has tripped many times. 2. Disconnect power, and use an ohmmeter to check 2. Toggle switch is broken inside. switch terminals for continuity, and replace switch if required. 3. Replace start capacitor. 3. Start capacitor is at fault.
Electrical Components and Wiring Motor Motor Wires ON/OFF Switch 110V Power Cord Ground (Green) Black Wire White Wire MOTOR MOTOR WIRES Disconnect power before performing any electrical service.
G8027 Parts Breakdown 43 44 ER W POFOR R UG T TO PL WAI EC RE UN D LL FO S AN CO BE ND ST OP HA T DU STINGINLE TO ACAR PLNE 33 45 25 32 IO 29 34 16 17 35 46 N UT ! CA ZARDa HA r ST wea n DU ays he w r w ne.
G8027 Parts List REF 1 2 3 4 5 6 7 8 9 10 11 12 13 14 16 17 18 18-1 18-2* 18-3* 18-4 19 20 21 22 PART # P8027001 PS20M PW02M P8027004 PS09M P8027006 PB08M PSS14M P8027009 P8027010 P8027011 PLW04M PB87M PB18M PSW06 PSW06 P8027018 P8027018-1 P8027018-2 P8027018-3 P8027018-4 P8027019 P8027020 P8027021 P8027022 DESCRIPTION SWIVEL CASTER PHLP HD SCR M5-.8 X 15 FLAT WASHER 5MM BASE PLATE PHLP HD SCR M5-.8 X 10 INLET COVER HEX BOLT M6-1 X 20 SET SCREW M8-1.
WARRANTY AND RETURNS Grizzly Industrial, Inc. warrants every product it sells for a period of 1 year to the original purchaser from the date of purchase. This warranty does not apply to defects due directly or indirectly to misuse, abuse, negligence, accidents, repairs or alterations or lack of maintenance.
WARRANTY CARD Name _____________________________________________________________________________ Street _____________________________________________________________________________ City _______________________ State _________________________ Zip _____________________ Phone # ____________________ Email ________________________ Invoice # _________________ Model # ____________________ Order # _______________________ Serial # __________________ The following information is given on a voluntary basis.
FOLD ALONG DOTTED LINE Place Stamp Here GRIZZLY INDUSTRIAL, INC. P.O.
Buy Direct and Save with Grizzly® – Trusted, Proven and a Great Value! Visit Our Website Today And Discover Why Grizzly® Is The Industry Leader! • SECURE ORDERING • ORDERS SHIPPED WITHIN 24 HOURS • E-MAIL RESPONSE WITHIN ONE HOUR -OR- Call Today For A FREE Full Color Catalog