MODEL T10008 2000 Kg DIGITAL CRANE SCALE OWNER'S MANUAL COPYRIGHT © OCTOBER, 2007 BY GRIZZLY INDUSTRIAL, INC. WARNING: NO PORTION OF THIS MANUAL MAY BE REPRODUCED IN ANY SHAPE OR FORM WITHOUT THE WRITTEN APPROVAL OF GRIZZLY INDUSTRIAL, INC.
SECTION 1: SAFETY ����������������������������������������������������������������������� �������������������������������������������������������������� ���������������������������������������������������������������������� �������������������������������������������������������������������� ������������������������ ������������������������������������������������������������������ �������������������������������������������������������������������� ���������������������������������������������������������
Safety Instructions for Crane Scales 1. READ THROUGH THE ENTIRE MANUAL BEFORE USING. This crane scale presents serious injury hazards to untrained users. 2. NEVER ALLOW UNQUALIFIED PERSONNEL TO SERVICE THIS SCALE. Servicing the scale incorrectly may reduce the maximum holding capacity of the load cell or cause the scale to give incorrect readings, which may result in overloading. 3. DO NOT LIFT MORE THAN THE MAXIMUM SUGGESTED CAPACITY.
SECTION 2: INTRODUCTION Foreword Contact Info It is our pleasure to provide this manual with the Model T10008. It was written to encourage safety considerations and guide you through general operating procedures and maintenance. If you have any comments regarding this manual, please contact us: The specifications, details, and photographs in this manual represent the Model T10008 as supplied when the manual was prepared.
SECTION 3: SET UP Unpacking Site Consideration Your crane scale was carefully packaged for safe shipping. If you discover any damage after you have signed for delivery, immediately call Customer Service at (570) 546-9663 for advice. Weight Capacity The Model T10008 crane scale has a maximum capacity of 2,000 Kg (4,410 lbs.). When choosing a mounting site, verify that the lifting structure can withstand at least the maximum loading capacity as well as any possible overloading that may occur.
Mounting and Loading Hardware When attaching hardware to the crane scale: • • DO NOT attach multiple chains or harnesses directly to the scale. Only one point of contact should be used on the hook and shackle to lessen the chance of the load falling and to allow proper load alignment. DO NOT attach oversized items or harnesses directly to the scale. Oversized loading hardware create multiple points of contact and will not fit properly with the crane scale hardware.
SECTION 4: OPERATIONS Scale Functions Hold LED Display Tare LED Display �� Tare Button ������ ���� Load Stable LED Display ���� ������ ON/OFF Button Remote Receiver Window Figure 4. Scale face. Turning the Scale ON After your crane scale has been properly suspended, familiarize yourself with the functions both on the scale and on the remote control. Begin by holding down the ON/OFF button on the scale to turn it ON (Figure 4). Each time the scale is turned on, it will flash a series of displays.
Overload Warning If the load exceeds the maximum capacity (net + tare weight), OVER will be displayed on the screen. DO NOT overload the scale. Overloading the scale may result in injury, damage the scale, and void your warranty. Remote Control Functions Display LED Turning the Scale OFF To turn the scale OFF, hold down the ON/OFF button on the scale or hold down the OFF button on the remote control. Zero Note: The scale will not turn OFF unless it is at the main weighing screen.
Scale Battery The scale will automatically display the current scale battery voltage when you turn the scale ON and OFF. To check the voltage during use, press the MR button on the remote control and the screen will display SHIFT. Press the F1 button and the screen will display U X.XX. To return to the main display, press MR again. Hold Function When the load has been added to the scale, wait until the STEADY light goes off, signifying that the load is stable (Figure 4).
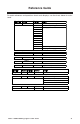
Reference Guide For quick references and questions about scale displays, use the charts below for assistance. Display Function Button On OFF ON/OFF 2000 U X.XX 99999 88888 77777 66666 55555 44444 33333 22222 11111 00000 - XX 0 OFF or ON/OFF U X.XX OFF Zero � Tare TARE/ TARE Hold HOLD Action Maximum capacity in Kg. Current battery voltage Warming up Current weight Steady light will engage, ready Scale is OFF 0 Display reads 0 0.
SECTION 5: MAINTENANCE General Regularly check mounting hardware for cracks, unsafe wear, deformation, or warping. DO NOT attempt to fix the mounting hardware! Discard and replace all damaged mounting hardware. Regularly check for loose pins, rings, screws, and safety latches. Tighten or replace any loose items. Damaged or loose parts may cause the load to fall and may result in serious injury. Always keep the scale in a hanging position to relieve strain on the load cell.
SECTION 6: SERVICE Troubleshooting Symptom Possible Cause Solution No display when the scale is turned ON. 1. Battery is dead or damaged. 1. Check and charge or replace battery. 2. Tighten the battery contact. Display flashes. 1. Low battery. 1. Recharge or replace battery. Scale will not turn ON or OFF. 1. ON/OFF button is damaged. 1. Check and clean the button and button contact. 2. Exit out of the function to the main screen, then turn the scale OFF. 2. Battery contact is loose. 2.
T10008 Front View Parts Breakdown �� �� � � � � � � � � � �� �� �� �� �� �� �� �� �� REF PART # DESCRIPTION REF PART # DESCRIPTION 1 2 3 4 5 6 7 8 9 10 ANCHOR SHACKLE SPECIAL BOLT 7/8-9 HEX NUT 7/8-9 COTTER PIN FRONT GASKET PHLP HD SCR M3-.5 X 8 LOCK WASHER 3MM HEX NUT M3-.5 CIRCUIT BOARD PHLP HD SCR M3-.5 X 10 11 12 13 14 15 16 17 18 19 20 LOCK WASHER 3MM LED W/ WIRE ASSEMBLY SCALE FACE PLATE TARE WIRE ASSEMBLY SCREEN POWER WIRE ASSEMBLY HIGH NUT M3-.5 X 20 PHLP HD SCR M3-.
T10008 Rear View Parts Breakdown �� �� �� �� �� �� �� �� �� �� �� �� �� ���� �� �� �� ���� ���� ���� �� �� �� �� ������ �� �� �� �� �� REF PART # DESCRIPTION REF PART # DESCRIPTION 21 22 23 24 25 26 27 28 28-1 28-2 28-3 28-4 29 30 31 32 FLAT WASHER 22MM COTTER PIN CLEVIS PIN 22 X 70 LIFTING YOKE COTTER PIN CLEVIS PIN 25 X 75 FLAT WASHER 30MM HOOK ASSEMBLY HOOK PHLP HD SCR M4-.7 X 20 SAFETY LATCH LOCK NUT M4-.
WARRANTY Grizzly Industrial, Inc. warrants every product it sells for a period of 1 year to the original purchaser from the date of purchase. This warranty does not apply to defects due directly or indirectly to misuse, abuse, negligence, accidents, repairs or alterations or lack of maintenance.