MODEL T10458 SOPRANO UKULELE KIT InSTRUCTION Manual (For models manufactured since 10/11) Copyright © January, 2012 By Grizzly INDUSTRIAL, Inc. Warning: No portion of this manual may be reproduced in any shape or form without the written approval of Grizzly industrial, inc.
Some dust created by power sanding, sawing, grinding, drilling, and other construction activities contains chemicals known to the State of California to cause cancer, birth defects or other reproductive harm. Some examples of these chemicals are: • • • Lead from lead-based paints. Crystalline silica from bricks, cement and other masonry products. Arsenic and chromium from chemically-treated lumber. Your risk from these exposures varies, depending on how often you do this type of work.
Table of Contents SAFETY............................................................................................................................................. 2 INTRODUCTION............................................................................................................................... 3 Manual Accuracy......................................................................................................................... 3 Identification.................................................
SAFETY Always wear safety glasses or goggles when operating equipment. Everyday glasses or reading glasses are not safety glasses. Be certain the safety glasses you wear meet the appropriate standards of the American National Standards Institute (ANSI). Because there are various ways to cut and join wood, you can make substitutions for the methods stated in this plan. We try to suggest the easiest methods possible. However, only you know your skills with each piece of machinery.
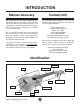
INTRODUCTION Manual Accuracy Contact Info We are proud to offer the Model T10458 Soprano Ukulele Kit. We've made every effort to be exact with the instructions, specifications, drawings, and photographs of the kit we assembled when writing this manual. However, sometimes we still make an occasional mistake. We stand behind our products. If you have any questions or parts requests, please call or write us at the location listed below. We are pleased to provide this manual with this kit.
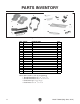
PARTS INVENTORY 3 9 18 11 1 2 12 10 13 14 17 8 5 7 4 15 16 6 Figure 2. Parts Identification.
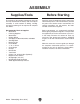
ASSEMBLY Supplies/Tools Before Starting The majority of the wooden components in this kit are fully machined at the factory and are ready for assembly. A small amount of drilling, sanding, and light machining will be required to complete the ukulele. Read this manual completely before starting the construction process. This will familiarize you with the parts of the ukulele used in construction, the specific procedures you will perform, the tools needed, and the time required.
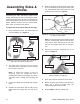
Assembling Sides & Blocks 5. Assembling the sides and blocks requires measuring and cutting the sides to the proper length, transferring marks onto the sides, and gluing the neck and tail blocks into place. The tail and neck blocks provide structure for the sound board, back, sides, and neck of the ukulele. Mark the peg hole on the outside of the sides at the neck block by lining up the blocks with the sound board and back layout lines and making a hole mark (see Figure 4).
10. Glue and clamp the tail block to the sides, as shown in Figure 6. Note: This kit includes a wood strip of purfling. At least 2 bands of the plastic purfling need to be on the outside edge of the purfling pattern to ensure that the wood piece will not splinter as it is bent around the sound hole. We recommend soaking the wood strip for at least an hour before installation. This will help the wood bend as it is installed. To install the purfling: 1.
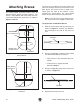
Attaching Braces The sound board and back braces must be installed before gluing the body together. The braces, sound board, and back come pre-measured and marked with layout lines as shown in Figures 9 and 10. The braces are roughed to size at the factory, but some fine tuning is necessary for the best fit. The back braces are meant to have a slight curve, which gives the back of the ukulele a belly, improving its sound quality. The sound board braces on the other hand are meant to be flat.
To attach the braces to the back: To attach the braces to the sound board: 1. Apply sufficient glue and center the braces on the back in their specified locations (see Figure 10 on Page 8). 1. 2. Place the edges of the back on 1⁄4" riser blocks. Use a weight to depress the back board enough to conform to the curve of the braces, as shown in Figure 13.
Attaching Kerfing Kerfing provides increased surface area for attaching the sound board and back to the ukulele. Attaching the kerfing works best if it is shaped to fit the sides of the ukulele. The kerfing is attached to the sides as shown in Figure 16. 4. Determine the final length of the kerfing at the tail block and cut as necessary. 5. Clamp the kerfing in place and let it dry over night. This forms the kerfing to the sides and makes glue-up go more smoothly. 6.
Assembling Body 3. Assembling the body consists of removing the excess material above the kerfing, and attaching the sound board and back to the sides/kerfing assembly. It is important to attach the sound board before the back in order to provide added structure when attaching the curved back. Secure the sound board to the body with rubber bands. Use wedges to ensure a tight fit all around the instrument, as shown in Figure 19. Allow the glue to dry for the manufacturer's recommended time.
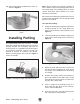
Installing Frets 3. Peel off the tape with the frets attached and set it aside. This will help you keep the frets organized until you are ready to install them. The fingerboard comes with precut fret slots. The frets have also been measured and roughly cut to fit their corresponding slots. Installing the frets requires matching the frets to the appropriate slot, installing them on the fingerboard, and removing the excess fret material. 4.
Attaching Neck to Ukulele Body The neck comes from the factory ready to fit the ukulele body. It must be installed on body before the fingerboard is attached. At the base of the neck, a peg has been installed to properly position it with the ukulele body. To attach the neck to the body: 1. Drill a hole in the neck block where you marked it earlier in construction (see Figure 4 on Page 6). 2. Using a pencil, draw a centerline down the length of the neck and the body of the ukulele.
Sanding Ukulele Body The components that make the ukulele body have been rough-sanded at the factory; however, no finish has been applied. To complete construction and prepare the ukulele for finish, it must be sanded. Neck Like the body, most of the neck has been machined at the factory; however, the neck-tofingerboard joint needs to be completed. Be sure to use caution while sanding this area as not to sand into the fingerboard or change its shape. To sand the ukulele neck: 1.
Attaching Fingerboard Determining Bridge Location With sanding completed, the fingerboard is ready to be attached to the neck and sound board. The bridge is glued directly to the sound board at the location of the bridge plate. Leaving an area of the sound board slightly smaller than the footprint of the bridge unfinished increases the strength of the glue joint that attaches the bridge to the sound board. The reduced size of this area allows the finish of the ukulele to be consistent around the bridge.
Preparing to Finish Painting/Finishing In preparation for applying the finish, we recommend using masking tape to protect the following parts of the ukulele. Finishing supplies are not supplied with the ukulele kit. • Mask the bridge mounting location, (see Figure 28). Mask the fingerboard and nut location, (see Figure 29). Fill the sound hole with newspaper, (see Figure 29). • • Bridge Footprint Masked Area Figure 28. Masked off area for bridge. Tip: The ukulele body is made from mahogany.
Attaching Bridge Remove the tape from the masked areas in preparation for attaching the bridge. Refer to Page 15 for the necessary measurements to locate the bridge. 7. Remove the saddle from the bridge. 8. Apply a thin coat of glue to the back of the bridge and the unfinished area of the sound board. Let the glue set until it is still tacky but clear.
Setting String Height The string height is the distance between the top of the fret and the bottom of the string (Figure 33). Correct string height is crucial for maximizing the playability of the ukulele. Measurements are taken at the 1st and 12th fret. — If the string heights are at least the thickness of a dime, then proceed to Step 2. — If the string heights are less than the thickness of a dime at the 1st fret, this is an indication that the height of the string nut needs to be adjusted.
Installing Tuning Peg Installing Strings Each tuning peg consists of the components shown in Figure 36. Each string of the ukulele is a different diameter. Number the strings 1, 2, 3, and 4—from the smallest diameter to the largest diameter. Their arrangement on the ukulele is shown in Figure 38. Bushing Tuning Washer Knob Ukulele Body Peg Seats 2 Peg 4 3 Nylon Bushings Spacer Figure 36. Tuning peg components. To install the tuning peg: 1. 1 Screw Figure 38. Proper string arrangement.
Tuning Tuning is the most important concept of playing a ukulele. If the ukulele is not in tune with itself, or the other instruments in an ensemble, the resulting music will not sound pleasing to the ear. Having a good understanding of tuning is essential to maximizing the full potential of any ukulele. AFTERMARKET ACCESSORIES NOTICE Refer to the newest copy of the Grizzly Catalog for other available accessories.
Model T24022—The Daily Ukulele Strum a different song every day with easy arrangements of 365 of your favorite songs! The Daily Ukulele includes arrangements that feature melody, lyrics and ukulele chord grids and are in ukulele-friendly keys that are particularly suited for groups of one to one hundred. Includes folk songs, pop songs, kids' songs, Christmas carols and Broadway tunes, all with a spiral binding.
Buy Direct and Save with Grizzly ® – Trusted, Proven and a Great Value! ~Since 1983~ Visit Our Website Today For Current Specials! ORDER 24 HOURS A DAY! 1-800-523-4777