
Instructions / Assembly


www.gronomics.com East Bethel, MN USA 763-753-7374
Continued
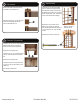
Place the second truss assembly on the top
of the planter box assemblies (pentagon cap
facing up).
Position the outside of the 80” corner posts
approximately 18” from the end of the truss
assembly.
Verify that the truss assembly is contacting
the angled notch on both 80” posts.
Install two 5/16 x 2-3/4” (Item 16) screws
through the slot in the 80” post and into the
truss assembly.
12
12
Planter Box Installation (Facing Out) Continued
18”
Angled Notch
16
16
Pentagon Cap Facing Up
18”
Angled Notch
16
16
18”
16
16
Stand pergola up. Locate one 31” x 5-1/2” side rail (Item 9). Install the side
rail into the slot on the two 80” posts, securely fastening the two posts
together.
Repeat on opposite side.
Locate the six 2” x 6” x 60” truss cross pieces (Item 19). Place one truss
cross piece (notch down) onto the truss assemblies 16” from the middle
of the truss assembly. Slide down until it contacts the 80” posts. Install the
next truss cross piece 32” from the middle of the truss assemblies. Install
the next truss cross piece 48” from the end of the truss assemblies.
Fasten each truss cross piece in place with one 10 x 4” deck screw (Item
17) (both sides). When installing the deck screws, tighten the screw unit it
makes contact with the truss cross piece.
NOTE: If the screw is installed too deep, it may allow moisture to penetrate
the wood and may cause damage to the structure.
Repeat procedure for opposite side of truss assemblies.
13
13
Securing Truss Assembly
9
17
17
19
19
16”
48”
32”