
Operation Manual


Rufton ein-/ausschalten
bei Geräten ohne
Blitzlicht und
Steckdosen-Funkgong
!
!
!
!
Taste T2 länger als 3
Sekunden gedrückt
halten, bis LED 2
aufleuchtet
Der Rufton ist nun
ausgechaltet. Die rote
Kontroll-LED 2 blinkt zur
Erinnerung
Wiedereinschalten
durch kurzes Betätigen
von Taste T1 oder T2
Wenn das Gerät über
mehrere Wochen nicht
benutzt wird, empfehlen
wir, die Batterien
herauszunehmen bzw.
im Falle des Steckdosen-
Funkgongs das Gerät
aus der Steckdose zu
ziehen
Switching the ring tone
on/off for equipment
without flash and plug-
in-chime
!
!
!
!
Continue pressing
button T2 for more than
3 seconds, until LED 2
lights..
The ring tone is now
switched off. The red
control LED 2 flashes as
a reminder.
Switch on again by
pressing button T1 or T2
briefly.
If the equipment is not
to be used for a period of
several weeks, we
recommend removing
the battery, or in the case
of the plug-in wireless
chime, removing the
equipment from the
socket.
Activation/désactivation
de la tonalité sur
appareils non équipés
de flash
!
!
!
!
Maintenir la touche T2
enfoncée pendant plus
de 3 secondes jusqu'à ce
que la LED 2 s'allume.
La tonalité est
désactivée. La diode de
surveillance rouge « LED
2 » clignote pour
mémoire.
Remise en marche par
appui bref de la touche
T1 ou T2.
Si l'appareil n'est pas
utilisé pendant plusieurs
semaines, il est conseillé
de retirer les piles ou
bien, dans le cas du
carillon radio pour prise
de courant, de
débrancher l'appareil de
la prise.
Beltoon aan/uit
schakelen bij toestellen
zonder flitslicht
!
!
!
!
Toets T2 langer dan 3
se-conden ingedrukt
houden tot LED 2
knippert.
De beltoon is nu
uitgeschakeld. De rode
controle-LED 2 knippert
ter herinnering
Opnieuw inschakelen
door kort bedienen van
toets T1 of T2
Wanneer het apparaat
meerdere weken niet
wordt gebruikt, adviseren
wij de batterijen te ver-
wijderen c.q. bij de
draadloze contact-doos-
gong het apparaat uit de
wandcontactdoos te
halen.
ALARM-Funktion
!
!
!
!
Auf der Leiterplatte des
Senders befindet sich
eine Drahtbrücke. Wird
diese Brücke gemäß Bild
4 durchtrennt, so ist die
ALARM-Funktion aktiv!
Wird die Taste des
Senders länger als 3
Sekunden betätigt, ertönt
am Empfänger der DIN-
ALARM-Ton
Diese Funktion ist gut
geeignet, um auf
besondere Situationen
aufmerksam zu machen!
ACHTUNG! Der Alarm-
Ton kann auch als
festeingestellte “Melodie”
programmiert werden,
siehe vorheriges Kapitel
ALARM-Function
!
!
!
!
The transmitters are
equipped with a bridge
on the PCB. By cutting
this bridge as shown in
fig. 4, the ALARM-
function will be enabled.
If the transmitter button
is
pressed for more than
3 seconds, the (DIN)
ALARM tone is emitted
from the receiver.
This function is well-
suited to drawing attention
to unusual situations!
ATTENTION! The Alarm
tone also can be set as a
fixed “melody”, see also
previous chapter
Fonction ALARME
!
!
!
!
Les émetteurs sont
équipés d'un pontet. Si
on coupe le pontet selon
la figure 4, la fonction
alarme est activée.
Quand la touche de
l'émetteur est activée
pendant plus de 3
secondes, l'ALARME
sonore retentit au niveau
du récepteur.
Cette fonction convient
parfaitement pour attirer
l'attention sur certaines
situations.
ATTENTION ! Il est
également possible de
programmer une
« mélodie » déterminée
comme tonalité d’alarme
(voir chapitre précédent)
ALARM-functie
!
!
!
!
Op de printplaat van de
zender zit een
draadbrug. Wanneer
deze brug volgens afb. 4
verbroken wordt, is de
ALARM-functie actief!
Wanneer de toets van
de zender langer dan 3
seconden bediend wordt,
klinkt op de ontvanger de
DIN-ALARM-toon.
Deze functie is goed
geschikt om op
bijzondere situaties
attent te maken.
ATTENTIE! De
alarmtoon kan ook als
vast ingestelde “melodie”
geprogrammeerd
worden, zie het
voorafgaande hoofdstuk
13
GB
F
D NL
4
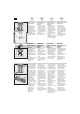
ALARM ein/on:
- Brücke trennen
- cut bridge
~
~
5
Press
>3 sec.
1
T2
LED 2
V2 V4
2
Blink
V2 V4
V5
LED 2
T2
3