Verstärker Bedienungsanleitung IRIDIUM GZIA 1.300HPX GZIA 1.
Bitte sorgfältig lesen Vielen Dank, dass Sie sich für eine Endstufe der Marke Ground Zero entschieden haben. Unsere Kunden sind es gewöhnt, von Ground Zero die beste und modernste Technologie zu erhalten. Viel Spaß mit diesen Produkten. Ausstattungsmerkmale 4 Ohm / 2 Ohm stabil Stereo 4 Ohm stabil Mono (GZIA 1.300HPX) 1 Ohm stabil Mono (GZIA 1.600HPX) Einschalt- und Schutzanzeige Bass Boost (GZIA 1.300HPX / 1.
Bitte unbedingt beachten! Fahrzeugbatterie vor der Installation abklemmen! (Hinweise in der Betriebsanleitung des KFZ beachten!) Keine Löcher in den Tank, die Bremsleitung, Kabel oder andere wichtige Fahrzeugteile bohren! Kabel niemals über scharfe Kanten führen. Es ist empfehlenswert, die Stromversorgung der Endstufe mit einem Kondensator (Powercap) min. 1 F zu puffern, um eine stabile Betriebsspannung zu gewährleisten.
Einstellungen und Funktionen – GZIA 1.
Einstellungen und Funktionen – GZIA 1.
Einstellungen und Funktionen – GZIA 2080HPX 6
Einstellungen und Funktionen – GZIA 2130HPX 7
Einstellungen und Funktionen – GZIA 2235HPX 8
Einstellungen und Funktionen – GZIA 4115HPX 9
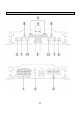
Einstellungen und Funktionen 1 Lautsprecheranschlüsse 2 Stromanschluss 3 Zustandsanzeige 4 Cinch Eingänge 5 High Level Eingänge 6 High Pass Regler 7 Low Pass Regler 8 Mode Schalter 9 10 11 Remote Control Eingang Gain Level Regler Bass Boost Zum Anschluss der Lautsprecher GND -> Masse Anschluss REM -> Remote Antennenanschluss [nicht bei Nutzung der High Level Eingänge (5)] BATT -> +12 Volt GRÜN – OK ROT – Fehler An diesen Anschlüssen schließen Sie die Cinchleitungen an.
High Level Input – GZIA 1.300HPX Bei Benutzung der High Level Eingänge kann es je nach Anlagen und Fahrzeug-Konfiguration zu Störgeräuschen kommen. Bitte nutzen Sie den mittleren zusätzlichen Masse-Anschluss dieses Eingangs, um diese Geräusche zu verringern, ggf. sogar komplett zu unterbinden. Verbinden Sie dieses Kabel mit GND des Powerterminals. Alternativ kann eine Verbindung mit dem GND / Masse Anschluss der Signalquelle ebenfalls hilfreich sein.
High Level Input – GZIA 1.600HPX Bei Benutzung der High Level Eingänge kann es je nach Anlagen und Fahrzeug-Konfiguration zu Störgeräuschen kommen. Bitte nutzen Sie den mittleren zusätzlichen Masse-Anschluss dieses Eingangs, um diese Geräusche zu verringern, ggf. sogar komplett zu unterbinden. Verbinden Sie dieses Kabel mit GND des Powerterminals. Alternativ kann eine Verbindung mit dem GND / Masse Anschluss der Signalquelle ebenfalls hilfreich sein.
High Level Input – GZIA 2080HPX Bei Benutzung der High Level Eingänge kann es je nach Anlagen und Fahrzeug-Konfiguration zu Störgeräuschen kommen. Bitte nutzen Sie den mittleren zusätzlichen Masse-Anschluss dieses Eingangs, um diese Geräusche zu verringern, ggf. sogar komplett zu unterbinden. Verbinden Sie dieses Kabel mit GND des Powerterminals. Alternativ kann eine Verbindung mit dem GND / Masse Anschluss der Signalquelle ebenfalls hilfreich sein.
High Level Input – GZIA 2130HPX Bei Benutzung der High Level Eingänge kann es je nach Anlagen und Fahrzeug-Konfiguration zu Störgeräuschen kommen. Bitte nutzen Sie den mittleren zusätzlichen Masse-Anschluss dieses Eingangs, um diese Geräusche zu verringern, ggf. sogar komplett zu unterbinden. Verbinden Sie dieses Kabel mit GND des Powerterminals. Alternativ kann eine Verbindung mit dem GND / Masse Anschluss der Signalquelle ebenfalls hilfreich sein.
High Level Input – GZIA 2235HPX Bei Benutzung der High Level Eingänge kann es je nach Anlagen und Fahrzeug-Konfiguration zu Störgeräuschen kommen. Bitte nutzen Sie den mittleren zusätzlichen Masse-Anschluss dieses Eingangs, um diese Geräusche zu verringern, ggf. sogar komplett zu unterbinden. Verbinden Sie dieses Kabel mit GND des Powerterminals. Alternativ kann eine Verbindung mit dem GND / Masse Anschluss der Signalquelle ebenfalls hilfreich sein.
High Level Input – GZIA 4115HPX Bei Benutzung der High Level Eingänge kann es je nach Anlagen und Fahrzeug-Konfiguration zu Störgeräuschen kommen. Bitte nutzen Sie den mittleren zusätzlichen Masse-Anschluss dieses Eingangs, um diese Geräusche zu verringern, ggf. sogar komplett zu unterbinden. Verbinden Sie dieses Kabel mit GND des Powerterminals. Alternativ kann eine Verbindung mit dem GND / Masse Anschluss der Signalquelle ebenfalls hilfreich sein.
Einschalten des Verstärkers Der Verstärker schaltet sich automatisch einige Sekunden nach dem Einschalten des Radios ein. Achtung: Ihr Verstärker schaltet sich zeitweise aus, wenn er überhitzt ist, schaltet sich jedoch nach der Abkühlung automatisch wieder ein (ca. 80° C). Einstellung des Audiopegels 1. LEVEL (MIN/MAX): mit Linksdrehung ganz auf MIN drehen 2. Drehen Sie die Lautstärke am Radio auf ungefähr 1/3 der Höchstlautstärke 3.
Anschluss – GZIA 1.
Anschluss – GZIA 1.
Stereo Anschluss – GZIA 2080HPX 20
Mono Anschluss – GZIA 2080HPX 21
Trimode Betrieb – GZIA 2080HPX 22
Stereo Anschluss – GZIA 2130HPX 23
Mono Anschluss – GZIA 2130HPX 24
Trimode Betrieb – GZIA 2130HPX 25
Stereo Anschluss – GZIA 2235HPX 26
Mono Anschluss – GZIA 2235HPX 27
Trimode Betrieb – GZIA 2235HPX 28
Stereo Anschluss – GZIA 4115HPX 29
Brückenbetrieb – GZIA 4115HPX 30
Trimode Betrieb – GZIA 4115HPX 31
Technische Daten Model Typ RMS Power @ 4 Ω CEA Standard CEA-2006-A GZIA 1.300HPX GZIA 1.
Technische Daten Model Typ RMS Power @ 4 Ω CEA Standard CEA-2006-A RMS Power @ 2 Ω CEA Standard CEA-2006-A RMS Power @ 1 Ω CEA Standard CEA-2006-A RMS Power @ 4Ω Gebrückt CEA Standard CEA-2006-A GZIA 2080HPX GZIA 2130HPX GZIA 2235HPX GZIA 4115HPX 2 Kanal Class A/B 2 Kanal Class A/B 2 Kanal Class A/B 4 Kanal Class A/B 2 x 60 W (1% THD+N) 2 x 80 W (1% THD+N) 2 x 85 W (1% THD+N) 2 x 130 W (1% THD+N) 2 x 150 W (1% THD+N) 2 x 235 W (1% THD+N) 4 x 70 W (1% THD+N) 4 x 115 W (1% THD+N) - - -
Wenn irgendetwas nicht funktioniert Problem Kein Ton Verstärker schaltet nicht ein Kontrolle Leuchtet die PWR LED? Hilfe Sicherung prüfen Remote Kabel prüfen +12 Volt prüfen Masse prüfen Leuchtet die PROT LED? Kurzschluss am Lautsprecher Gerät überhitzt Gerät defekt Sicherung prüfen +12Volt prüfen Masse prüfen Keine Stromzufuhr Keine Spannung am Remote Remote am Radio prüfen Verstärker schaltet bei Lautstärke ab Lautsprecherimpedanz prüfen Prüfen Sie, ob der Widerstand am LS Terminal von 2 Ohm n
Die Gewährleistung entspricht der gesetzlichen Regelung. Eine Rücksendung kann nur nach vorheriger Absprache und in der Originalverpackung erfolgen. Bitte unbedingt einen maschinell erstellten Kaufbeleg und eine Fehlerbeschreibung beilegen. Von der Gewährleistung ausgeschlossen sind Defekte, die durch Überlastung, unsachgemäße Behandlung oder bei Teilnahme an Wettbewerben entstanden sind.
Amplifier Owner’s Manual IRIDIUM GZIA 1.300HPX GZIA 1.
PLEASE READ BEFORE INSTALLATION Thank you for selecting a Ground Zero amplifier. We are providing a helpful hints list which should keep you from experiencing unnecessary shut down. Have fun with this high quality Titanium product. Features 4 Ohm / 2 Ohm stable Stereo 4 Ohm stable Mono (GZIA 1.300HPX) 1 Ohm stable Mono (GZIA 1.600HPX) Power & Protection indicator Bass Boost (GZIA 1.300HPX / 1.
Please note! As a precaution it is advisable to disconnect the vehicle’s battery before making connection to the +12 Volts supply wiring (see owner’s manual of your car for further information). Please use great caution drilling your trunk. Your gas tank and brake lines can be damaged by puncturing with your drill bit – this could cause damage or failure of your cars operating systems. Never pass wires over sharp angles.
Controls and functions – GZIA 1.
Controls and functions – GZIA 1.
Controls and functions – GZIA 2080HPX 6
Controls and functions – GZIA 2130HPX 7
Controls and functions – GZIA 2235HPX 8
Controls and functions – GZIA 4115HPX 9
Controls and functions 1 Speaker terminals 2 Power terminals 3 Satus indication 4 Cinch inputs 5 High Level inputs 6 High Pass controller 7 Low Pass controller 8 Mode switch 9 10 11 Remote control input Input level controller Bass Boost controller For connection of the speakers GND -> Ground connection REM -> Remote antenna terminal [Not for use with High level inputs (5)] BATT -> +12 Volt GREEN – OK RED – Error Terminal for connection of the RCA wires.
High Level Input – GZIA 1.300HPX Depending on the configuration of your car and sound system, error noises may appear when using the high level inputs. Please use the additional middle ground-connection of this input to reduce these noises. Connect this wire to the GND powerterminal. A connection to the GND connection of the signal source can also be useful. The Auto-On function allows you to use the amplifier without an additional remote connection. The remote terminal will not be used.
High Level Input – GZIA 1.600HPX Depending on the configuration of your car and sound system, error noises may appear when using the high level inputs. Please use the additional middle ground-connection of this input to reduce these noises. Connect this wire to the GND powerterminal. A connection to the GND connection of the signal source can also be useful. The Auto-On function allows you to use the amplifier without an additional remote connection. The remote terminal will not be used.
High Level Input – GZIA 2080HPX Depending on the configuration of your car and sound system, error noises may appear when using the high level inputs. Please use the additional middle ground-connection of this input to reduce these noises. Connect this wire to the GND powerterminal. A connection to the GND connection of the signal source can also be useful. The Auto-On function allows you to use the amplifier without an additional remote connection. The remote terminal will not be used.
High Level Input – GZIA 2130HPX Depending on the configuration of your car and sound system, error noises may appear when using the high level inputs. Please use the additional middle ground-connection of this input to reduce these noises. Connect this wire to the GND powerterminal. A connection to the GND connection of the signal source can also be useful. The Auto-On function allows you to use the amplifier without an additional remote connection. The remote terminal will not be used.
High Level Input – GZIA 2235HPX Depending on the configuration of your car and sound system, error noises may appear when using the high level inputs. Please use the additional middle ground-connection of this input to reduce these noises. Connect this wire to the GND powerterminal. A connection to the GND connection of the signal source can also be useful. The Auto-On function allows you to use the amplifier without an additional remote connection. The remote terminal will not be used.
High Level Input – GZIA 4115HPX Depending on the configuration of your car and sound system, error noises may appear when using the high level inputs. Please use the additional middle ground-connection of this input to reduce these noises. Connect this wire to the GND powerterminal. A connection to the GND connection of the signal source can also be useful. The Auto-On function allows you to use the amplifier without an additional remote connection. The remote terminal will not be used.
Turning on the amplifier The amplifier automatically turns on a few seconds after you turn on your radio. Note: Your amplifier temporarily shuts down if it gets too hot, then restarts automatically once it cools (At about 80° / 176° F). Adjusting the audio level 1. LEVEL (Min/Max): Turn fully counter- clockwise to MIN position 2. Turn the auto sound system's volume control to about two-third of its full range. 3. Adjust LEVEL to a comfortable listening level.
Wiring – GZIA 1.
Wiring – GZIA 1.
Stereo wiring – GZIA 2080HPX 20
Mono wiring – GZIA 2080HPX 21
Trimode wiring – GZIA 2080HPX 22
Stereo wiring – GZIA 2130HPX 23
Mono wiring – GZIA 2130HPX 24
Trimode wiring – GZIA 2130HPX 25
Stereo wiring – GZIA 2235HPX 26
Mono wiring – GZIA 2235HPX 27
Trimode operation – GZIA 2235HPX 28
Stereo wiring – GZIA 4115HPX 29
Bridged wiring – GZIA 4115HPX 30
Trimode operation – GZIA 4115HPX 31
Specifications Model Type RMS Power @ 4 Ω CEA Standard CEA-2006-A GZIA 1.300HPX GZIA 1.
Specifications Model Type RMS Power @ 4 Ω CEA Standard CEA-2006-A RMS Power @ 2 Ω CEA Standard CEA-2006-A RMS Power @ 1 Ω CEA Standard CEA-2006-A RMS Power @ 4Ω Bridged CEA Standard CEA-2006-A GZIA 2080HPX GZIA 2130HPX GZIA 2235HPX GZIA 4115HPX 2 Channel Class A/B 2 x 60 W (1% THD+N) 2 x 80 W (1% THD+N) 2 Channel Class A/B 2 x 85 W (1% THD+N) 2 x 130 W (1% THD+N) 2 Channel Class A/B 2 x 150 W (1% THD+N) 2 x 235 W (1% THD+N) 4 Channel Class A/B 4 x 70 W (1% THD+N) 4 x 115 W (1% THD+N) - - -
Trouble shooting guide Symptoms Check Points Cure Check fuses in amplifier. Be sure remote lead is connected. Is the POWER LED illuminated? Check signal leads. Check again control. No sound Check tuner/deck volume level.
Die Gewährleistung entspricht der gesetzlichen Regelung. Eine Rücksendung kann Nur nach vorheriger Absprache und in der Originalverpackung erfolgen. Bitte unbedingt einen maschinell erstellten Kaufbeleg und eine Fehlerbeschreibung beilegen. Von der Gewährleistung ausgeschlossen sind Defekte, die durch Überlastung, unsachgemäße Behandlung oder bei Teilnahme an Wettbewerben entstanden sind.
Amplificador Manual de usuario IRIDIUM GZIA 1.300HPX GZIA 1.
POR FAVOR LEA ANTES DE LA INSTALACIÓN Gracias por elegir un amplificador Ground Zero . Estamos proporcionando una lista de consejos útiles que debe mantenerse de experimentar innecesario cerrar. Diviértete con este producto de titanium de alta calidad. Features 4 Ohm / 2 Ohm stable Stereo 4 Ohm stable Mono (GZIA 1.300HPX) 1 Ohm stable Mono (GZIA 1.600HPX) Power & Indicador de proteccion Bass Boost (GZIA 1.300HPX / 1.
Aviso! Como medida de precaución es recomendable desconectar la batería del vehículo antes de realizar la conexión a las + 12 voltios (véase el manual de su coche para más información de) cableado de alimentación. Utilice precaución el tronco de perforación. Sus líneas de freno y el tanque de gas pueden ser dañados por perforar con su broca, esto podría ocasionar daños o el fracaso de los sistemas operativos de coches. Nunca pasar cables ángulos agudos.
Controles y functiones – GZIA 1.
Controles y functiones – GZIA 1.
Controles y functiones – GZIA 2080HPX 6
Controles y functiones – GZIA 2130HPX 7
Controles y functiones – GZIA 2235HPX 8
Controles and functiones – GZIA 4115HPX 9
Controles y funciones 1 Terminales altavoz 2 Terminales de corriente 3 Indicador de status 4 RCA inputs 5 High Level inputs 6 High Pass controller 7 Low Pass controller 8 Mode switch 9 10 11 Remote control input Input level controller Bass Boost controller Para conectar a los altavoces GND -> Conectara a masa ( chapa del coche) REM -> Remote de antenna de radiol [No usar con entrada de alta (5)] BATT -> +12 Volt VERDE – OK ROJO – Error Terminalpar conectar los cables de RCA .
High Level Input – GZIA 1.300HPX Dependiendo de la configuración de tu coche y sistema de sonido ruidos o parasites pueden aparecer al usar la entrada de altas. Por favor usar el cable adicional del medio a masa para reducir posibles parásitos. La conexión a masa puede ser útil.
High Level Input – GZIA 1.600HPX Dependiendo de la configuración de tu coche y sistema de sonido ruidos o parasites pueden aparecer al usar la entrada de altas. Por favor usar el cable adicional del medio a masa para reducir posibles parásitos. La conexión a masa puede ser útil.
High Level Input – GZIA 2080HPX Dependiendo de la configuración de tu coche y sistema de sonido ruidos o parasites pueden aparecer al usar la entrada de altas. Por favor usar el cable adicional del medio a masa para reducir posibles parásitos. La conexión a masa puede ser útil.
High Level Input – GZIA 2130HPX Dependiendo de la configuración de tu coche y sistema de sonido ruidos o parasites pueden aparecer al usar la entrada de altas. Por favor usar el cable adicional del medio a masa para reducir posibles parásitos. La conexión a masa puede ser útil. .
High Level Input – GZIA 2235HPX Dependiendo de la configuración de tu coche y sistema de sonido ruidos o parasites pueden aparecer al usar la entrada de altas. Por favor usar el cable adicional del medio a masa para reducir posibles parásitos. La conexión a masa puede ser útil. Cable de altavoz .
High Level Input – GZIA 4115HPX Dependiendo de la configuración de tu coche y sistema de sonido ruidos o parasites pueden aparecer al usar la entrada de altas. Por favor usar el cable adicional del medio a masa para reducir posibles parásitos. La conexión a masa puede ser útil. .
Encendido de amplificadior El amplificador se enciende automáticamente en unos segundos después de encender el aparato de radio. Note: El amplificador temporalmente apaga si se calienta demasiado y, a continuación, reinicia automáticamente una vez se enfría (sobrelos 80° / 176° F). Ajustando el nivel de audio 1. LEVEL (Min/Max): Gire completamente contador - las agujas del reloj a MIN 2. Activar el control de volumen del sistema de sonido de la auto sobre dos tercios de su gama completa. 3.
Wiring – GZIA 1.
Wiring – GZIA 1.
Stereo wiring – GZIA 2080HPX 20
Cableado en modo MONO – GZIA 2080HPX 21
Trimode operation – GZIA 2080HPX 22
Stereo wiring – GZIA 2130HPX 23
Cableado en modo MONO – GZIA 2130HPX 24
Trimode operation – GZIA 2130HPX 25
Stereo wiring – GZIA 2235HPX 26
Cableado en modo MONO – GZIA 2235HPX 27
Trimode operation – GZIA 2235HPX 28
Stereo wiring – GZIA 4115HPX 29
Bridged wiring – GZIA 4115HPX 30
Trimode operation – GZIA 4115HPX 31
Especificationes GZIA 1.300HPX GZIA 1.
Especificationes Modelo Tipo RMS Power @ 4 Ω CEA Standard CEA-2006-A RMS Power @ 2 Ω CEA Standard CEA-2006-A GZIA 2080HPX GZIA 2130HPX GZIA 2235HPX GZIA 4115HPX 2 Canales Class A/B 2 x 60 W (1% THD+N) 2 Canales Class A/B 2 x 85 W (1% THD+N) 2 Canales Class A/B 2 x 150 W (1% THD+N) 4 Canales Class A/B 4 x 70 W (1% THD+N) 2 x 80 W (1% THD+N) 2 x 130 W (1% THD+N) 2 x 235 W (1% THD+N) 4 x 115 W (1% THD+N) RMS Power @ 1 Ω - - - - RMS Power @ 4Ω Bridged 1 x 200 W (1% THD+N) 1 x 240 W (10% T
Guia de posibles problemas Sintomas comprobar Solución Comprobar los fusibles del amplificador. Asegurar que remote este Se ilumina el led de POWER? conectado. Comprobar los RCA. No suena Comprobar potenciómetros. Comprobar volumen de la radio.
La garantía cumple con la disposición legal. El retorno se puede hacer sólo después de la consulta y en su embalaje original. Por favor, asegúrese de incluir un recibo generado por ordenador y una descripción del error. Excluidos de la garantía son los defectos causados por la sobrecarga, el tratamiento inadecuado o participar en concursos.
Vahvistimen Käyttöohje IRIDIUM GZIA 1.300HPX GZIA 1.
Ole hyvä ja lue tämä käyttöohje ennen asennusta! Kiitoksia että valitsit Ground Zero vahvistimen. Lukemalla tämän käyttöohjeen varmistat että saat vahvistimesta kaiken sen tarjoaman suorituskyvyn lisäksi pitkiä nautinnollisia hetkiä musiikin parissa. Ominaisuudet 4 Ohm / 2 Ohm vakaa stereo 4 Ohm vakaa Mono (GZIA 1.300HPX) 1 Ohm vakaa Mono (GZIA 1.600HPX) Virta & suojaus merkkivalo Bass Boost (GZIA 1.300HPX / 1.
HUOM! Varmuuden vuoksi on hyvä irroittaa auton akun maakaapeli ennen vahvistimen virtaliittimien kytkentöjä. (Katso auton käyttöoppaasta tarkemmat tiedot). Käytä varovaisuutta poratessasi mahdollisia reikiä auton tavaratilassa. Polttoaine- ja jarruputket saattavat vaurioitua reikää poratessasi – tämä voi aiheuttaa vakavia turvallisuusriskejä. Älä koskaan vedä johtoja terävien kulmien ja reunojen yli. On suositeltavaa käyttää min.
Kytkimet ja toiminnot – GZIA 1.
Kytkimet ja toiminnot – GZIA 1.
Kytkimet ja toiminnot – GZIA 2080HPX 6
Kytkimet ja toiminnot – GZIA 2130HPX 7
Kytkimet ja toiminnot – GZIA 2235HPX 8
Kytkimet ja toiminnot – GZIA 4115HPX 9
Kytkimet ja toiminnot 1 Kaiutinliittimet 2 Virtaliittimet 3 Tilan merkkivalo 4 RCA sisääntulo 5 High Level (kaiutintasoinen) sisääntulo 6 Ylipäästösuodin 7 Alipäästösäädin 8 Mode- kytkin 9 10 11 Kaukosäätimen liitäntä Sisääntulotason säätö Bass Boost Kaiutinjohdot GND -> Maadoitusjohto REM -> Herätevirta BATT -> +12 Volttia VIHREÄ – OK PUNAINEN – VIRHE Signaalikaapelit. Häiriöiden välttämiseksi, käytä hyvälaatuisia RCA-johtoja.
High Level (kaiutintasoinen) sisääntulo – GZIA 1.300HPX Riippuen autosi audiojärjestelmästä ja kytkennöistä, häiriöitä voi esiintyä käytettäessä high level sisääntuloa. Kytke silloin vaihtoehtoinen johtosarjassa oleva lisämaa eliminoidaksesi häiriöitä. Kytke tämä johto vahvistimen GND virtaterminaaliin. Auto-On toiminto (high-level) mahdollistaa vahvistimen käytön ilman erillistä remote-johtoa. Remote-johtoa ei silloin tarvitse kytkeä .
High Level (kaiutintasoinen) sisääntulo – GZIA 1.600HPX Riippuen autosi audiojärjestelmästä ja kytkennöistä, häiriöitä voi esiintyä käytettäessä high level sisääntuloa. Kytke silloin vaihtoehtoinen johtosarjassa oleva lisämaa eliminoidaksesi häiriöitä. Kytke tämä johto vahvistimen GND virtaterminaaliin. Auto-On toiminto (high-level) mahdollistaa vahvistimen käytön ilman erillistä remote-johtoa. Remote-johtoa ei silloin tarvitse kytkeä .
High Level (kaiutintasoinen) sisääntulo – GZIA 2080HPX Riippuen autosi audiojärjestelmästä ja kytkennöistä, häiriöitä voi esiintyä käytettäessä high level sisääntuloa. Kytke silloin vaihtoehtoinen johtosarjassa oleva lisämaa eliminoidaksesi häiriöitä. Kytke tämä johto vahvistimen GND virtaterminaaliin. Auto-On toiminto (high-level) mahdollistaa vahvistimen käytön ilman erillistä remote-johtoa. Remote-johtoa ei silloin tarvitse kytkeä .
High Level (kaiutintasoinen) sisääntulo – GZIA 2130HPX Riippuen autosi audiojärjestelmästä ja kytkennöistä, häiriöitä voi esiintyä käytettäessä high level sisääntuloa. Kytke silloin vaihtoehtoinen johtosarjassa oleva lisämaa eliminoidaksesi häiriöitä. Kytke tämä johto vahvistimen GND virtaterminaaliin. Auto-On toiminto (high-level) mahdollistaa vahvistimen käytön ilman erillistä remote-johtoa. Remote-johtoa ei silloin tarvitse kytkeä .
High Level (kaiutintasoinen) sisääntulo – GZIA 2235HPX Riippuen autosi audiojärjestelmästä ja kytkennöistä, häiriöitä voi esiintyä käytettäessä high level sisääntuloa. Kytke silloin vaihtoehtoinen johtosarjassa oleva lisämaa eliminoidaksesi häiriöitä. Kytke tämä johto vahvistimen GND virtaterminaaliin. Auto-On toiminto (high-level) mahdollistaa vahvistimen käytön ilman erillistä remote-johtoa. Remote-johtoa ei silloin tarvitse kytkeä .
High Level (kaiutintasoinen) sisääntulo – GZIA 4115HPX Riippuen autosi audiojärjestelmästä ja kytkennöistä,häiriöitä voi esiintyä käytettäessä high level sisääntuloa. Kytke silloin vaihtoehtoinen johtosarjassa oleva lisämaa eliminoidaksesi häiriöitä. Kytke tämä johto vahvistimen GND virtaterminaaliin. Auto-On toiminto (high-level) mahdollistaa vahvistimen käytön ilman erillistä remote-johtoa. Remote-johtoa ei silloin tarvitse kytkeä .
Vahvistimen käynnistys Kun laitat ohjelmalähteen päälle vahvistin käynnistyy automaattisesti. Huomaa: Vahvistin kytkeytyy tilapäisesti pois päältä, mikäli sen lämpötila nousee liian kuumaksi. Lämpötilan laskettua normaaliksi vahvistin käynnistyy jälleen automaattisesti. (noin 80°). Sisääntulon säätö 1. LEVEL (Min/Max): Käännä säädin täysin MIN asentoon 2. Käännä äänenvoimakkuussäädin asentoon kaksi kolmasosaa maksimivoimakkuudesta. 3.
Kytkentä – GZIA 1.
Kytkentä – GZIA 1.
Stereo kytkentä – GZIA 2080HPX 20
Mono kytkentä – GZIA 2080HPX 21
Trimode käyttö – GZIA 2080HPX 22
Stereo kytkentä – GZIA 2130HPX 23
Mono kytkentä – GZIA 2130HPX 24
Trimode käyttö – GZIA 2130HPX 25
Stereo kytkentä – GZIA 2235HPX 26
Mono kytkentä – GZIA 2235HPX 27
Trimode käyttö – GZIA 2235HPX 28
Stereo kytkentä – GZIA 4115HPX 29
Sillattu kytkentä – GZIA 4115HPX 30
Trimode käyttö – GZIA 4115HPX 31
Tekniset tiedot Malli Tyyppi RMS teho @ 4 Ω CEA Standard CEA-2006-A GZIA 1.300HPX GZIA 1.
Tekniset tiedot Malli Tyyppi RMS teho @ 4 Ω CEA Standard CEA-2006-A RMS teho @ 2 Ω CEA Standard CEA-2006-A RMS teho @ 1 Ω CEA Standard CEA-2006-A RMS teho @ 4Ω Bridged CEA Standard CEA-2006-A GZIA 2080HPX GZIA 2130HPX GZIA 2235HPX GZIA 4115HPX 2 Channel Class A/B 2 x 60 W (1% THD+N) 2 x 80 W (1% THD+N) 2 Channel Class A/B 2 x 85 W (1% THD+N) 2 x 130 W (1% THD+N) 2 Channel Class A/B 2 x 150 W (1% THD+N) 2 x 235 W (1% THD+N) 4 Channel Class A/B 4 x 70 W (1% THD+N) 4 x 115 W (1% THD+N) - - -
Ongelman esiintyessä Ongelman kuvaus Tarkasta Toimenpide Tarkasta vahvistimen sulakkeet. Tarkasta onko herätevirtajohto kytketty. Palaako POWER LED valo? Tarkista signaalikaapelit. Tarkasta kytkimen asennot. Ei ääntä Tarkasta ohjelmalähteen äänenvoimakkuussäätimen asento. Tarkasta etteivät kaiutinjohdot ole Palaako diaknostiikka LED valo? oikosulussa tai vahvistin ylikuumentunut.
Die Gewährleistung entspricht der gesetzlichen Regelung. Eine Rücksendung kann nur nach vorheriger Absprache und in der Originalverpackung erfolgen. Bitte unbedingt einen maschinell erstellten Kaufbeleg und eine Fehlerbeschreibung beilegen. Von der Gewährleistung ausgeschlossen sind Defekte, die durch Überlastung, unsachgemäße Behandlung oder bei Teilnahme an Wettbewerben entstanden sind.