22 GFB 5620 EN
CONTENTS------------------------------------------------------------------------------------------------------------------------------------4 SETUP AND SAFETY 6 6 6 6 7 GENERAL INFORMATION Special features of your TV Receiving digital channels Grundig SCR system Important notes on environmental protection Notes on still images 7 8 8 9 CONNECTION AND PREPARATION Connecting the antenna and the power adapter Inserting batteries into the remote control 10 10 11 12 13 OVERVIEW Connections on the televisi
CONTENTS------------------------------------------------------------------------------------------------------------------------------------48 48 54 56 57 SPECIAL SETTINGS Searching for digital television channels from a satellite automatically Searching for digital television channels from a satellite manually LNB settings Settings for motorised antennas (DiSEqC 1.
SETUP AND SAFETY-----------------------------------------------------------------------------------------------------Please note the following instructions when setting up the television set: This television is designed to receive and display video and audio signals. All other uses are expressly prohibited. 7 The ideal viewing distance is five times the diagonal screen size. 7 Make sure the power cord or the power supply unit (if provided) are not damaged.
SETUP AND SAFETY-----------------------------------------------------------------------------------------------------Do not connect any other equipment while the device is switched on. Also switch off other equipment before connecting it. 7 Do not plug in the power cord of the device until you have connected the external equipment and the antenna. 7 Make sure the mains plug is freely accessible.
GENERAL INFORMATION--------------------------------------------------------------------------------Special features of your TV You can receive and watch digital TV channels using your television set (via DVB-S/S2, DVB-T and DVB-C) – including High Definition programmes (HD). However, the reception of digital TV channels in HD is currently limited to a few countries in Europe.
GENERAL INFORMATION--------------------------------------------------------------------------------Important notes on environmental protection The following information will help you to save resources – and money as well. 7 If you are not using your television set for several days, you should pull out the mains plug for environmental and safety reasons. This way the television does not consume any electricity.
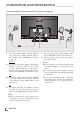
CONNECTIONANDPREPARATION----------------------------------------------Connectingtheantennaandthepoweradapter 4 3 2 1 1 To receive digital satellite channels (DVB-S/ S2), connect the satellite antenna cable to the antenna socket »SATELLITE« on the television set.
CONNECTION AND PREPARATION----------------------------------------------Inserting batteries into the remote control Environmental note 7 This symbol on rechargeable batteries/batteries or on the packaging indicates that the rechargeable battery/battery may not be disposed of with regular household rubbish. For certain rechargeable batteries/batteries, this symbol may be supplemented by a chemical symbol.
OVERVIEW-----------------------------------------------------------------------------------------------------------------------------------Connectionsonthetelevisionset DCIN Socket for power adapter. PC-IN AV1/S-VHS SCART socket (CVBS signal, RGB signal); Video and sound socket for S-Video camcorder. VGA socket, video input for PC; Sockets for video input (YUV signal). HDMI2 HDMI socket, audio/video input. OpticOut Socket for audio output (optical) for PCM/AC3 signals.
OVERVIEW------------------------------------------------------------------------------------------------------------------------------------SATELLITE ntenna socket for the A satellite antenna (DVB-S/ S2). ANT IN Antenna socket for a DVB-T, DVB-C and analogue antenna. U eadphone jack (3.5 mm H jack plug); Sockets for audio output. USB1 SB socket for external U data media without a power supply of their own. HDMI1 DMI socket, H audio/video input.
OVERVIEW-----------------------------------------------------------------------------------------------------------------------------------Theremotecontrol–Mainfunctions Switches on from standby; Selects channel – directly. Selects the channel list (»All«, »FAV 1« to »FAV 4«). Switches on and off (Standby). Switches between teletext and TV mode. Opens the »HDMI CEC Device List«. Exit the menu. Display information. Opens the main menu. Opens the channel list. Opens the TOOLS menu.
OVERVIEW------------------------------------------------------------------------------------------------------------------------------------The remote control – All functions (red) Selects pages in teletext; (green) Selects/activates various functions (yellow) in the menus. (blue) 5 witches to double character size S in teletext; selects the previous title/previous picture in the file browser. 6 efreshes a teletext page; R selects the next track/next picture in the file browser.
SETTINGS-----------------------------------------------------------------------------------------------------------------------------------------Initial set-up and tuning television channels Selecting language, country and operating mode The television set is equipped with automatic channel search, which searches for satellite channels (DVB-S/S2), terrestrial channels (DVBT), cable channels (DVB-C) and analogue channels. 1 Switch on the television set from standby with »8«, »1…0« or »P+« or »P-«.
SETTINGS----------------------------------------------------------------------------------------------------------------------------------------T uningthetelevisionchannels fromsatellite(DVB-S/S2) Advancedinstallation You have two options for tuning digital satellite channels. 1 In the »Source Setup« menu, in the »Connection Type« line, select the option »Satellite« with »<« or »>«. A The easy installation, which pre-configures all antenna settings for the satellite channels on Astra 19.
SETTINGS----------------------------------------------------------------------------------------------------------------------------------------6 Select the line »DISEqC Mode« with »V« or »Λ«. Select »DiSEqC 1.0« or »DiSEqC 1.1« in accordance with the existing antenna system with »<« or »>«. – DiSEqC 1.0 allows up to four satellites to be received simultaneously. – DiSEqC 1.1 allows up to 16 satellites to be received simultaneously. 7 Select the line »LNB Selection« with »V« or »Λ«.
SETTINGS-----------------------------------------------------------------------------------------------------------------------------------------Tuning terrestrial television channels (DVB-T) Tuning television channels from the cable provider (DVB-C) 1 In the »Source Setup« menu, in the »Connection Type« line, select the option »Air« with »<« or »>«. 1 In the »Source Setup« menu, in the »Connection Type« line, select the option »Cable« with »<« or »>«. 2 Select the line »Scan Type« with »V« or »Λ«.
SETTINGS----------------------------------------------------------------------------------------------------------------------------------------Changingtheprogramtablefor thedigitalchannels Selectingchannellists Channels which are found using the scan are saved in the »PROGRAM TABLE«. 2 Select the »SOURCE SETUP« menu with »V« or »Λ« and press »OK« to confirm. – The »SOURCE SETUP« menu appears.
SETTINGS-----------------------------------------------------------------------------------------------------------------------------------------Deleting channels in the program table 1 In the »PROGRAM TABLE« menu, select the Edit mode by pressing »« (red). 2 Select the television channel to be deleted with »V«, »Λ«, »<« or »>« and press »« (yellow) to delete. Note: 7 You can delete all channels with »« (blue).
SETTINGS-----------------------------------------------------------------------------------------------------------------------------------------3 “Push” the channel into the favourites lists 1 to 4 with »<« or »>« and press »OK« to confirm. – The position in the favourites list is marked with »✔«. – You can enter the same channel in more than one favourite list. – Each favourite list can store up to 250 channels. Enter own names for the favourites lists (max.
SETTINGS----------------------------------------------------------------------------------------------------------------------------------------Picturesettings 1 Open the menu with »MENU«. 2 Select the menu item »PICTURE SETTINGS« with »V« or »Λ« and press »OK« to confirm. – The »PICTURE SETTINGS« menu appears. PICTURE SETTINGS 20.09.
SETTINGS----------------------------------------------------------------------------------------------------------------------------------------Soundsettings Automaticvolume 1 Open the menu with »MENU«. Television stations broadcast at different volumes. The automatic volume limiting (AVL) function means the volume is kept the same when you switch between channels. 2 Select the menu item »SOUND SETTINGS« with »V« or »Λ« and press »OK« to confirm. – The »SOUND SETTINGS« menu appears. 20.09.
SETTINGS-----------------------------------------------------------------------------------------------------------------------------------------Soundeffects Equalizer This menu offers three preset sound effects (Music, Natural and Speech) and one setting to be created by you (User). Equalizer offers a sound setting ”User” that you can create. 1 Select the line »Sound Preset« with »V« or »Λ«. 2 Select the sound effect »Music«, »Natural« or »Speech« by pressing »<« or »>«.
TELEVISION - OPERATION-------------------------------------------------------------------------------Basic functions Switching on and off 1 Switch the television to standby with the power switch »ON • OFF«. 2 Press »8«, »1…0« or »P+« or »P-« to switch on the television from standby mode. 3 Press »8« to switch the television to standby. Selecting channels 1 Press »1…0« to select presets directly. 2 Select television channels step by step with »P+« or »P-«.
TELEVISION - OPERATION-------------------------------------------------------------------------------Audio settings Zoom function Various audio settings are available. This function allows you to enlarge the picture as required. 1 Open the Tools menu with »TOOLS«. 2 Select the menu item »Sound Preset« with »V« or »Λ«. 3 Select the audio setting by pressing »<« or »>«. – You can change the »User« audio setting – see the “Soundeffects” chapter on page 22.
TELEVISION - OPERATION-------------------------------------------------------------------------------Zapping function Electronic TV guide This function remembers the channel you are currently watching while you switch over to other ones (zapping). The electronic TV guide provides an overview of all programmes that will be broadcast in the next week (for digital channels only). 1 Press »1…0« or »P+«, »P–« to select the channel to be stored in the zapping memory and press »<« to confirm.
TELEVISION - OPERATION-------------------------------------------------------------------------------Changing the picture format »Panorama« format Basic setting is 16 : 9. This setting is suitable for films in an especially wide format. 1 Select the picture format with » «. – The picture format (for example »16:9«) is displayed. – You can choose between the following picture formats: During programmes in 4:3 format, the picture is stretched horizontally if the »Panorama« function is selected.
USB OPERATION---------------------------------------------------------------------------------------------------------------File formats Image data Your television can work with the following file formats using the USB sockets: Your television can display pictures in the formats JPEG, PNG and BMP. JPEG stands for Joint Picture Experts Group. It denotes a process for compressing picture files. PNG and BMP are process used to save image data with no, or very little, losses.
USBOPERATION--------------------------------------------------------------------------------------------------------------Connectingexternaldatamedia Before connecting the external data medium it is recommended to switch the television to stand-by mode. Before removing the external data medium, the television set must be switched to standby, so that no data loss occurs. Notes: The »USB2« socket of the television set supplies a maximum power of 500 mA in accordance with USB specifications.
USB OPERATION---------------------------------------------------------------------------------------------------------------The file browser Settings in the USB setup menu The file browser displays video, audio and picture files stored on external data media. Selecting the menu If an external data medium contains files in different formats, you can, when necessary, filter out the formats not required.
USB OPERATION---------------------------------------------------------------------------------------------------------------DivX® VOD Basic playback functions You must have your device registered in order to play the protected video that you will buy from DivX®. 1 Select the data medium by pressing » «, use »V«, »Λ«, »<« or »>« to select the option »USB« and press »OK« to confirm. – The file browser appears. 1 Select »DivX® VOD« with »V« or »Λ« and confirm with »OK«. – Registration Code appears.
USB OPERATION---------------------------------------------------------------------------------------------------------------Notes: 7 Use »Λ« to select »Up Folder«, when you would like to return to the last folder. Use »Root« (and then press »OK«) to return to the main folder. It is possible that files which are actually supported do not function correctly in USB mode. This is because certain files are not recorded with standardised compression processes, although they feature the “right” file ending.
USB OPERATION---------------------------------------------------------------------------------------------------------------Selecting a track or picture in steps (SKIP) 1 During playback, select the next track/ picture with »6«. 2 During playback, select the previous track/ picture with »5«. – Playback begins with the track or picture you selected. Selecting a certain passage for playback (video files only) 1 During playback, press »OK«. 2 Enter the passage (time) with »1 ...
TELETEXT OPERATION----------------------------------------------------------------------------------------------TOP text or FLOF text mode Enlarging the character height 1 Press »TXT« to switch on teletext. If you have difficulty reading the text on the screen, you can increase the character height. 2 Select teletext pages directly with »1...0« or step by step with »V« and »Λ«. Return to teletext page 100 with »?«.
CONVENIENCEFUNCTIONS-----------------------------------------------------------------------OpeningtheSETTINGSmenu Changingtheaudiolanguage 1 Open the menu with »MENU«. (only for digital television channels) 2 Select the menu item »SETTINGS« menu with »V« or »Λ« and press »OK« to confirm. – The »SETTINGS« menu appears. You can define a primary and a secondary audio language. 20.09.
CONVENIENCE FUNCTIONS------------------------------------------------------------------------Setting the date and time Timer functions Automatic setting Entering the switch-off time (sleep timer) Your television set detects the difference in time to Greenwich Mean Time (GMT) automatically, as long as the channel selected transmits a time signal. 1 Select the line »Date & Time« with »V« or »Λ« and press »OK« to confirm. In the »Sleep Timer« menu you can enter a time for the television to switch off.
CONVENIENCE FUNCTIONS------------------------------------------------------------------------6 Select the line »Volume« with »V« or »Λ« and use »<« or »>« to set the volume. 7 Select the line »Set Hour« with »V« or »Λ« and enter the time with »1…0«. 8 Save the data with »« (green). Note: 7 You can abort the entry by pressing »« (red). 9 Press »EXIT« to end the setting. Switch-off timer In the »Auto Off« menu, you can enter a time for the television to switch off.
CONVENIENCE FUNCTIONS------------------------------------------------------------------------Locking keys (Parental lock) Locking television channels When the key lock is activated, the buttons on the television set do not function. You can lock individual television channels, for example channels unsuitable for children, using a personal PIN code. 1 Select the line »Keypad Lock« with »V« or »Λ«. 2 Enter the PIN code »1234« with »1 ... 0«.
CONVENIENCE FUNCTIONS------------------------------------------------------------------------Updating software (for digital channels only) 1 In the »SETTINGS« menu, select the line »Check For Updates updates« with »V« or »Λ« and press »OK« to confirm. – A search for new software will be made and – if available – it will be installed. Note: 7 If a search for software updates should be made automatically, select the line »Automatic OAD« with »V« or »Λ« and use »<« or »>« to select the option »On«.
OPERATION USING EXTERNAL DEVICES-----------------------------DIGI LINK Your television is equipped with the DIGI LINK function. This function uses the CEC (Consumer Electronics Control) protocol. CEC allows external devices which are connected to the »HDMI« sockets by an HDMI cable (e.g. DVD player) to be operated with a remote control. Prerequisite is that the devices connected support CEC. Read the operating manual for the external device to find out how to activate the corresponding function.
OPERATIONUSINGEXTERNALDEVICES----------------------------Deviceoperation Switchingthedevicetostandby You can decide whether external devices should react to your television's remote control. This option switches the external device to standby. «, use »V«, »Λ«, »<« or »>« to 1 Press » select the preset »HDMI1« to »HDMI2« and press »OK« to confirm. «, use »V«, »Λ«, »<« or »>« to 1 Press » select the preset »HDMI1« to »HDMI2« and press »OK« to confirm. 2 Open the menu with »MENU«.
OPERATIONUSINGEXTERNALDEVICES----------------------------HighdefinitionHDready Connect the corresponding input sources (e.g. HDTV receiver or HD-DVD player) to the »HDMI« sockets (for digital HDTV sources). Connectionoptions 7 7 This ensures that you can view digital HDTV programmes, even if they are copy-protected (HDCP High Bandwidth Digital Content Protection), without encountering problems.
OPERATION USING EXTERNAL DEVICES-----------------------------Connecting external devices ... with digital audio/video signals Suitable devices: Digital satellite receivers, Playstation, BluRay player, DVD player/ recorder, set-top box, notebook, PCs. 7 Video signal: Digital video; resolution: standard 576p; HDTV 720p, 1080i, 1080p. 7 Audio signal: digital audio (stereo, multi-channel compression, uncompressed). 7 Presets »HDMI 1«, »HDMI 2«.
OPERATION USING EXTERNAL DEVICES-----------------------------Using a DVD player, DVD recorder, video recorder or set-top box 1 Switch on the external device and select the function you wish to use. 2 Press » «, use »V«, »Λ«, »<« or »>« to select the preset for the input signal (»AV1«, »AV2«, »S-VHS«, »HDMI1«, »HDMI2« or »Component«) and press »OK« to confirm. Headphones Connecting the headphones 1 Plug the headphone jack (3.5 mm ø jack plug) into the headphone socket on the left side of the television.
OPERATION USING EXTERNAL DEVICES-----------------------------Hi-fi system/AV receiver Connecting the hi-fi system/ AV receiver 1 Connect the »Optic Out« socket on the television to the corresponding socket of the device with an optical digital cable (digital audio signal). Setting the audio format You can select whether the audio signal output via the »Optic Out« socket should be in the PCM or AC2 format. 1 Open the menu with »MENU«.
OPERATIONASAPCMONITOR---------------------------------------------------------- ConnectingaPC 1 Connect the »PC-IN« socket on the television to the corresponding socket on the PC using a VGA cable (video signal). 2 Connect the »Audio« socket on the television to the corresponding socket on the PC using a suitable cable (audio signal). Note: 7 Adjust your PC to the monitor (for example, picture resolution 1280 x 768, picture frequency 60 Hz). 20.09.
OPERATIONWITHACOMMONINTERFACE------------------ WhatisaCommonInterface? Common Interface (CI) is an interface for DVB receivers. 7 Encrypted channels can only be viewed with a CA module suitable for the encryption system and in conjunction with the corresponding smart card. 7 The television set is equipped with a Common Interface slot into which CI modules from various providers can be inserted.
SPECIALSETTINGS---------------------------------------------------------------------------------------------------------Searchingfordigitaltelevision channelsfromasatellite automatically Satellite data changes frequently, new channels are constantly being added. You should therefore perform an automatic search from time to time. This searches all transponders for new channels. 1 Open the menu with »MENU«. 2 Select the menu item »SOURCE SETUP« with »V« or »Λ« and press »OK« to confirm.
SPECIAL SETTINGS---------------------------------------------------------------------------------------------------------Searching for digital television channels from a satellite manually If you know the parameters of a new television channel, you can also search for it manually. Current transponder data can be found in the teletext, in satellite TV magazines or on the Internet. 1 Open the menu with »MENU«. 2 Select the menu item »SOURCE SETUP« with »V« or »Λ« and press »OK« to confirm.
SPECIAL SETTINGS---------------------------------------------------------------------------------------------------------Notes: 7 Use installation equipment supported / suggested by your Multiswitch. Other users / receivers connected to the system may be affected if the specified user band number and frequency is changed during installation. 7 User band and User band frequency is specified on the Multiswitch used; and each user / receiver uses a specified user band and user band frequency.
SPECIALSETTINGS---------------------------------------------------------------------------------------------------------DiSEqC1.2Settings You can adjust the alignment of the satellite antenna to each individual satellite. These settings will be saved so that the antenna can later be easily guided to each saved alignment. 1 Select the line »DiSEqC 1.2 SETTINGS« with »V« or »Λ« and press »OK« to confirm. – The »DiSEqC 1.2 SETTINGS« menu appears. 2 Select the preferred option with »V« or »Λ«.
SPECIAL SETTINGS---------------------------------------------------------------------------------------------------------Note: 7 You can accelerate the search. To do this, you need information about the frequency and network ID. You are usually able to get this data from your cable operator or find it in forums on the Internet. For example, the frequency 402MHz and network ID 61441 can be entered for Germany.
SPECIALSETTINGS---------------------------------------------------------------------------------------------------------Searchingfordigitalterrestrial TVchannelsautomatically 1 Open the menu with »MENU«. 2 Select the menu item »SOURCE SETUP« with »V« or »Λ« and press »OK« to confirm. – The »SOURCE SETUP« menu appears. 3 Select the line »Source« with »V« or »Λ« and press »OK« to confirm. Select the option »Air« with »<«, »>«, »V« or »Λ« and press »OK« to confirm.
SPECIAL SETTINGS---------------------------------------------------------------------------------------------------------Searching for digital terrestrial TV channels manually Tuning analogue television channels 1 Open the menu with »MENU«. This setting is only necessary if you cannot receive any digital channels and you have not carried out an analogue search during initial setup. The television channels can be set directly or using the scan.
SPECIALSETTINGS---------------------------------------------------------------------------------------------------------4 Select the line »Automatic Channel Search« with »V« or »Λ« and press »OK« to confirm. 20.09.2010 15:46 SOURECE SETUP Source Air Automativ Channel Search OK Digital Manual Tuning Tuningthetelevisionchannelsby enteringthechannelnumbers 1 Open the menu with »MENU«. 2 Select the menu item »SOURCE SETUP« with »V« or »Λ« and press »OK« to confirm.
SPECIAL SETTINGS---------------------------------------------------------------------------------------------------------Note: If you wish to remedy other television channels, repeat steps 4 to 7. 7 8 Press »EXIT« to end the setting. Changing stored analogue channels If channels were stored with the automatic channel search while tuning the television channels, you can delete them. You can also store channels in a different preset, change or enter the name of a channel as well as skip channels.
SPECIAL SETTINGS---------------------------------------------------------------------------------------------------------Creating lists of favourites Displaying signal information You can select your favourite channels and save them in up to four favourites lists (Fav 1 to Fav 4). (for digital channels only) 1 In the »PROGRAME TABLE« menu, switch over to the list view with »« (yellow). 2 Select the preferred channel with »V« or »Λ«.
INFORMATION---------------------------------------------------------------------------------------------------------------------Product Fiche GRUNDIG 22 GFB 5620 Energy Efficiency class: A Screen size: 55 cm/22 inch Power consumption: On mode 22 W / 30 W max. Annual power consumption 33 kWh Stand-by power consumption < 0.50 W Maximum resolution: WUXGA, 1920 x 1080 Other information Operating voltage: 220–240 V,~, 50–60 Hz Output: 12 V / 2,5 A max.
INFORMATION---------------------------------------------------------------------------------------------------------------------Service information for dealers Note for the Product Package The product complies with the following EU directives and regulations: 2006/95/EC: Directive on the harmonisation of the laws of Member States relating to designed for use within certain voltage limits. 2004/108/EC: Directive relating to electromagnetic compatibility.
INFORMATION---------------------------------------------------------------------------------------------------------------------Troubleshooting If the information provided below does not help, please consult an authorised GRUNDIG dealer. Please bear in mind that malfunctions can also be caused by external devices such as video recorders or satellite receivers.