
Operation Manual

ENGLISH
86
8 Select the line »Select Access Point« with
»
V
« or »
Λ
« and press »OK« to confirm.
– Present WPS-supported wireless networks
are scanned to display in the »Select Ac-
cess Point« menu.
9 Select the network that you want to connect
with »
V
« or, »
Λ
« and press »OK« to
confirm.
– 8-digit pin code is displayed in the wire-
less WPS menu.
Note:
7
Refer to the manual of your router to find
out how the PIN is entered via a PC.
10 Use a PC to enter the pin on the router (e.g.
AVM FRITZ!Box: menu item WLAN Set-
tings... WPS) and save.
Note:
7
The 8-digit PIN code must be entered in the
modem interface in 2 minutes; otherwise,
connection of television with the modem is
cut.
11 Press »
« (green) to confirm the registra-
tion.
– The message “Connection to Gateway:
Success” appears.
12 Press »
« (green) to check the performed
settings and also if the local network and
internet connection has been established.
– »Testing ... Please wait« message will
be displayed, and if the connection is
established »Connection To Gateway:
Successfull«, »Internet Connection: Suc-
cessfull« messages and MAC address will
be displayed.
13 Press »EXIT« to end the setting.
Connecting automatically by entering
the network password
Use this method for establishing a connection
if your router does not support “WPS-PBC” or
WPS PIN entry.
1 Open the menu with »MENU«.
2 Select menu item »Settings« with »
V
«, »
Λ
«,
»
<
« or »
>
« and press »OK« to confirm.
3 Select the menu item »Network« with »
>
« or
»
<
« and press »
V
« to confirm.
– »Network« menu is active.
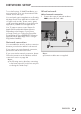
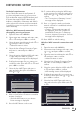
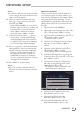
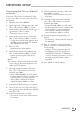
Change Connection Type Wired
Network Configuration AUTO
Wake-on-LAN Off
Advanced
Picture
Tuesday
xx xxx xxxx
Source TimerSound NetworkTV Parental
Settings > Network
Change AreaConnec Test Connection Select Back
BACK
4 Select the line »Change Connection Type«
with »
V
« or »
Λ
« and press »OK« to
confirm.
5 Select the option »Wireless« with »
V
« or
»
Λ
« and press »OK« to confirm.
– WiFi warning message will be displayed.
6 Confirm the message »Do you want to turn
on Wi-Fi?« select »Yes« with »
<
« or »
>
« and
press »OK« to confirm.
7 Select the line »Network Configuration«
with »
V
« or »
Λ
« and select the option
»AUTO« with »
<
« or »
>
«.
8 Select the line »Select Access Point« with
»
V
« or »
Λ
« and press »OK« to confirm.
– »Select Access Point« menu is displayed
by scanning available wireless networks.
9 Select the network that you want to con-
nect with »
V
« or »
Λ
« and press »OK« to
confirm.
– Wireless connection password screen is
displayed.
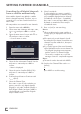
NETWORK SETUP
-------------------------------------------------------------------------------------------