ǵ COLOR TELEVISION AMIRA 15 LCD 38-6605 BS AMIRA 17 LW 45-6605 BS AMIRA 20 LCD 51-6605 BS DEUTSCH ENGLISH FRANÇAIS ITALIANO NEDERLANDS TÜRKÇE POLSKI
CONTENTS ____________________________________________ 2 3-4 Set-up and safety 5-6 Connection/Preparation 5-6 6 Connecting the antenna and the mains cable Adjusting the inclination of the screen 7-9 Overview 7 7 8-9 Operating controls on the television Connections on the television The remote control 10-13 Settings 10 10-11 12 12-13 Setting television channels automatically Changing stored channels Picture settings Audio settings 14-15 Television operation 14 15 15 Basic functions Changing
SET-UP AND SAFETY ___________________________ 10 cm 10 cm 20 cm Please note the following information when setting up your television set. This television set is designed to receive and display video and audio signals. Any other use is expressly prohibited. 20 cm Amira The ideal viewing distance is 5 times the screen diagonal. External light falling on the screen impairs picture quality. Ensure sufficient clearance between the TV and the wall cabinet.
SET-UP AND SAFETY ___________________________ Please note when deciding where to put the device that furniture surfaces are covered by various types of lacquer and plastic, most of which contain chemical additives. These may cause corrosion to the feet of the device, thus resulting in stains on the surface of the furniture which can be difficult or impossible to remove. The screen of your LCD television meets the highest quality standards and has been checked for pixel faults.
CONNECTION/PREPARATION __________ Connecting the antenna and the mains cable 1 Take off the cover (A). 2 Plug the antenna cable of the rooftop antenna into the »ANT IN Ä« antenna socket on the television. 3 Plug the mains cable supplied into the mains socket of the power unit. 4 Plug the power pack into the »DC 12 V« socket (Amira 15 and Amira 17) or the »DC 15 V« socket (Amira 20) on the television. 5 Plug the power cord plug into an earthed safety socket.
CONNECTION/PREPARATION __________ Inserting batteries in the remote control 1 Open the battery compartment by removing the lid. 2 Insert the batteries (Mignon type, for example UM-3 or AA, 2x1,5V). Observe the polarity (marked on the base of the battery compartment). 3 Close the battery compartment. Note: If the television no longer reacts properly to remote control commands, the batteries may be flat. Be sure to remove used batteries.
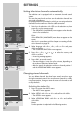
OVERVIEW ____________________________________________ Controls on the television • Operation indicator. + P– Switches the television on from standby; Channel selection. TV/AV Selects the AV channels and the most recently viewed television channel. + MENU Opens the »INFO« menu. – + + P – TV/AV MENU z Amira IO z – Adjusts the volume. IO Switches the television into and out of standby mode.
OVERVIEW ____________________________________________ The remote control Ǽ Switches off the television set (stand-by). PIP Key has no function. E Switches between picture formats. -/-- Switches to the PC channel position; switches to double character size in teletext mode. 1...0 Switches the television on from standby mode; selects channels directly. d Sound on/off (mute). i Opens and closes the »INFO« menu; closes all menus. Z Zap function.
OVERVIEW ____________________________________________ z Ȅ PIP Ƿ F Selects various picture settings; scrolls back a page in teletext mode Time on; scrolls to the next page in teletext mode. Selects the desired chapter in teletext mode. Selects various audio settings∞ selects the desired topic in teletext mode. z VCR, SAT Switches to operating a GRUNDIG video DVD recorder, a GRUNDIG satellite receiver or a GRUNDIG DVD player.
SETTINGS ______________________________________________ Setting television channels automatically The television set is equipped with an automatic channel search system. You start the search and can then sort the television channels into your order of preference. 99 preset positions are provided, to which you can assign television channels from the antenna or from the cable connection.
SETTINGS ______________________________________________ Deleting channels PROGRAM TABLE 1 ARD 6 BR3 2 RTL 7 TELE5 3 SAT1 8 WDR 4 ZDF 9 VOX 5 PRO7 10 SRTL OK ● SELECT AND OPEN SKIP MOVE DELETE NAME EXIT 1 2 ARD 6 BR3 2 RTL 7 TELE5 3 SAT1 8 WDR 4 ZDF 9 VOX 5 PRO7 OK ● Press » « (yellow) to delete the channel. 1 In the »PROGRAM TABLE« menu, select the channel to be moved with with »P+«, »P-«, » « or » «.
SETTINGS ______________________________________________ Picture settings PICTURE 1 Press »i« to open the »INFO« menu. – The »INFO« menu appears. 2 Select »PICTURE« with »P+« or »P-« and confirm with »OK«. – The »PICTURE« menu appears. 3 Select »BRIGHTNESS«, »CONTRAST«, »COLOUR« or »SHARPNESS« with »P+« or »P-« and adjust them with » « or » «. BRIGHTNESS CONTRAST COLOUR SHARPNESS SMART CONTROL OK ● SELECT AND EDIT USER Ǹ Ƿ EXIT BACK Notes: After a short while the »PICTURE« menu reappears.
SETTINGS ______________________________________________ Stereo width Widens the audio output for stereo programmes and improves the sound with mono reception. SOUND VOLUME BALANCE SOUND TYPE MONO SOUND MODE NORMAL EQUALIZER OK ● 1 Select »SOUND MODE« with »P+« or »P-«. 2 Press » « or » « to select the setting. Ǹ Ƿ Equaliser SELECT AND EDIT The equaliser offers you four pre-programmed sound settings (Music, Sport, Cinema and Dialogue) and two which you can modify yourself (User 1 and User 2).
TELEVISION OPERATION ___________________ Basic functions Switching on and off 1 PIP 2 3 z Switch on the television by pressing the »IO « button on the television set. – The device switches to standby mode. Switch the television on with »1…0« or »P+« or »P-«. Press the »Ǽ« button to switch the television to standby mode. Press »1…0« or »P+« or »P-« to switch on the device from standby mode. Completely switch the television off by pressing »IO « on the television set. – This saves electricity.
TELEVISION OPERATION ___________________ Changing the picture format 1 Select the picture format with »E «. – You can choose between the following picture formats: »4:3« format The picture is shown in 4:3 format. »AUTO« format The picture format is automatically switched to »16:9« for 16:9 programmes. For programmes in 4:3 format, the picture automatically fills the screen. »16:9« format During programmes in 4:3 format the picture is stretched horizontally if the »16:9« format is selected.
TELETEXT MODE _______________________________ TOP text or FLOF text mode 1 2 PIP z PAP SIZE 3 Press »z « (red) to scroll back a page. 4 Press » 5 Press » « (yellow) to select chapters. 6 Press »F « (blue) to select topics. 7 Press »TXT« to switch off teletext mode. SAT Ȅ « (green) to scroll to the next page. Ƿ POS d VCR You can directly select teletext pages with »1...0«.
TELETEXT MODE _______________________________ Page stop A multiple page may contain several sub-pages, which are automatically scrolled by the transmitting station. PIP 1 Stop the sub-pages with »PAP«. –» « is displayed instead of the page number. 2 Press »PAP« to quit the function. Calling up a sub-page directly z 1 Call up the sub-pages with »SIZE«. 2 Enter the four-digit number of the sub-page with »1…0«. – The selected sub-page is appears after a short delay.
CONVENIENCE FUNCTIONS______________ Convenience functions with the »FEATURES« menu 1 2 Press »i« to open the »INFO« menu. Select »FEATURES« with »P+« or »P-« and confirm with »OK«. Note: Further operation is explained in the following sections. Changing the menu language FEATURES LANGUAGE PARENTAL LOCK CLOCK OK ● Select the language with »P+«, »P-«, » « or » « and press »OK« to confirm. 3 Press »i« to finish the setting.
USING EXTERNAL DEVICES _______________ Note: Do not connect any other equipment while the device is switched on. Switch off the other equipment as well before connecting it. Only plug the device into the mains socket after you have connected the external devices and the antenna.
USING EXTERNAL DEVICES _______________ Decoder or satellite receiver In order for the television to receive encoded programs from a privately operated station, a decoder is needed. Connecting a decoder or satellite receiver AV 1 AV 2 ANT IN AUDIO OUT R L L AV 3 R Video S-VHS DC 15V PC INPUT PAY-TV 1 Connect the »AV1« socket on the television set and the appropriate socket on the decoder using a EURO-AV cable. Notes: A satellite receiver can also be connected to this socket.
USING EXTERNAL DEVICES _______________ Camcorder Connecting the camcorder 1 AV 1 AV 2 ANT IN AUDIO OUT R L L AV 3 R Video S-VHS DC 15V Connect the yellow socket »AV3 Video« on the television and the corresponding socket on the camcorder (VHS, Video 8) with a cinch cable (picture signal) PC I or connect the »S-VHS« socket (picture signal) on the television and the corresponding socket on the camcorder (S-VHS, Hi 8) with a cinch cable.
PC MONITOR MODE __________________________ Note: The Amira 20 is not suitable for use with a PC. Connecting a PC AV 1 AV 2 ANT IN AUDIO OUT R L L AV 3 R Video S-VHS DC 15V PC INPUT 1 Connect the »VGA« socket on the television set and the appropriate socket of the PC using a VGA cable. Selecting the channel position for the PC 1 Select the PC channel position with »-/--«. PC settings These settings are only possible when signals are received from a PC.
SPECIAL SETTINGS ______________________________ Setting television channels SOUND PICTURE SETUP FEATURES ǵ INFO This setting is only necessary if a new channel comes on air and you do not want to change the order of your channels. The television channel can be set directly or using the search. Setting channels using the search 1 Press »i« to open the »INFO« menu. – The »INFO« menu appears. SELECT AND OPEN EXIT MANUAL SETTING PROGRAM NO Select »SETUP« with »P+« or »P-« and confirm with »OK«.
SPECIAL SETTINGS ______________________________ Fine tuning television channels The television automatically tunes itself to the best possible reception. You may need to carry out manual fine tuning in areas where there is poor reception. MANUAL SETTING PROGRAM NO 1 Press »i« to open the »INFO« menu. – The »INFO« menu appears. 2 Select »SETUP« with »P+« or »P-« and confirm with »OK«. – The »SETUP« menu appears. 3 Select »MANUAL SETTING« with »P+« or »P-« and confirm with »OK«.
SPECIAL SETTINGS ______________________________ Re-tuning all television channels You can re-tune all the television stations, for example if you move to another town. SETUP 1 Press »i« to open the »INFO« menu. – The »INFO« menu appears. 2 Select »SETUP« with »P+« or »P-« and confirm with »OK«. – The »SETUP« menu appears. 3 Select »STATION SEARCH« with »P+« or »P-« and confirm with »OK«. – The »COUNTRY SELECTION« menu appears. 4 Press »P+«, »P-«, » « or » « to select the country and »OK« to confirm.
INFORMATION_____________________________________ Technical data Operating voltage: DC 12 V, 4 A with 100 – 240 V mains adapter, 50/60 Hz (Amira 15) DC 12 V, 5 A with 100 – 240 V mains adapter, 50/60 Hz (Amira 17) DC 15 V, 4,5 A with 100 – 240 V mains adapter, 50/60 Hz (Amira 20) Power consumption: in operation 36 W (Amira 15) in operation 54 W (Amira 17) in operation 60 W (Amira 20) in standby approx.
INFORMATION_____________________________________ Troubleshooting If the remedies given below do not work, please consult an authorised GRUNDIG dealer. Please bear in mind that malfunctions can also be caused by external devices such as video recorders or satellite receivers.
INFORMATION_____________________________________ Additional Information for units sold in the UK. Units sold in the UK are suitable for operation from a 240V ac, 50Hz mains supply. The range of multi-system receivers is built to work in most European countries. However, the mains plug and socket system for the UK differs from many European countries. This appliance has been supplied with a fitted, non-removable, approved converter plug for use in the UK. This converter plug is fitted with a 5A rated fuse.
Grundig Multimedia B.V. • Atrium, Strawinskylaan 3105 • NL-1077 ZX Amsterdam • http://www.grundig.