INTERNET RADIO Cosmopolit 3F+ WEB iP en
CONTENTS----------------------------------------------------------------------------------------------------------------------------------4 4 4 COSMOPOLIT 3F+ WEB iP Packing contents Special features 5 SET-UP AND SAFETY 6 6 9 11 OVERVIEW The device controls The remote control The display 12 CONNECTION AND PREPARATION 12 Connecting external devices 12 Connecting an MP3 player or a USB memory stick 12 Connecting the iPod/iPhone 12 Connecting the headphones 13 LAN connection to the inter
CONTENTS----------------------------------------------------------------------------------------------------------------------------------37 DAB MODE 37 Selecting the DAB input source 37 Selecting a DAB station – from the station list 37 Selecting a DAB station – from presets 37 Selecting a DAB station – from the favourites list 37 Displaying DAB station information 38 FM MODE 38 Selecting the tuner input source 38 Selecting stations – from presets 38 Selecting stations – from the list Recall Pr
COSMOPOLIT 3F+ WEB iP-------------------------------------------------------------------------Packing contents Cosmopolit 3F+ WEB iP Remote control 2 batteries (Micro, R 03 /UM 4/AAA, 2x1,5V) Operating manual Mains adapter 6 V, 1800 mA Special features Your device provides access to numerous internet radio stations via a router. You can connect the device to the internet using a LAN cable or WLAN. For Internet operation, a DSL connection and DSL flat rate are recommended.
SET-UP AND SAFETY-----------------------------------------------------------------------------------------------Please note the following instructions when setting up the system: The device is designed for the playback of audio signals. Any other use is expressly prohibited. 7 If you want to set up the device on wall shelves or in cupboards, please ensure that it is adequately ventilated. There must be at least 10 cm of space at the side, above and behind the device.
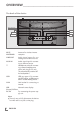
OVERVIEW---------------------------------------------------------------------------------------------------------------------------------The device controls The front of the device LCD Display IR sensor Jog-Shuttle + iPod dock drawer _ Jog-Shuttle Rotate the Jog-Shuttle to set and to confirm the preferred options. Press to activate and confirm the functions and the menus. For more details, please see “Jog-Shuttle” section. _ + Turn left or right to select menu options or to adjust the volume.
OVERVIEW---------------------------------------------------------------------------------------------------------------------------------The top of the device MODE ON/OFF ANTENNA FAV MENU MENU Opens the main menu and main screen which shows time, date and information line. Switches back to the previous menu option in the menu. FAV Stores a station as a preset and opens the preset menu.
OVERVIEW---------------------------------------------------------------------------------------------------------------------------------The back of the device Wi-Fi Antenna USB U AUX IN LAN LINE OUT Wi-Fi ANTENNA DC IN Antenna for wireless internet reception. LINE OUT Audio signal output for connecting to an external source. AUX IN Audio signal input for connecting an external source. U Headphone socket for connecting a stereo headphone set with a jack plug (ø 3.5 mm).
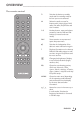
OVERVIEW---------------------------------------------------------------------------------------------------------------------------------The remote control 8 Switches the device to standby mode and from standby mode to the last input source selected. M Selects the audio sources for Internet radio, Music player, DAB radio, FM radio, iPod/iPhone and Aux In modes. 1-0 Number buttons, stores and selects presets for Internet, DAB and FM stations (in Internet and tuner mode).
OVERVIEW--------------------------------------------------------------------------------------------------------------------------------- Switches in the menu one step forwards. Switches in the menu one step backwards. OK _ + Confirms selected option. Sets the volume. Starts and pauses playback. 7 Interrupts the playback (in USB/ iPod/iPhone mode). / In FM radio mode: Press to start the station search, it stops when a station is found.
OVERVIEW---------------------------------------------------------------------------------------------------------------------------------The display Time/Date FM 11:17 87.65 MHz The dot-matrix display provides information required during operation. In standby: Displays the time. 87.65 Displays the source (e.g. FM radio), the current time and date. Displays the volume setting, preset sound settings, total playing time, elapsed playing time. Displays other performing functions of the device.
CONNECTION AND PREPARATION---------------------------------------Connecting external devices Connecting the iPod/iPhone Notes: 7 Switch the device off before you connect external devices. 1 Use a standard audio cable to connect the audio output of the external device to the socket »AUX IN« on the back of the device. The device uses the iPod Universal Dock connector, developed for use with iPod/iPhone.
CONNECTION AND PREPARATION---------------------------------------LAN connection to the internet Telephone socket Splitter Modem/router Cosmopolit 3F+ WEB iP Media servers on the computer Note: 7 Switch the device off before you connect it to the internet. 1 Connect the Ethernet socket of the modem/ router to the »LAN« socket of the device using a standard network cable (Twisted pair, RJ45 plug). – The data throughput level is 10/100 Mbit. Note: The lines represent the function.
CONNECTION AND PREPARATION---------------------------------------Connecting to the mains supply Notes: 7 Check that the mains voltage on the type plate (on the back of the power adapter) corresponds to your local mains supply. If this is not the case, contact your specialist dealer. 7 Before connecting the power adapter plug to the wall socket, ensure that all other connections have been made. Putting battery in the remote control 1 Open the battery lid by pressing on the arrow and sliding the lid out.
JOG-SHUTTLE------------------------------------------------------------------------------------------------------------------------Functions and operation using the Jog-Shuttle on the device Example – Setting the time and date automatically As an alternative to using the remote control, you can also select and confirm the selected operations and functions using the Jog-Shuttle. 1 Press »MENU« to open the menu. – The menu appears; the content depends on the the current operating mode.
SETTINGS---------------------------------------------------------------------------------------------------------------------------------------Menu navigation Start First Installation Press »MENU« on the device or on the remote control, select »Main menu« using » « or » « or by turning the Jog-Shuttle, and confirm by pressing the Jog-Shuttle or »OK« on the remote control. 1 First switch on the device by pressing »8« on the remote control or »ON/OFF« on the device. – Display: »Setup wizard« menu opens.
SETTINGS---------------------------------------------------------------------------------------------------------------------------------------Select one of the options by pressing » « or » « or by turning the Jog-Shuttle and confirm by pressing on the Jog-Shuttle or »OK« on the remote control. – The menu »Set timezone« appears (only if »Update from Network« was selected). Note: 7 If »Update from FM« was selected, continue from point 7. 5 Select the time zone (ex.
SETTINGS---------------------------------------------------------------------------------------------------------------------------------------Notes: 7 You can choose between numbers, lower and upper case letters, and special characters. 7 Press » «, » « to scroll through the menu pages (numbers, letters, special characters, etc.). 7 If you make a mistake during entry, press » «, » «, » « or » « to select the push button »BKSP« and press »OK« to confirm. The last character is deleted.
SETTINGS---------------------------------------------------------------------------------------------------------------------------------------Manual station search If you know the frequencies or the transmission channels of the ensembles (multiplexes), you can also search for DAB stations manually. 1 Press »MENU« to open the DAB menu. 1 Press »MENU« to open the DAB menu. 3 Select the push button »YES« by pressing » « or » « or by turning the Jog-Shuttle and confirm by pressing »OK«.
SETTINGS---------------------------------------------------------------------------------------------------------------------------------------Searching for and saving FM stations Setting the search mode There are two different automatic station search modes. 1 Press »M« repeatedly on the remote control or »MODE« on the device until »FM radio« appears on display. 2 Press »MENU« to open the »FM« menu.
SETTINGS---------------------------------------------------------------------------------------------------------------------------------------6 Switch off the menu by pressing » «. 7 Confirm the security query by selecting the push button »YES« using » « or » « or by turning the Jog-Shuttle and confirm by pressing »OK«. Note: 7 If the »NO« button is selected, then the settings will not be saved. 8 Press »MENU« to end the setting.
GENERAL FUNCTIONS---------------------------------------------------------------------------------------Switching on and off By using the menu 1 Switch on the device from standby mode by pressing »8« on the remote control or »ON/OFF« on the device. –D isplay: The system switches to the last source selected. 1 Press »MENU« to open the menu. 2 Switch the device to standby mode by pressing »8« on the remote control or »ON/OFF« on the device. – Display: The current time and date.
INTERNET RADIO MODE-------------------------------------------------------------------------------Listening to an Internet radio station You can browse the catalogue of Internet radio stations and classify them by genre (style of music), by country or by popularity. The stations are organized in a hierarchical menu in the same way files are organized in directories on a computer.
INTERNET RADIO MODE-------------------------------------------------------------------------------Searching for Internet radio stations in the »Genre« category 1 In the »Stations« menu, select the »Genre« option by pressing » « or » « or by turning the Jog-Shuttle and confirm by pressing »OK«. Time/Date Genre Alternative Ambient Big Band Bluegrass Blues > > > > > 2 Press » « or » « or turn the Jog-Shuttle to select the search criteria (e.g. »Alternative«, »Ambient«) and confirm by pressing »OK«.
INTERNET RADIO MODE-------------------------------------------------------------------------------Selecting the most popular Internet radio stations Storing Internet radio stations on presets You can use this function to select radio stations that are most frequently listened to. You can use the remote control to fill 10 presets with the Internet radio stations of your choice. If you assign the presets again, the previously saved stations are overwritten.
INTERNET RADIO MODE-------------------------------------------------------------------------------Opening the most recently selected Internet stations The device saves the 10 most recently selected radio stations in a folder which you can open at the same time as the station list. 1 In the »Station list« menu, select the »Last listened« option by pressing » « or » « or by turning the Jog-Shuttle and confirm by pressing »OK«.
INTERNET RADIO TUNING SERVICE--------------------------------------Registering on the GRUNDIG homepage You need to complete a one-time registration of your device on the GRUNDIG page “GRUNDIG INTERNET RADIO TUNING SERVICE” stating the MAC address of your device. You can search for stations on this web page and listen to them. When logging on, the device must be connected to the Internet (see the section “Start First Installation”).
INTERNET RADIO TUNING SERVICE--------------------------------------Note: 7 You can start listening to the radio station by pressing the push button »5«. Prerequisite for this is that you have suitable software installed (e.g. Nero Media Home, Windows Media Player). Selecting a radio station from the available genres 1 Select the preferred genre in the “Music” genre. – A list of the radio stations featuring the selected style is displayed. 2 Highlight the radio station using the »❤+« button.
INTERNET RADIO TUNING SERVICE--------------------------------------6 Exit the “GRUNDIG INTERNET RADIO TUNING SERVICE” Internet page using the »Logout« button. 5 Enter the station name, URL of the radio station, location and music genre and confirm by pressing the »5« button. Note: 7 Radio stations that are no longer required can be deleted from the favourites group. To do so, select the radio station and then click on the »❤–« button.
SHARED MEDIA MODE-------------------------------------------------------------------------------------Shared media server (audio streaming) This function allows you to make a selection by artist and track, as well as by album, genre, etc.; this selection depends on the structure of the music archive and on the UPnP server software in use (e.g. Nero Media Home, Windows Media Player 12). Access times may be prolonged depending on the size of the music archive, and this make usage inconvenient.
SHARED MEDIA MODE-------------------------------------------------------------------------------------Playing playlists 1 Select the input source »Music player« by pressing »M« on the remote control or using »MODE« on the device. 2 Select the option »My playlist« by pressing » « or » « or by turning the Jog-Shuttle on the device, and confirm by pressing »OK«. – The selection list appears in the display.
SHARED MEDIA MODE-------------------------------------------------------------------------------------Play using the "Play to ..." function in the Windows Media Player Play using the "Play to ..." function without the Windows Media Player With the Windows Media Player, you can manage your media data and quickly find the required album or song that you want to play. You can also play albums or songs from the PC on the Cosmopolit 3F without using the Windows Media Player.
iPod/iPhone MODE-------------------------------------------------------------------------------------------------The device features an iPod/iPhone dock which allows you to play digital audio files and video sound tracks stored on your iPod/iPhone using the device’s speaker. Playing the contents of an iPod/ iPhone 1 Open the »iPod dock drawer« by pressing on it. 2 Connect your iPod/iPhone into the »iPod dock connector« until it latches into place (see the “Connecting the iPod/iPhone” section).
iPod/iPhone MODE-------------------------------------------------------------------------------------------------Displaying information You can check whether the iPod/iPhone model used displays information on the device display. 1 Press »i«. – Display: »Authentication: Success«, the information is displayed. – Display: »Authentication: - -«, the information is not displayed. 2 Display further information using »i«.
USB MODE----------------------------------------------------------------------------------------------------------------------------------Playing the contents of a USB memory stick 8 Press »7« on the remote control to stop playback. 1 Switch off the device from standby mode by pressing »8« on the remote control or »ON/OFF« on the device.
USB MODE----------------------------------------------------------------------------------------------------------------------------------Repeating all files or tracks (Repeat All) 1 During playback press » « once on the remote control. – Display: » «. – All the tracks or files are played back repeatedly. 2 To quit this function, press » « on the remote control. – Display: » « disappears from the display. Playing tracks in random order 1 Open the »Music player« menu by pressing »MENU«.
DAB MODE---------------------------------------------------------------------------------------------------------------------------------Selecting the DAB input source 1 Press »M« repeatedly on the remote control or »MODE« on the device until »DAB radio« appears on display. Selecting a DAB station – from the station list The available DAB stations are stored in a »Station list«. 1 Open the DAB menu using »MENU«.
FM MODE--------------------------------------------------------------------------------------------------------------------------------------Selecting the tuner input source 1 Press »M« repeatedly on the remote control or »MODE« on the device until »FM radio« appears on the display.
AUX MODE--------------------------------------------------------------------------------------------------------------------------------Listening to an external source You can listen to the audio signal from the external device connected through your system’s speakers. 1 Switch on the device from standby mode by pressing »8« on the remote control or »ON/OFF« on the device.
TIMER MODE--------------------------------------------------------------------------------------------------------------------------Your device has 2 timer modes: – The switch-on timer, which switches the device on at the set time and wakes you with the input source you selected. – The sleep timer, which switches the device off at a preset time. Press » « or » « or turn the Jog-Shuttle to set the alarm hour and confirm by pressing »OK«. – Display: The clock digits for the minutes flash.
TIMER MODE--------------------------------------------------------------------------------------------------------------------------If no button is pressed for 10 seconds while setting, the system will quit the process automatically, and you have to start again. 7 If you select “iPod” as the timer source, make sure that an iPod has been inserted. Otherwise the device activates the buzzer. 7 11 Switch the device to standby by pressing »8« on the remote control or »ON/OFF« on the device.
SPECIAL SETTINGS-----------------------------------------------------------------------------------------------------Displaying Software and ID information 1 Press »MENU« to open the menu. 2 Select the option »System settings« by pressing » « or » « or by turning the Jog-Shuttle and confirm by pressing »OK«. 3 Select the option »Info« by pressing » « or » « or by turning the Jog-Shuttle and confirm by pressing »OK«. Time/Date Info SW version: GRUNDIG_CP_3F_IP_DAB Version 2.
SPECIAL SETTINGS-----------------------------------------------------------------------------------------------------5 Select the network by pressing » « or » « or by turning the Jog-Shuttle, and confirm by pressing »OK«. – The »Key« menu appears (if the network is encrypted), and the cursor is positioned at the first input field. Note: 7 If the network is encrypted, the network key (security code WEP or WPA) must be entered.
SPECIAL SETTINGS-----------------------------------------------------------------------------------------------------Registering the device with the WLAN router with individual network settings These settings require advanced knowledge of network configuration. 1 Press »MENU« to open the menu. 2 Select the option »System settings« by pressing » « or » « or by turning the Jog-Shuttle and confirm by pressing »OK«.
SPECIAL SETTINGS-----------------------------------------------------------------------------------------------------11 Enter the Secondary DNS. Select the first number by pressing » « or » « or by turning the Jog-Shuttle. Select the next digit position by pressing » « or by turning the Jog-Shuttle (you can switch back by pressing » « on the remote control). Repeat the procedure for all characters. Confirm the number by pressing »OK«.
SPECIAL SETTINGS-----------------------------------------------------------------------------------------------------Setting the time, time zone and date automatically 1 Press »MENU« to open the menu. 2 Select the option »System settings« by pressing » « or » « or by turning the Jog-Shuttle and confirm by pressing »OK«. 3 Select the option »Time/Date« by pressing » « or » « or by turning the Jog-Shuttle and confirm by pressing »OK«.
SPECIAL SETTINGS-----------------------------------------------------------------------------------------------------Changing the menu language 1 Open the menu for the current input source by pressing »MENU«. 2 Select the option »System settings« by pressing » « or » « or by turning the Jog-Shuttle on the device and confirm by pressing »OK«. 3 Select the option »Language« by pressing » « or » « or by turning the Jog-Shuttle on the device and confirm by pressing »OK«.
INFORMATION-----------------------------------------------------------------------------------------------------------------Glossary Boot loader version Boot loader is a software application that is loaded by the device firmware from a bootcapable medium and then executed. The boot loader then loads further parts of the operating system. Domain name system The domain name system (DNS) is one of the most important services on the Internet.
INFORMATION-----------------------------------------------------------------------------------------------------------------Proxy server A proxy or proxy server is a service program for computer networks that administers data transfer. It makes data transfer faster, and can also increase security by implementing access control mechanisms. Wi-Fi The Wi-Fi Alliance is an organisation that has taken on the task of certifying products from different manufacturers on the basis of the IEEE802.
INFORMATION-----------------------------------------------------------------------------------------------------------------Licence conditions This product is protected by the intellectual property rights of the Microsoft Corporation. The use or distribution of such technology outside of this product is prohibited unless under licence from Microsoft or an authorised subsidiary.
INFORMATION-----------------------------------------------------------------------------------------------------------------USBware from Jungo Ltd. Notice required: “Copyright 1994-2005 The FreeBSD Project All rights reserved. Redistribution and use in source and binary forms, with or without modification, are permitted provided that the following conditions are met: 1. Redistributions of source code must retain the above copyright notice, this list of conditions and the following disclaimer. 2.
INFORMATION-----------------------------------------------------------------------------------------------------------------1. Redistributions of source code must retain the above copyright notice, this list of conditions and the following disclaimer. be used to endorse or promote products derived from this software without specific prior written permission. 2.
INFORMATION-----------------------------------------------------------------------------------------------------------------4. The names "OpenSSL Toolkit" and "OpenSSL Project" must not be used to endorse or promote products derived from this software without prior written permission. For written permission, please contact openssl-core@openssl.org. 5.
INFORMATION-----------------------------------------------------------------------------------------------------------------Cleaning the device Pull out the power cord from the wall socket. Clean the device by using a soft cloth slightly moistened with a mild detergent solution. Do not use a solution containing alcohol, spirits, ammonia or abrasives. Environmental note This product has been manufactured with high quality parts and materials which can be reused and are suitable for recycling.
INFORMATION-----------------------------------------------------------------------------------------------------------------Made for iPod/iPhone “Made for iPod/iPhone” means that an electronic accessory has been designed to connect specifically to an iPod/iPhone, and has been certified by the developer to meet Apple performance standards. Apple is not responsible for the operation of this device or its compliance with safety and regulatory standards.
INFORMATION-----------------------------------------------------------------------------------------------------------------Internet faults Problem Possible cause/remedy Desired WLAN network not found. – WLAN network is deactivated, switch on the WLAN network. – SSID is suppressed on the router; display SSID on the router. – Distance to router is too large; reduce distance to router. Connection to router not established.
www.grundig.