ǵ COLOR TELEVISION VISION II 26 LXW 68-9620 DOLBY VISION II 32 LXW 82-9620 DOLBY DEUTSCH ENGLISH FRANÇAIS ITALIANO NEDERLANDS TÜRKÇE POLSKI
CONTENTS ____________________________________________ 3-4 2 Set-up and safety 5-6 Connection/Preparation 5 6 Connecting the antenna and the mains cable Inserting batteries in the remote control 7-9 Overview 7 8 9 9 Connections on the television The remote control (TV mode) The remote control (teletext mode) Operating controls on the television 10 Settings 10 10 Setting television channels automatically Picture and sound settings 11 Easy Dialog System 11 The »Easy Dialog System« interactive
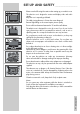
SET-UP AND SAFETY ___________________________ Please note the following information when setting up your television set. 10 cm 10 cm This television set is designed to receive and display video and audio signals. Any other use is expressly prohibited. 20 cm The ideal viewing distance is 5 times the screen diagonal. External light falling on the screen impairs picture quality. Ensure sufficient clearance between the TV and the wall cabinet. The television set is designed for use in dry rooms.
SET-UP AND SAFETY ___________________________ Please note when deciding where to put the device that furniture surfaces are covered by various types of lacquer and plastic, most of which contain chemical additives. These may cause corrosion to the feet of the device, thus resulting in stains on the surface of the furniture which can be difficult or impossible to remove. The screen of your LCD television meets the highest quality standards and has been checked for pixel faults.
CONNECTION/PREPARATION __________ Connecting the antenna and the mains cable 2 1 TV R É 1 Plug the antenna cable of the rooftop antenna into the » « antenna socket on the television. 2 Plug the mains cable supplied into the mains socket of the television. 3 Plug the mains cable into the wall socket. Notes: Only plug the device into the mains socket after you have connected the external devices and the antenna. The connected devices have to be set in the »Installation« menu at the »Devices« point.
CONNECTION/PREPARATION __________ High definition – HD ready Your television can receive high-definition television signals (HDTV). You can connect the input sources (HDTV set-top box or HDTV DVD player) to either the »DVI« socket (digital HDTV signal) or the »Y Pb Pr« socket (analogue HDTV signal). This ensures that you can view digital HDTV programmes, even if they are copy-protected (HDCP High-Definition Copy Protection).
OVERVIEW ____________________________________________ Connections on the television ʋ Mains socket. AV 6 PC IN VGA connection for PC. PC AUDIO IN Audio signal input PC. AV 3 AV socket, for connecting a video recorder, DVD player, satellite receiver or camcorder using the AV adapter supplied. AV 1 Euro/AV socket for a DVD player, video recorder or satellite receiver. LINE OUT y Headphone socket/audio output. Service socket for dealers. Antenna socket.
OVERVIEW ____________________________________________ The remote control (TV mode) @ Tele Pilot 150 C Ǽ Switches the television off (standby) and on. PIP TV picture in teletext. E Switches between picture formats. D Calls up the A–Z index. 1 ... 0 Switch the television on from standby. Select TV stations directly. »0« Selects AV channels »AV 1«, »AV 2« and »AV 3«. Alphanumerical station selection (see page 13). Enter teletext page numbers. d Sound on/off (mute).
OVERVIEW ____________________________________________ The remote control (teletext mode) Enter teletext page numbers. 1…0 E Switches to double character height. D Shows information on the videotext functions on the »VT settings« menu. i Opens the »VT settings« menu. P+, P- Page catching. Select teletext pages directly from the main pages and open them with »OK«. Ǹ Ƿ Select subpages. To do this, set the »Subpages« function in the »VT settings« menu to »On«.
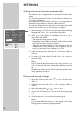
SETTINGS ______________________________________________ Setting television channels automatically The television set is equipped with an automatic channel search system. You start the search and can then sort the television channels into your order of preference. 99 preset positions are provided, to which you can assign television channels from the antenna or from the cable connection. You can also delete television channels from the channel list which were found more than once or which have poor reception.
EASY DIALOG SYSTEM ______________________ The »Easy Dialog System« interactive operating instructions Your TV set is equipped with the »Easy Dialog System« interactive operating instructions. The many possibilities as well as settings and operation of the TV set are displayed with this interactive operating instructions by menu tables, user guides and help functions. The printed operating instructions are used for the first installation, as well as for a general overview and are therefore very brief.
TELEVISION OPERATION___________________ Basic functions Switching on 1 Turn on the television set with »IO « on the television set. – If only the LED illuminates, the set is in standby mode. – Turn on the television set with »1…0« or »P+« or »P-«. Switching to and from standby 1 2 Press the »Ǽ« button to switch the television to standby mode. Press »IO « on the television set to switch it off completely. – This saves electricity. Selecting channels @ 1 Use »1…0« to select channels directly.
TELEVISION OPERATION___________________ Zap function With this function you may store the current channel position and switch to another one (zap). Use »1…0« or »P+«, »P--« to select the channel position you wish to store in the zap memory (e.g channel position 7, PRO7) then press »Z« to store it. – On the picture screen appears, for example, »Z 7 PRO7«. 2 Using »1…0« or »P+«, »P-« you now may switch to another channel position.
TELETEXT MODE _______________________________ TOP text or FLOF text mode 1 2 Press »TXT« to switch to teletext mode. You can directly select teletext pages with »1...0«. Note: At the bottom of the screen, you will see an information line consisting of a red, green and, depending on the station, yellow and blue text field. Your remote control has buttons with the corresponding colours. @ 3 Press »z « (red) to scroll back a page. 4 Press » 5 Press »@« (yellow) to select chapters.
INFORMATION_____________________________________ Technical data Mains voltage: 230 V, 50/60 Hz, (power pack control range 190 ... 264 V) Power consumption: in operation 110 W, in standby approx. 1 W (Vision 26) in operation 130 W, in standby approx.
INFORMATION_____________________________________ Troubleshooting If the remedies given below do not work, please consult an authorised GRUNDIG dealer. Please bear in mind that malfunctions can also be caused by external devices such as video recorders or satellite receivers.
INFORMATION_____________________________________ Problem Possible cause Remedy Remote control does not work. No optical connection. Point remote control at the TV set. Remote control batteries. Check or replace the batteries, pay attention to polarity. undefined operating status Turn your TV set off for approx. 2 min. using the main power button Child lock is activated. After switching on, “child lock” appears on the menu. Enter secret number or number combination 7038580. Wrong menu language.
INFORMATION_____________________________________ Additional Information for units sold in the UK. Units sold in the UK are suitable for operation from a 240V ac, 50Hz mains supply. The range of multi-system receivers is built to work in most European countries. However, the mains plug and socket system for the UK differs from many European countries. This appliance has been supplied with a fitted, non-removable, approved converter plug for use in the UK. This converter plug is fitted with a 5A rated fuse.
Grundig Multimedia B.V. • Atrium, Strawinskylaan 3105 • NL-1077 ZX Amsterdam • http://www.grundig.