
Operation Manual


ENGLISH
19
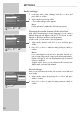
Adjusting the digital receiver to the
LNB configuration of the satellite antenna
The digital receiver has been factory set so that it is ready for
operation, without time-consuming adjustment, with most satellite
antennas and LNB configurations.
Changes in this menu have a direct effect on the reception charac-
teristics of the digital receiver and should therefore only be made by
an expert.
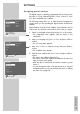
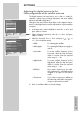
1 In the main menu, select »Installation« with »P-« or »P+« and
press »OK« to confirm.
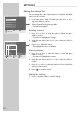
2 Select »Antenna connection« with »P-« or »P+« and press
»OK« to confirm.
3 Select the item with »P-« or »P+« and press »
Ǹ
«, »
Ƿ
« or
»1 ... 0« to make the setting:
– »LNB«: For selecting the satellites.
– »LNB supply«: For switching the LNB power supply on
and off.
– »Low band«: To set the oscillator frequency for the
Low band, select this item and press
»OK« to confirm. Enter the required
value using »1 ... 0«.
– »High band«: To set the oscillator frequency for the
High band, select this item and press
»OK« to confirm. Enter the required
value using »1 ... 0«.
– »DiSEqC«: If you want to receive up to four satel-
lites simultaneously, each LNB must be
assigned to its input on the DiSEqC
switch.
– »Tone burst«: If you want to receive two satellites at
the same time, each LNB is assigned to
its input on the tone burst switch.
4 Press »i« and then »OK« to save the settings.
SETTINGS
_________________________________________________
Antenna connection
Select Back Exit
and open
LNB
LNB supply
Low band
High band
DiSEqC
Tone burst
Astra 19.2
On
9.750 GHz
10.600 GHz
A
A
Installation
Select Back Exit
and open
Menu language
Channel search
Video output
Time
Antenna connection
Special functions
Info