GUADAB08IP DAB Radio with iPod docking station User Guide IMPORTANT: Please read all instructions carefully before use and keep for future reference GUADAB08IP_UserGuide.
Introduction Thank you for choosing this Grundig DAB Radio with Docking Station. Not only can you listen to your favourite DAB radio stations, but you can also listen to all the songs and albums on your iPod. It’s really simple to use; you can fully operate your DAB Radio with Docking Station using the supplied Remote Control. Throughout this User Guide the DAB Radio with Docking Station will be referred to as the DAB Radio. Safety is important Use of any electrical equipment should be undertaken with care.
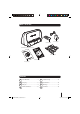
What’s in the box Power Adaptor Remote Control DAB Radio with iPod Docking Station 8 x iPod Adaptors Quick Start Guide This User Guide Contents 01 Your DAB Radio ............................4 05 Troubleshooting ..........................15 02 Get going .....................................6 06 Specifications .............................16 03 Daily use ......................................9 07 Warnings ....................................17 04 Advanced features .....................
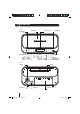
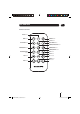
01 Your DAB Radio FRONT BASS TREBLE Button REMOTE CONTROL Sensor SCAN Button INFO Button MODE Button IPOD Docking Station SPEAKERS LCD Display VOL+ Button VOL - Button LEFT ARROW Button SELECT Button STANDBY Button HEADPHONE Jack PRESET Button RADIO MENU Button RIGHT ARROW Button REAR AERIAL ON/OFF Switch POWER Socket LINE OUT Socket BATTERY Compartment 4 GUADAB08IP_UserGuide.
Your DAB Radio 01 REMOTE CONTROL MENU Button MODE Button STANDBY Button SELECT Button LEFT ARROW Button RIGHT ARROW Button NUMERIC/PLAY/PAUSE Button NUMERIC/RWD Button NUMERIC/FWD Button NUMERIC/REPEAT Button NUMERIC/SHUFFLE Button SHIFT Button INFO Button VOL + Button SCAN Button TREBLE Button BASS Button VOL - Button 5 GUADAB08IP_UserGuide.
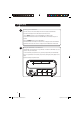
02 Get going 1 Setting up the DAB Radio Insert the connector of the Power Adaptor into the Power Socket of the DAB Radio. Insert the Power Adaptor into the wall socket and turn the socket on. Turn the ON/OFF Switch at the rear of the DAB Radio to the ON (I) position. Unclip and extend the Aerial at the rear of the DAB Radio to ensure the best reception is received. Press the STANDBY button to turn the DAB Radio on.
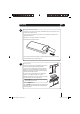
Get going 3 02 Using the Remote Control The Remote Control can be used to operate the DAB Radio. Before using the Remote Control, the Safety Tab should be removed. To open the Remote Control Battery Compartment, press the Battery Compartment Cover Tabs together and remove. Carefully remove the Safety Tab which covers the battery. Replace the Battery Compartment Cover. To use the Remote Control, simply direct it towards the Remote Control Sensor on the front of the DAB Radio and press the desired buttons.
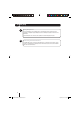
02 Get going 5 Using Headphones A pair of headphones (not supplied) with a 3.5mm diameter stereo plug and 8-32 ohm impedance is required. Plug the headphones into the Headphone Socket on the front of the DAB Radio. When headphones are connected, the speakers are automatically disconnected. 6 Connecting to External Devices Your DAB Radio can be connected to external devices, for example a Home Stereo.
Daily use DONT FORGET! Some functions described in this User Guide can only be performed using the DAB Radio or the Remote Control. Switching On To turn the DAB Radio on, press the STANDBY button. To turn the DAB Radio off, press the STANDBY button again. DONT FORGET! Ensure the ON/OFF Switch is in the on (I) position before turning the DAB Radio on. Adjusting the Volume To increase the volume, press the VOL + button. To decrease the volume, press the VOL - button.
03 Daily use Menu Navigation You can access the menu system of your iPod using the Remote Control. favourite stations for easy access. You can preset up to 10 DAB radio stations in the DAB Radio memory. To access the iPod menu system, press the MENU button. Select the station you want to preset using the LEFT and RIGHT ARROW buttons. Use the LEFT or RIGHT ARROW buttons to highlight the menu options. Press the SELECT button to listen to the selected station.
Daily use • Program Type (PTY) -displays the station program type, for example ‘Pop’ • Multiplex Name - displays the broadcasting area and collection of radio stations on this frequency e.g.: BBC National DAB, Digital 1 Network. 03 To perform a Full Scan, press and hold the SCAN button. ‘Full Scanning’ will be shown on the 1st line of the LCD Display complete with a progress bar and the number of stations found during the scan.
03 Daily use Selecting a preset station To select a preset station, press the appropriate NUMERIC button on the remote control. The DAB Radio will retune to the selected preset station. DONT FORGET! If the preset number is above 5, press the SHIFT button before the NUMERIC button. To select a preset station using the buttons on the DAB Radio, press the PRESET button. Use the LEFT and RIGHT ARROW buttons to highlight the preset station. Press the SELECT button.
Advanced features Radio Menu The radio menu allows you to configure the settings for the DAB Radio. To access the Radio menu, press the RADIO MENU button. The Radio menu will be shown on the LCD Display. Press the LEFT and RIGHT ARROW buttons to scroll through the available features. Press the SELECT button to select an option. DONT FORGET! If you access the Radio menu and do not make a selection after a few seconds, the DAB Radio will return to the previous display.
04 Advanced features To manually set the clock, choose the ‘Set Clock’ option. The current time will be shown in the bottom of the LCD Display with the Hours between two arrows. To adjust the Hours, press the LEFT and RIGHT ARROW buttons to increase or decrease the Hours. Press the SELECT button. The Minutes will be shown between two arrows. To adjust the Minutes, press the LEFT and RIGHT ARROW buttons to increase or decrease the Minutes. Press the SELECT button.
Troubleshooting 05 Problem Possible Cause What to do The DAB Radio does not power on. 1. The Power Adaptor is not connected to the DAB Radio 1. Connect the Power Adaptor to the DAB Radio. 2. The wall socket is not turned on. 2. Turn on the power at the wall socket. 3. The Batteries are flat. 3. Replace the batteries. The DAB Radio will not receive any DAB radio stations. 1. The Aerial is not unclipped and extended. 1. Unclip and fully extend the Aerial.
06 Specifications Power Supply (Input) • 230 V ~ 50 Hz • 6 x ‘C’ type batteries Power Supply (Output) • 9 V DC 1200 mA Power Output • 2 x 2 W RMS @ 10% THD output Radio Frequency Coverage • 174-240 MHz • 87.5-108 MHz IMPORTANT: This manual contains for-reference-only graphics and information that are subject to change without prior notice. 16 GUADAB08IP_UserGuide.
Warnings • Unqualified attempts to repair the DAB Radio unit will invalidate the warranty. • Refer repairs of the DAB Radio to qualified service personnel only. • Do not disassemble the DAB Radio. • Store the DAB Radio in a clean, dry environment. • Wipe dust off the DAB Radio with a clean, dry and soft cloth. • For stubborn stains use a damp (not dripping) cloth. • Do not expose the DAB Radio to rain or moisture, dripping or splashing. • Do not use any cleaning solutions on the DAB Radio.
08 Guarantee The DAB Radio is guaranteed for twelve months from the date of original purchase. If any defect due to faulty materials or workmanship, contact the Grundig Helpline. Have your receipt of purchase on hand. The guarantee is subject to the following provisions: • It is only valid within the boundaries of the country of purchase. • The product must be correctly installed and operated in accordance with the instructions contained in this User Guide.
Technical Support: 0871 230 1777 GUADAB08IP_UserGuide.