GUSR91DAB DAB Radio With PLL FM Tuner User Guide IMPORTANT: Please read all instructions carefully before use and keep for future use
Introduction Thank you for choosing this Grundig DAB Radio with Touch Screen Control Panel. Not only can it receive DAB radio stations, but you can also tune into FM radio stations or connect an auxiliary device to it. Throughout this User Guide the DAB Radio with Touch Screen Control Panel will be referred to as the DAB Radio Safety is important Use of any electrical equipment should be undertaken with care. Please read the safety section on page 17 and 18 before using your DAB Radio.
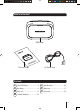
What’s in the box? DAB Radio DAB With PL R91 GUS B Radio DA r Guide Use L FM r Tune d ke ep for future use an use fore y be refull s ca ction IMPO T: RTAN d e rea Pleas tru all ins This User Guide AC Power Cord Contents 01 Your DAB Radio ........................3 05 Specifications ..........................16 02 Get going ..................................4 06 Warnings .................................17 03 Daily use ...................................5 07 Guarantee ................
01 Your DAB Radio Rod Antenna BBS button Display button Standby button Volume control knob Preset button Standby Mute BBS Scan 10:00:00 23-7-2009 Display Preset Mode Menu Mute button Select/Scroll up/ down Menu button Scan button Mode button LCD Display AC Power Socket ON/OFF switch AUX In Socket PHONE Socket 3
Get going 1 02 Connect the small end of the mains lead to the AC input socket on the rear of the unit. Connect the 3 pin plug to a suitable wall socket. 2 Turn the power switch on the rear of the unit to the ON position. 3 Using Headphones A pair of headphones (not supplied) with a 3.5mm diameter stereo plug and 8-32 ohm impedance is required. Plug the headphones into the Headphone Socket on the side of the DAB Radio.
03 Daily Use Switching On 1 2 3 To turn on the DAB Radio, ensure the power switch on the rear of the unit is set to the ON position. Press the STANDBY button on the touch panel. To turn the DAB Radio off press the STANDBY button again. Adjusting the Volume 1 2 3 To increase the volume, turn the volume control knob clockwise. To decrease the volume, turn the volume control knob anti-clockwise. You can also press the MUTE button to turn the sound off.
Daily Use 03 Changing DAB Stations 1 2 Rotate the Scroll Up/Down knob to scroll through the stations in the station list. Press the Scroll Up/Down button to select a new station from the list. Push the SELECT button to confirm. The radio will tune to the new station. DON’T FORGET! If no new station is selected the DAB Radio will display the currently playing station after 15 seconds. From time to time new DAB stations may be added to the DAB station list.
03 Daily Use Changing the DAB Station Information It is possible to change the information displayed on the second line of the display when listening to a DAB station. There are seven types of information available as listed below with examples to the right. Press DISPLAY Button 1 2 3 4 5 6 7 8 9 7 Dynamic Label Segment (DLS) This is scrolling text information supplied by the DAB station. It may comprise information on music titles or details of the programme and is provided by the broadcaster.
Daily Use 03 Using the MENU Control (DAB mode) The MENU control allows you to change some of the system options on your DAB Radio. These options are arranged in a menu structure as shown below. BBC Radio 5 Live RadioText Return to Station list Press MENU Button DAB Rotate the “SELECT” button clockwise DAB Press SELECT Button Rotate the “SELECT” Button to choose radio frequency, press SELECT Button to confirm.
03 Daily Use Using the Menu Press the MENU button to enter the menu. Rotate the SELECT button to scroll through the options described below. Full Scan 1 Press the MENU button to access the menu. 2 Rotate the SELECT button until “Full scan” is displayed. Push the SELECT button to activate a full scan for DAB stations. Manual Tune It is possible to manually tune to a specific channel/frequency and add this to the station list.
Daily Use 03 Dynamic Range Control (DRC) DRC adds or removes a degree of compression to compensate for the differences in the dynamic range between radio stations. For example, a station broadcasting popular music may have a high level of compression applied since the emphasis is on a constant high listening level. Where as a station broadcasting classical music will have little or no compression as the listener requires all of the highs and lows in the music to define the detail.
03 Daily Use Time - Allows you to set the time and date manually or update automatically from the DAB or FM radio broadcast. Backlight - Allows you to set the backlight time-out from 10, 15, 30 and 60 seconds, or constantly on. DON’T FORGET! When using battery power, the backlight time-out will be set to 10 seconds when the DAB Radio is switched to standby. You can touch any button on the radio to turn the backlight on for 10 seconds if you want to view the time.
Daily Use 03 Changing the FM Station Information It is possible to change the information that is displayed on the second line of the display when listening to a FM station. There are six types of information available as listed below with examples to the right. Press DISPLAY Button 1 Radio text This is scrolling text information supplied by the FM station. It may comprise information on Radio 2 DLS scrolling music titles or details of the programme and is Press DISPLAY Button provided by the broadcaster.
03 Daily Use Using the MENU Control (FM mode) The MENU control allows you to change some of the system options on your DAB Radio. These options are arranged in a menu structure as shown below. Press MENU Button FM Audio setting Rotate the “SELECT” to choose ALL Station/Stonge Station only, press “SELECT” button to confirm.
Daily Use 03 Using the Menu Press the MENU button to enter the menu. Rotate the SELECT button to scroll through the options described below. Scan 1 Press the MENU button to access the menu. 2 Rotate the SELECT button until “Scan setting” is displayed. 3 Push the SELECT button to select. 4 Rotate the SELECT button to select “All stations” or “Strong stations”. 5 Push the SELECT button to confirm. DON’T FORGET! All subsequent scans will be made according to the setting chosen.
04 Trouble Shooting PROBLEM POSSIBLE CAUSE No sound Volume not adjusted. Headphones are connected. Mains lead is not correctly connected. Microprocessor locked up. The unit does react to operation of any button Poor radio reception 15 G REMEDY Adjust the Volume. Disconnect the headphones. Connect the mains lead properly. Turn off the unit, disconnect the mains plug, reconnect after a few seconds. Weak radio signal Ensure the telescopic antenna is Interference from other electrical fully extended.
Specifications 05 Model Number GUSR91DAB Power Supply AC Input 230 V 50Hz or 6 X "C" (UM-2) batteries Standby Power Consumption 2W Max Power Consumption 13W Max Power Output 1.2W 10% THD Power Output 1W DAB section Band III, 174 MHz to 240 MHz FM section 87.5 MHz to 108 MHz IMPORTANT: Due to continual revision and improvements to our products design, specifications are subject to change without notice.
06 Warnings WEEE General Safety This appliance is labelled in accordance with European Directive 2002/96/EG concerning used electrical and electronic appliances (Waste Electrical and Electronic Equipment - WEEE). The guideline determines the framework for the return and recycling of used appliances. This DAB Radio has been designed and manufactured to meet European safety standards, but like any electrical equipment, care must be taken if you are to obtain the best results and safety is to be assured.
Warnings 06 Electrical Information Wiring Instructions This DAB Radio is supplied with a mains lead fitted with a BS1363/A 13 amp plug. If it is not suitable for your supply sockets it must be removed and replaced with an appropriate plug. If the plug becomes damaged and/or needs to be replaced please follow the wiring instructions below. The supply cable will be either 2-core or 3-core. Follow the appropriate wiring instructions given below.
07 Guarantee The DAB Radio is guaranteed for twelve months from the date of original purchase. If there are any defects due to faulty materials or workmanship, contact the Grundig Helpline. Have your receipt of purchase on hand. The guarantee is subject to the following provisions: • It is only valid within the boundaries of the country of purchase. • The product must be correctly installed and operated in accordance with the instructions contained in this User Guide.
Helpline 0871 230 1777 G