
Camcorder User Manual


Allgemeiner Teil / General GV44…, GV45…, GV46…
1 - 36 GRUNDIG Service-Technik
2. Connecting and Setting Up
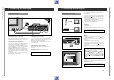
Improving the picture quality
If wavy lines are visible on the TV screen, the channel tuned
to is already occupied by a TV station.
In this case, proceed as follows:
Press the
“
8 button on the recorder.
On the TV set, search for a channel – in the UHF band be-
tween the channels 30 and 40
+
2 channels – which is not
occupied by a TV station (only snow on the picture screen).
Store the channel found in the memory of the TV set (see the
operating instructions for the TV set).
Switch to the test pattern by pressing the
J
button on the
recorder.
After a few seconds, the recorder will transmit the test pat-
tern.
Using the alignment pin supplied, turn the channel selector q
(FREQ./MOD.) on the back of the recorder (see illustration)
slightly to the right or left until the test pattern appears on the
screen.
Reconnect the aerial cable to the socket
–
II
–
of the recorder.
Complete the adjustment by pressing the
“
8 button on the
recorder.
Remove the aerial cable from the socket
–
II
–
of the recorder.
There should be no cassette in the recorder.
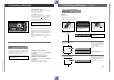
Switching the Recorder´s Transmitter Off
and On
If your recorder receives many TV stations between the chan-
nels 30 and 40 in the UHF band, you may experience picture
interference when using your recorder. To avoid this, the
recorder´s transmitter can be switched off.
In order for the picture/sound signal of the recorder to be
passed to the TV set, the two units must be connected by
means of a EURO-AV cable.
Switching the recorder´s transmitter off
Press the
Z
button, the numbered buttons
8518
and the
O
button.
The transmitter of the recorder is now switched off.
»OFF«
appears briefly in the display of the recorder.
Switching the recorder´s transmitter on
Press the
Z
button, the numbered buttons
8519
and the
O
button.
The transmitter of the recorder is now switched on.
»ON«
appears briefly in the display of the recorder.
DECODER A2
H
L
H
L
x
x
A
1
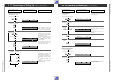
Tuning to TV Stations with the Automatic
Tuning System (ATS)
Preparation
Switch the TV set on.
Select the AV programme position for the recorder on the TV
set.
You can now check the settings on the TV screen.
2.1 Connecting and Setting Up for sets with ShowView
AV/CV
TRACKING
PROGRAM
2
3
1
5
4
8
9
7
0
SAT
6
EW/ED
SET
;
OK
CL
CHECK
AUTO
p
o
ON/OFF
TIMER
RECORD
TV
AV
8
o
p
+
–
PROGRAM
:
Ç
Hi-Fi
COUNT
0000
LP
*
8
V
S-VHS
e
RP 33
Press these buttons on the
remote control
8
You will see this in the display
of the recorder Explanations
1. Selecting the ATS function
“
ATS ,
»
ENGLIS
« appears in the display of the
recorder as the language.
All previously stored channel num-
bers will be erased.
2. Selecting the language (of your
location)
a) no b) yes
Sor A
“
ATS ,
“
ATS ,
When you select the "language", the
ATS tuning system searches for and
stores those stations that broadcast in
the respective language.
You can choose from different lan-
guages.
»
GB
« appears in the display of the re-
corder as the country.
uu
When you select the "country", the ATS
tuning function searches for and stores
those stations that broadcast in the res-
pective country.
You can choose from different coun-
tries.
3. Selecting the country (location)
a) no b) yes
Sor A
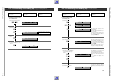
ENGLIS 88:8888 88:88:88
PROG
SEC PAL
SAT
START
C +
DATE
STOP
VPS
PDC
ENGLIS 88:8888 88:88:88
PROG
SEC PAL
SAT
START
C +
DATE
STOP
VPS
PDC
–GB–SC 88:8888 88:88:88
PROG
SEC PAL
SAT
START
C +
DATE
STOP
VPS
PDC
–GB–SC 88:8888 88:88:88
PROG
SEC PAL
SAT
START
C +
DATE
STOP
VPS
PDC