MICRO HiFi SYSTEM Ovation 3 CDS 8000 en
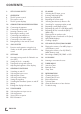
CONTENTS----------------------------------------------------------------------------------------------------------------------------------3 SET-UP AND SAFETY 4 4 7 9 OVERVIEW The hi-fi system controls The remote control The hi-fi system displays 10 10 10 11 11 11 11 12 12 CONNECTION AND PREPARATION Connecting the antenna Connecting a USB memory stick Inserting a memory card Removing the memory card Connecting external devices Connecting the headphones Connecting to the mains supply Putting battery in t
SET-UP AND SAFETY-----------------------------------------------------------------------------------------------Please note the following instructions when setting up the system: The hi-fi system is designed for the playback of audio signals. Any other use is expressly prohibited. 7 If you want to set up the hi-fi system on wall shelves or in cupboards, please ensure that it is adequately ventilated. There must be at least 10 cm of space at the side, above and behind the hi-fi system.
OVERVIEW---------------------------------------------------------------------------------------------------------------------------------The hi-fi system controls DISPLAY Tweeters MENU VOL Infrared sensor MODE Jog-Shuttle The front of the device ecording button, starts or ends R recording to USB memory stick or SD/SDHC/MMC memory card. VOL olume button, opens the V control menu for the volume or sound settings. MENU enu button, opens the control M menu for different modes of operation.
OVERVIEW---------------------------------------------------------------------------------------------------------------------------------The sides of the device USB U 8 SD U eadphone socket for connectH ing a stereo headphone set with a jack plug (ø 3.5 mm). This automatically switches off the loudspeakers. USB SB socket for connecting MP3 U player, a USB memory stick or a card-reading device. SD ard slot for inserting a memory C card (SD or SDHC).
OVERVIEW---------------------------------------------------------------------------------------------------------------------------------The back of the device WOOFER FM ANT. AUX IN AC ~ WOOFER L oudspeaker for bass sounds. FM ANT. Antenna socket for the antenna cable or wire antenna for FM reception. AUX IN udio signal input for A connecting an external source. AC ~ For connecting the power supply unit.
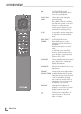
OVERVIEW---------------------------------------------------------------------------------------------------------------------------------The remote control 8 Switches the hi-fi system to standby mode and from standby mode to the last input source selected. ecording button, starts or ends R recording to USB memory stick or SD/SDHC/MMC memory card. VOL olume button, opens the V control menu for the volume or sound settings.
OVERVIEW---------------------------------------------------------------------------------------------------------------------------------7 In CD/USB/SD mode: interrupts the playback. Press twice to stop playback. DSC/UBS/ Selects the sound setting by WEC pressing briefly. Press and hold down, switches the ultra bass system on and off. Cancels or reactivates the switch-on timer function for the weekend (in stand by mode). S/N In operation: sets the sleep timer. In stand by: sets the reminder timer.
OVERVIEW---------------------------------------------------------------------------------------------------------------------------------The hi-fi system displays Displays the current time. In tuner mode: displays the frequency band and frequency, the station name, the station type and the radio text information provided when RDS information is contained in the radio signal, the preset for a saved radio station.
CONNECTION AND PREPARATION---------------------------------------Connecting the antenna Connecting a USB memory stick 1 Plug the auxiliary antenna supplied or the roof antenna cable into the »FM ANT.« socket. The hi-fi system supports most USB memory sticks. Note: 7 If no roof antenna is available, use the auxiliary antenna supplied. When suitably positioned, this antenna provides reasonably good reception of local FM (VHF) channels. Do not shorten the auxiliary antenna.
CONNECTION AND PREPARATION---------------------------------------Inserting a memory card Connecting external devices The hi-fi system supports SD/SDHC and MMC memory cards. Note: 7 The hi-fi system must be switched off while the memory card is being inserted. If it is not switched off, data can be lost. 1 Switch off the hi-fi system by pressing »8«. 2 Insert the card carefully into the »SD« card slot (on the left side) with gold contacts first and facing to the backside, until it latches into place.
CONNECTION AND PREPARATION---------------------------------------Connecting to the mains supply Notes: 7 Check that the mains voltage on the type plate (on the bottom of the hi-fi system) corresponds to your local mains supply. If this is not the case, contact your specialist dealer. 7 Before connecting the AC power cord to the wall socket, ensure that all other connections have been made. 1 Insert the supplied mains cable into the »AC~« socket on the hi-fi system.
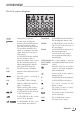
JOG-SHUTTLE------------------------------------------------------------------------------------------------------------------------Functions and operation using the Jog-Shuttle on the hi-fi system and the remote control You can perform many functions using the JogShuttle and the operation buttons »VOL«, » «, »MENU« and »MODE« on the hi-fi system and remote control. The mode of operating with both controls is the same.
JOG-SHUTTLE------------------------------------------------------------------------------------------------------------------------Operation Example – setting the timer Press on »VOL«, »MODE«, »MENU« or » «. Turn the Jog-Shuttle to select the function and press on it to activate. In the selected menu you can select one of the submenus – this can also be done by turning the Jog-Shuttle. This is activated by pressing on it. 1 Press on »MODE« to select the »MODE« menu.
SETTINGS---------------------------------------------------------------------------------------------------------------------------------------Automatic tuning search for FM radio stations (ATS) After connecting the hi-fi system to the mains power for the first time, the automatic tuning search begins. It searches for radio stations and can save up to 40 presets. – Display: the frequency in rapid run-through and the preset. – After the search, the demo mode is started automatically.
SETTINGS---------------------------------------------------------------------------------------------------------------------------------------Tuning and storing radio stations After the initial automatic station search, you can also adjust radio stations whenever you want. Programming radio stations – automatically for all available radio stations Automatic programming starts from the preset number (1) and former programmed radio stations will be overridden.
SETTINGS---------------------------------------------------------------------------------------------------------------------------------------Programming radio stations – manually Adjusting the brightness of the display 1 Switch on the hi-fi system from standby mode by pressing »8«. 1 Repeatedly press »BRIGHT« on the remote control to change the brightness of the display in four levels. 2 Press »MODE« and rotate Jog-Shuttle to find »FM TUNER« on display and confirm by pressing on the Jog-Shuttle.
GENERAL FUNCTIONS---------------------------------------------------------------------------------------Switching on and off Setting the equaliser The only way to disconnect the hi-fi system from the mains supply is to pull out the plug from the wall socket. The user sound setting allows you to make your own personal equaliser settings. 1 Switch on the hi-fi system from standby mode by pressing »8« on the remote control or on the hi-fi system. – The system switches to the last selected source.
GENERAL FUNCTIONS---------------------------------------------------------------------------------------Switching the Ultra Bass System on and off 1 Press and hold down »DSC/UBS« to switch the Ultra Bass System on and off. –D isplay: » « appears when the UBS is activated and disappears when deactivated. Note: 7 If you select user sound setting, wait until »USER« disappears, or follow the below procedures. 1 Press »VOL« to open the sound control menu.
TUNER MODE ---------------------------------------------------------------------------------------------------------------------Selecting the tuner input source Viewing RDS information 1 Switch on the hi-fi system from standby mode by pressing »8« on the remote control or on the hi-fi system. If an RDS station is being received, information can be opened up in the display. 2 Press »MODE« and rotate Jog-Shuttle to find »FM TUNER« on display and confirm by pressing on the Jog-Shuttle.
CD MODE---------------------------------------------------------------------------------------------------------------------------------------The hi-fi system is suitable for music CDs bearing the logo shown here (CD-DA), and for CD-Rs (CD-Recordables) and CD-RWs (CD-Rewritables) with audio data or MP3 and WMA formats. In MP3/WMA mode, the terms “album” and “file” are very important. “Album” corresponds to a folder on a PC, “file” to a file on a PC or CD-DA track.
CD MODE---------------------------------------------------------------------------------------------------------------------------------------Repeating the current track 1 During playback, press » « on the remote control or press »MENU«, on the hi-fi sytem, then press once to the Jog-Shuttle and select the current track by turning the Jog-Shuttle to the left. – T he playing time is »00:00«. The track is repeated from the beginning.
CD MODE---------------------------------------------------------------------------------------------------------------------------------------Playing the start of each track or file (Intro) 1 Press »REP./INT.« on the remote control in stop mode. – Display: »INTRO«. – Intro playback starts automatically. – The first 10 seconds of all the tracks or files on the CD are played. 2 To quit this function, press the »REP./INT.« or press »7« twice to stop playback and quit the function.
USB AND SD/SDHC/MMC MODE --------------------------------------------For MP3/WMA mode with MP3 player, USB memory stick or SD/SDHC/MMC card, the same playback and search functions are available as for CD mode (see CD Mode section). Playing the contents of an MP3 player or a USB memory stick 1 Switch off the hi-fi system with »8«.
USB AND SD/SDHC/MMC MODE --------------------------------------------Recording to MMC/SD/SDHC or USB The hi-fi system has a recording function which can record from FM Tuner, CD or Aux input sources. Recording from the radio (FM Tuner) 1 Press »MODE« and rotate Jog-Shuttle to find »FM TUNER« on display and confirm by pressing on the Jog-Shuttle. 2 Press »1« to »9« on the remote control to select the presets; or press »+10« on the remote control and then »1« to »9« to select the presets from 10 to 40.
AUX MODE--------------------------------------------------------------------------------------------------------------------------------Listening to an external source You can listen to the sound of the connected external device through your system’s speakers. 1 Use a standard audio cable (not supplied) to connect »AUX IN« on the back of the hi-fi system to an AUDIO OUT or »U « headphone socket on an external equipment (such as CD player, or VCR).
TIMER MODE--------------------------------------------------------------------------------------------------------------------------Your hi-fi system has 3 timer modes: – T he switch-on timer, which switches the hi-fi system on at the set time and wakes you with the input source you selected. – T he reminder timer, which switches the hi-fi system to remind you by sounding the signal tone at a preset time. – T he sleep timer, which switches the hi-fi sys�tem off at a preset time.
TIMER MODE--------------------------------------------------------------------------------------------------------------------------Activating and deactivating the timer 1 In standby, press »TIMER« on the remote control once. –D isplay shows » « or » « if the timer is activated. They disappear when the timer is deactivated. Interrupting the timer 1 When the timer sounds, press »SNOOZE « on the remote control. – T he timer signal stops.
INFORMATION-----------------------------------------------------------------------------------------------------------------Cleaning the device Pull out the power cord from the wall socket. Clean the device by using a soft cloth slightly moistened with a mild detergent solution. Do not use a solution containing alcohol, spirits, ammonia or abrasives. Cleaning the CD unit Technical data This device is noise-suppressed according to the applicable EU directives.
INFORMATION-----------------------------------------------------------------------------------------------------------------General information on laser devices CLASS 1 LASER PRODUCT This device is a CLASS 1 LASER PRODUCT. This means that the laser is designed in such a way as to ensure that the maximum permissible emission value cannot be exceeded under any circumstances. Caution: If operating devices or methods other than those specified here are employed, it may lead to dangerous exposure to emissions.
INFORMATION-----------------------------------------------------------------------------------------------------------------Troubleshooting Not every kind of sound interference is caused by a defect in your hi-fi system. Cables that have accidentally been disconnected, damaged CDs and flat battery for the remote control will impair functioning. If the following measures do not resolve the problem satisfactorily, please visit www.grundig.
www.grundig.