CONTROL CPCCONTRO OWNER’S MANUAL 3 BETRIEBSANLEITUNG 15 MODE D’EMPLOI 29 GEBRUIKSAANWIJZING 43 20040/120503 © ALL RIGHTS RESERVED MARMITEK ®
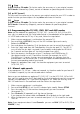
PC CONTROL REMOTE 2 4 1 3 5 6 8 7 10 9 12 11 14 13 16 15 17 18 19 2 20 21 22 23 24 25 MARMITEK
ENGLISH General Security Note Technical manipulation of the product or any changes to the product are forbidden, because of security and approval issues. Please take care to set up the device correctly - consult your user guide. Children should use the device only under adult supervision. Avoid the following • • • • strong mechanical wear and tear high temperature strong vibrations high humidity Please also respect the additional security notes in the various user guide chapters.
5. 6. 4.7. Default Volume Control for satellite Controlling home automation modules 5.1. Changing the home automation House Code 5.2. Programming the Home Automation IR/RF Mode Troubleshooting 12 12 13 13 13 1. Introduction The PC Control Remote can be use as a Wireless Mouse Remote and as a Universal Remote Control. To control a PC the PC Control remote works with the wireless USB receiver CM21A (included in your PC Control kit).
Important note for Windows 98 and Me users If after plugging in the CM21A USB receiver (X10 hardware(TM)setup), the "add new hardware" wizard starts, follow these steps (Be sure to have click on the OK button in the X10 hardware(TM)setup window BEFORE following these steps) a. Click next in this window. b. Select "Search for the best driver for your device (recommended)’ and click next. c. In the new window, select "Specify a location", click the "Browse" button to search for the driver files. d.
3.3. Function of the remote's buttons in PC mode [1] POWER Close the application which is active. You will even be able to shutdown your PC remotely. [2] RED LED indicator The indicator light flashes when the remote is operating or lights continuously while you are programming the remote. [3] PC Press this key to select the PC mode and be able to use the mouse pad and control ShowShifter. [5] Mouse Pad Move the cursor around the screen. [6] L Left click. [7] R Right click.
ENGLISH [17] Navigation keys Up, Down, Right, Left. In showShifter: allows you to select menu items (icons). While watching a DVD: allows you to navigate into the DVD menu. [18] Menu Toggle between full screen/window screen. [19] Exit Go back one level If your are in the DVD screen: go back to main ShowShifter screen. If you are in main ShowShifter screen: close ShowShifter. [20] While playing a DVD: fast backward (x2, x4, x8…). While playing a CD: fast backward. While playing audio file: previous track.
3.4. Minimum PC Requirements • • • • • • • • Pentium III 800 MHz. 64MB RAM (128MB recommended). Minimum 300MB free space on Hard-Disk (1 GB recommended). Windows 98SE/Me/2000/XP. Compatible with almost any sound card and TV tuner card (see www.marmitek.com for compatible devices). Latest version of DirectX (provided on CD). Latest version of Windows Media Player (provided on CD). Codec of the video files you want to play. 4. A/V Functionality 4.
[11] Numeric keys 0 - 9 Work the same way as your original remote. mode: select Home Automation module address. [12] Mute Allows you to turn on/off the sound. You can control the "Mute" function of your TV even when you are in VCR, DVD or SAT mode. No need to select the TV mode. mode: turns All Home Automation module off. [13] A/V Selection of an external source (SCART input). [14] --/If you are in programming mode - automatic code search - you can confirm the code of the device you want to control.
[23] Stop In VCR, DVD or CD mode: This button works the same way as in your original remotes. IN TV mode: Coloured key (Green), control of videotext or special equipment functions. [24] REC (record ) This key works the same way as the one on your original remote for your VCR. In order to avoid a mistake you have to press this key twice to activate this feature. [25] Pause In VCR, DVD or CD mode: This button works the same way as in your original remotes.
Note: if certain functions of your equipment can’t be controlled you will have to find a different code for your brand. 4.4. Automatic code search When searching an unknown code, you can step through the library automatically (AutoSearch). When your equipment responds, you can stop the searching process and store the code you found. Note: as you can dedicate any appliance (TV, DVD, SAT...
2. 3. 4. 5. Press the mode key (3) for the equipment you want to identify (TV, VCR, DVD, SAT or AUX). The LED blinks once. Press again SETUP. The LED blinks once. To identify the first digit press each number button from 0 - 9 (11) until the LED blinks. The number you pressed is the first digit of the code. Press each number key from 0 - 9 as above to find the second digit. Press each number key from 0 - 9 as above to find the third digit. When the third digit has been found the LED will go off. 4.7.
5.1. Changing the home automation House Code The preset house code is A and in the majority of cases it is not necessary to change this setting except if there is interference from neighbouring Marmitek X10 systems. In that case: 1. 2. 3. 4. Press and hold SETUP (4) until the LED lights continuously. Release the SETUP (4) button. Use the digit keys to enter the number equivalent to the chosen home code (1=A, 2=B, ... 16=P). Press the --/- (14) to confirm your command. The LED will turn off.
PC modes NO mouse or PC operation at all • ensure the remote is in PC mode by pressing the PC button before you operate the mouse pad, mouse buttons or any of the other keys. • Ensure that the CM21A Receiver is plugged into your USB port. • Ensure that a compatible driver is loaded (by installing ShowShifter software see 3.1). • Set the remote back to factory default (see end of this paragraph).
Allgemeiner Sicherheitshinweis Technische Manipulationen oder Veränderungen des Produktes sind aus Sicherheits- und Zulassungsgründen nicht gestattet. Bitte sorgen Sie dafür, dass das Gerät korrekt eingestellt ist - nutzen Sie Ihre Bedienungsanleitung. Kinder sollten das Gerät nur unter Aufsicht der Eltern benutzen.
5. 6. 4.4. Automatische Codesuche 4.5. Markensuche 4.6. Erkennungscode gefunden 4.7. Standardvolumensteuerung für Satelliten Steuerungsmodule Haustechnik 5.1. Verändern des Hauscodes für die Haustechnik 5.2. Programmieren des Haustechnik-Codes (IR oder RF) Fehlersuche 24 24 25 25 25 26 26 27 1. Einführung Die PC-Fernbedienung kann als drahtlose Maus und als allgemeine Fernbedienung verwendet werden.
3. 4. 5. 6. Installieren Sie DirectX9.0 von der CD-Rom oder laden Sie es von der Microsoft Webseite herunter: www.microsoft.com/directx/homeuser/downloads/default.asp Wenn auf Ihrem Computer Windows XP läuft, brauchen Sie DirectX nicht zu installieren, da es bereits installiert wurde. Wenn Sie komprimierte Videodateien und MP3-Dateien abspielen wollen, dann installieren Sie den Windows Media Player 9 von der CD-Rom oder laden Sie ihn von der Microsoft Webseite herunter: www.microsoft.
Computerbildschirm zu bewegen, und die 2 Drucktasten auf der linken und rechten Seite des Mauspads als linke und rechte Klicktaste. ShowShifter gestattet es Ihnen, um DVD, CDs, Video- und Musikdateien abzuspielen und live fernzusehen, aufzunehmen und anzuhalten (TimeShift). Die Fernbedienung bietet Ihnen direkten Zugang zu den ShowShifter-Funktionen (Abspielen, Pause etc. siehe Absatz 3.3 unten).
[11] Numerische Tasten 0 - 9 In ShowShifter: direkter Zugang zu den Menüpunkten (Piktogramme). Während Sie fernsehen: Direkter Zugang zu den Kanälen. Während Sie eine DVD oder CD abspielen: direkter Zugang zu den Abschnitten oder Titeln. Während Sie Audiodateien abspielen: direkter Zugang zu den Titeln (falls vorhanden). [12] Mute Schaltet den Ton Ihres Computers ein- oder aus (Stummschaltung). [14] --/Bestätigt die Auswahl in ShowShifter. [16] DEUTSCH [15] OK Bestätigt die Auswahl in ShowShifter.
Zeitverschiebungsmodus): Bei jedem Tastendruck 15 Sek., 30 Sek., 3 Min., 5 Min., etc. vorwärts bewegen. [22] : Abspielen Während Sie eine DVD, CD, Audiodatei, Videodatei abspielen: Abspielen der ausgewählten Datei, CD oder DVD. Wenn die Datei, CD, oder DVD angehalten wurde, beginnt Sie mit dem Abspielen wieder ab diesem Zeitpunkt. Während Sie fernsehen (im Zeitverzögerungsmodus): Fortsetzen Zeitverschiebungsmodus, das bedeutet, Sie werden wieder ab dem Zeitpunkt der Pause fernsehen.
[2] ROTE LED-Anzeige Die Anzeige blinkt, wenn die Fernbedienung in Betrieb ist oder leuchtet permanent, während Sie die Fernbedienung programmieren. [3] PC, TV, Videorecorder, DVD, SAT, AUX oder Haustechnik ( ) Diese Tasten ermöglichen die Auswahl der Anwendung, die Sie bedienen möchten.
[14] --/Wenn Sie sich im Programmiermodus - automatische Codesuche - befinden, können Sie den Code des Gerätes, das Sie bedienen möchten, bestätigen. Im Zusammenhang mit den numerischen Tasten gestattet Ihnen diese Schaltfläche bei einigen Gerätetypen, direkt Kanäle höher als Kanal 9 auszuwählen. [15] OK Bestätigt die Menüauswahl. [16] : Info: Zeigt Informationen über die ausgewählte Anwendung an. : Teletext AN: Startet/stoppt Teletext.
[25] Pause Im Videorecorder-, DVD- oder CD-Modus: Diese Schaltfläche funktioniert auf dieselbe Weise wie bei Ihrer Original-Fernbedienung. Im TV-Modus: farbige Taste (Violett), Steuerung des Videotextes oder spezieller Anlagenfunktionen. 4.2. Programmieren der TV-, Videorecorder-, DVD- SAT- und AUX-Modi 1. 2. 3. 4. 5. 6. Stellen Sie sicher das Ihr Gerät eingeschaltet ist (zum Beispiel TV). Drücken und halten Sie SETUP (4), bis die LED-Anzeige permanent aufleuchtet. Lassen Sie die SETUP-Taste los.
Die Suche beginnt nach dem letzten registrierten Code. Wenn dieser 030 war, dann beginnt die Suche mit 031 bis zum letzten möglichen Code und danach wieder von 000 bis 029. Hinweis: Wenn bestimmte Funktionen Ihres Geräts nicht gesteuert werden können, müssen Sie einen anderen Code für Ihre Gerätemarke finden. 4.4. Automatische Codesuche Wenn Sie einen unbekannten Code suchen, können Sie die Bibliothek automatisch durchlaufen (AutoSearch).
Taste --/-(14). Sollten Sie den Code versehentlich verpasst haben, können Sie die automatische Suche stoppen, indem Sie Channel- (9) drücken und dies wiederholen, um zum richtigen Code zurückzukehren. Drücken Sie zur Bestätigung --/-(14). 1. 2. 3. 4. 5. Drücken und halten Sie die SETUP-Taste (4), bis die LED-Anzeige (2) permanent aufleuchtet. Lassen Sie die SETUP-Taste los. Drücken Sie die Modustaste des Gerätetyps, den Sie identifizieren wollen (TV, Videorecorder, DVD, SAT oder AUX).
• Einschalten Ihrer elektrischen Wärmedecke vor dem Ende des Films, damit Sie es warm haben, wenn Sie ins Bett gehen. Zur Steuerung von Lampen oder anderer Anwendungen benötigen Sie zusätzliche Haustechnikmodule. Die Module werden einfach in den Wechselstromanschluss gesteckt, zusätzliche Leitungen sind nicht erforderlich. Für mehr Informationen besuchen Sie www.marmitek.com.
4. Die LED-Anzeige (2) erlischt, nachdem die letzte Ziffer eingegeben wurde. Wenn Sie einen falschen Code eingegeben haben, blinkt die LED-Anzeige 3 Sekunden lang und erlischt dann. Sie müssen wieder bei Schritt 2 beginnen. 6. Fehlersuche A/V-Modus • • • • • • • Prüfen Sie mit Ihrer Original-Fernbedienung, ob das Gerät einwandfrei funktioniert. Stellen Sie sicher, dass Sie die entsprechende Modustaste der Anlage oder des Gerätes, das Sie bedienen wollen, gedrückt haben.
Optimalisierung der RF-Reichweite Um die Reichweite voll ausnutzen zu können, ist es sehr wichtig, dass der Empfänger der PC Control möglichst weit von Ihrem PC aufgestellt wird. Dies, da der Mikroprozessor Ihres PCs die Empfangreichweite Ihrer PC Control durch RF-Strahlung stark beeinflussen kann. Wie ist die PC-Fernbedienung wieder auf die Fabrikeinstellung zurückzusetzen? • 1. Drücken und halten Sie die SETUP-Taste (4), bis die LED-Anzeige (2) permanent aufleuchtet. Lassen Sie SETUP los.
Conseils de sécurité générale Pour des raisons de sécurité, toute manipulation technique ou modification du produit est interdite. N’utilisez pas d’objet pointu ou en métal sur l’écran LCD. L’écran LCD étant fragile, n’appuyez pas fortement dessus. Consultez le guide utilisateur afin d’installer la télécommande correctement. Toute utilisation par un enfant doit être supervisée par un adulte.
5. 6. 4.5. Recherche par marque 4.6. Identification des codes trouvés 4.7. Contrôle du volume en mode satellite Contrôle des modules domotique 5.1. Changement du "code maison" (House Code) 5.2. Programmation du code domotique Pannes et problèmes de fonctionnement 38 38 39 39 40 40 41 1. Introduction La télécommande PC peut être utilisée comme souris sans fil et comme télécommande infrarouge universelle.
5. 6. Remarque importante pour les utilisateur de Windows 98 et Me Si pendant l’installation des pilotes X10 (X10 hardware (TM) Setup), le programme "Assistant Ajout de Nouveau Matériel" démarre, suivez les étapes suivantes (Assurez-vous d’avoir cliqué sur le bouton OK dans la fenêtre du "X10 hardware (TM) Setup" AVANT de passer aux étapes ci-dessous) a. Cliquez sur "suivant" dans la fenêtre. b. Sélectionnez "Rechercher le meilleur pilote pour votre périphérique (recommandé)" et cliquez sur "Suivant". c.
La souris vous permettra de contôler les logiciels qui ne sont pas supportés par ShowShifter tel que les présentations, les radio Internet, etc... Vous pouvez achetez la version complète et la plus récente de ShowShifter sur www.showshifter.com N.B. Pour lancer un DVD, assurez-vous que vous avez un lecteur DVD compatible installé sur votre ordinateur ainsi qu'un décodeur MPEG2.
[14] --/Confirme une sélection dans ShowShifter. [15] OK Confirme une sélection dans ShowShifter. [16] touche de zapping entre 2 formats d’écran: taille maximale ou minimale (plein écran ou fenêtré). retour au niveau précédent (ex: si vous êtes sur l’écran DVD, vous pouvez revenir à l’écran principal ShowShifter, si vous êtes sur l’écran principal de ShowShifter, vous pourrez fermer ShowShifter).
[23] Stop Lorsque vous regardez un DVD ou un fichier vidéo, ou que vous écoutez un CD ou un fichier audio: Arrête la lecture du fichier, du DVD, du CD. Lorsque vous regardez la TV (en mode time shift): sortie du mode time shift et retour à la chaîne TV sélectionnée (en direct) [24] REC (record ) Lorsque vous regardez la TV: démarre l’enregistrement de la chaîne visualisée. Appuyez 2 fois sur cette touche pour démarrer l’enregistrement.
[5] Mouse Pad réservée au mode PC [6] L réservée au mode PC [7] R réservée au mode PC [8] réservée au mode PC [10] Volume +/Réglage du volume. Vous pouvez commander le volume de votre TV même en mode VCR, DVD ou SAT. Inutile de sélectionner le mode TV. mode : Permet d’augmenter ou de baisser l’intensité lumineuse d’une lampe connectée à un module X10. [11] Clavier touches numériques 0 - 9 Pour les appareils A/V: Elles fonctionnent de la même manière que celles de votre télécommande d’origine.
[17] Navigation keys haut, bas, droite, gauche : permettent de naviguer dans le menu (TV, DVD etc ). [18] Menu Affichage du Menu. [19] Exit Effacement du Menu [20] Retour rapide. En mode VCR, DVD ou CD: elle fonctionne de la même manière que celle de vos télécommandes d'origine. En mode TV: La touche de couleur (Rouge), contrôle le vidéotexte ou certaines fonctions d’appareils bien spécifiques [21] Avance rapide.
3. 4. 5. 6. Appuyez sur la touche mode (3) de l’équipement que vous souhaitez commander (par exemple TV pour un téléviseur). A l’aide de la liste de codes, composez grâce aux touches numériques (11) le premier code à 3 chiffres correspondant à la marque de votre téléviseur. Après avoir entré le code, le voyant lumineux (2) s’éteint. Si le code entré est erroné, le voyant clignote 3 secondes puis s’éteint. Vous devez reprendre la procédure à partir de l’étape.
vous souhaitez programmer un SAT sous la touche VCR, entrez d’abord le code d’un satellite de n’importe quelle marque, selon la procédure décrite dans le § 4.2, puis suivez la procédure suivante 1. 2. 3. 4. Vérifiez que votre équipement est en marche. Sinon allumez le manuellement. Appuyez et maintenez la touche S (4) enfoncée jusqu’à ce que le voyant LED (2) demeure allumé en permanence. Appuyez sur le mode (3) de l’équipement souhaité (par exemple TV). La LED clignote une fois.
3. 4. 5. Appuyez de nouveau sur la touche SET UP (4). Le voyant clignote une fois. Pour identifier le premier chiffre appuyez sur chaque touche de 0 à 9 (11) jusqu’à ce que le voyant s’éteigne. La dernière touche sur laquelle vous avez appuyé correspond au premier chiffre du code. Appuyez sur chaque touche de 0 à 9, comme indiqué ci-dessus, pour identifier le deuxième chiffre. Appuyez sur chaque touche de 0 à 9, comme indiqué ci-dessus, pour identifier le troisième chiffre.
Pour allumer/éteindre des appareils branchés à un module domotique Appuyez sur la touche (3), taper le code unité du module sur le clavier numérique (11) puis enfoncer la touche Channel+/- (9) Pour faire varier l’intensité d’une lampe branchée à un module domotique Taper son code grâce aux touches numériques (11) puis appuyer sur Volume+/- (10) Pour allumer d’un seul coup TOUTES les lampes connectées à un module domotique Appuyer la touche Power (1) Pour éteindre d’un seul coup TOUS les modules domotique
6. Pannes et problèmes de fonctionnement Si la Télécommande ne marche pas ou a tendance à perdre les codes entrés • Vérifiez avec la télécommande d’origine que l’équipement fonctionne correctement • Vérifiez que vous ayez tout d’abord appuyé sur la touche correspondant au téléviseur TV, magnétoscope VCR, satellite SAT, etc. de l’équipement que vous désirez commander • Si le code de la liste que vous avez entré ne fonctionne pas, essayez le code suivant, ou bien utilisez la recherche automatique AUTOSEARCH.
Réinitialisation complète de la télécommande (programmation usine) • • • • Appuyez et maintenez la touche S (4) enfoncée jusqu’à ce que le voyant LED (2) reste allumé en permanence. Relachez la touche S. Appuyez et relâchez la touche STOP (23) 2 fois. Appuyez et relâchez la touche MUTE (12) Le voyant (2) s'éteint après quelques secondes Pour plus d'information, mise à jour logiciel ou questions, visitez le site www.marmitek.com.
Algemene waarschuwing Technische manipulatie of andere aanpassingen van het product zijn niet toegestaan om redenen van veiligheid en keuringen. Lees de gebruiksaanwijzing voor hulp bij het correct installeren van het apparaat. Gebruik van de afstandsbediening door kinderen alleen onder toezicht van een volwassene. Voorkom de volgende situaties • • • • overmatige mechanische slijtage en schade; hoge temperaturen; sterke vibraties; hoge luchtvochtigheid.
1. Inleiding De PC Control afstandsbediening kan worden gebruikt als draadloze muisbediening en als universele afstandsbediening. Om een pc te bedienen hebt u voor de afstandsbediening de draadloze USB-ontvanger CM21A nodig (maakt onderdeel uit van uw PC Control-kit). De afstandsbediening kan tot 6 apparaten bedienen (TV, VCR, DVD, SAT, PC en Home Automation-modules of een ander apparaat onder de AUX-knop). De afstandsbediening bevat een aantal voorgeprogrammeerde codes.
de CM21A aan te sluiten op de USB-poort van uw pc (deze gebruikt hetzelfde stuurprogramma als de CM19A USB Firecracker Transceiver). Klik op "OK". Hierna ziet u een Windows-bericht dat aangeeft dat nieuwe hardware is gevonden. Het CM21A-stuurprogramma wordt nu automatisch geïnstalleerd.
3.3 Functies van de knoppen in PC-modus [1] POWER Sluit het actieve programma. U kunt zelfs op afstand uw pc uitschakelen. [2] Rode LED-lampje Dit lampje knippert wanneer de afstandsbediening wordt geactiveerd of brandt continu wanneer u de afstandsbediening programmeert. [3] PC Druk op deze knop om de PC-modus te activeren en de muisknop en ShowShifter te gebruiken. [5] Muisknop Beweegt de cursor over het scherm. [6] L Linksklikken. [7] R Rechtsklikken. [8] Bevestigt de selectie in ShowShifter.
Skip : Tijdens het afspelen van een dvd, cd of geluidsbestand: naar vorige hoofdstuk of track. Skip : Tijdens het afspelen van een dvd, cd of geluidsbestand: naar volgende hoofdstuk of track. [17] Navigatieknoppen Naar boven, naar beneden, naar links, naar rechts. In ShowShifter: menuopties (pictogrammen) selecteren. Tijdens het afspelen van een dvd: navigeren in het dvd-menu. [18] Menu Heen en weer schakelen tussen volledig scherm en venstergrootte. [19] Exit Een niveau terug (bijv.
op Play, dan kunt u verder tv-kijken vanaf het punt waar u was gebleven, terwijl ShowShifter voor u blijft opnemen. 3.4 Minimale systeemvereisten • • • • • • • • • Pentium III 800 MHz 64 MB RAM (128 MB aangeraden) Minimaal 300 MB vrije ruimte op de harde schijf (1 GB aangeraden) Windows 98SE/Me/2000/XP Compatible met de meeste geluids- en en TV-kaarten. Zie www.marmitek.com voor compatible kaarten.
[9] CH +/Selecteer het volgende of vorige kanaal op uw tv of satellietontvanger. In DVD-modus het volgende of vorige hoofdstuk. modus: Schakelt de geselecteerde Home Automation-module aan of uit. [10] Volume +/hiermee regelt u het volume. U kunt het volume van uw tv harder of zachter zetten, ook wanneer u in VCR-, DVD- of SAT-modus bent. Hiervoor hoeft u niet over te schakelen naar de TV-modus. modus: Dimt de geselecteerde Home Automation-module.
[21] FF In VCR-, DVD- of CD-modus: deze knop werkt net zoals die op uw eigen afstandsbediening. In TV-modus: Gekleurde knop (blauw), bedienen van videotekst- of andere apparaatfuncties. [22] Play In VCR-, DVD- of CD-modus: deze knop werkt net zoals die op uw eigen afstandsbediening. In TV-modus: Gekleurde knop (geel), bedienen van videotekst- of andere apparaatfuncties. [23] Stop In VCR-, DVD- of CD-modus: deze knop werkt net zoals die op uw eigen afstandsbediening.
4.3 Handmatig codes zoeken Als uw apparaat (tv, satelliet, etc.) niet reageert, kunt u een andere code voor uw merk proberen. Reageert het apparaat nog steeds niet, probeer dan de methode "handmatig codes zoeken".
4.5 Merk zoeken Als uw merk hierna wordt genoemd, kunt u op merk zoeken (sneller dan handmatig en automatisch zoeken) Merk Code Merk Code Philips/Radiola 1 Telefunken/Saba/Normende 4 Sony/Panasonic/JVC/Sharp Akai/Toshiba/Daewoo 2 Grundig/Blaupunkt 5 Thomson/Brandt 3 Nokia/ITT 6 1. 2. 3. 4. Zet het apparaat dat u wilt besturen aan. Druk op SETUP (4) en houd deze knop ingedrukt totdat het LED-lampje (2) continu brandt. Laat SETUP los.
afstandsbediening voorheen het televisievolume in satellietmodus regelde, regelt het nu het volume van de satellietdecoder. Als het voorheen het volume van de satellietdecoder regelde, regelt het nu het volume van de televisie. 5. De Home Automation-modules instellen Met de PC Control Afstandsbediening kunt u elk willekeurig elektrisch apparaat in huis besturen.
Om de (AUX)-knop in te stellen op een infraroodsignaal gaat u als volgt te werk: Druk op SETUP (4) en houd deze knop ingedrukt totdat het LED-lampje (2) continu brandt. Laat SETUP los. Druk op de (AUX)-knop en laat deze los. Voer de volgende driecijferige code in: 821. Het LED-lampje (2) gaat uit nadat het laatste cijfer is ingevoerd. Als u de verkeerde code hebt ingevoerd, knippert het LED-lampje 3 seconden. Daarna gaat het lampje uit. U moet vanaf stap 2 herhalen.
De • • • Transceiver-module werkt, maar de andere modules reageren niet Controleer of de modules dezelfde HuisCode gebruiken als de Transceiver-module. Probeer de module in een ander stopcontact te steken. Stel de afstandsbediening in op de fabrieksinstellingen (zie einde van deze paragraaf). Optimaliseren van het RF-bereik Om maximaal van het bereik te profiteren is het belangrijk dat u de ontvanger van de PC Control zo ver mogelijk van uw PC af plaatst.