S AT E L L I T E T V R E C E I V E R S T R 36 2 22 TTWWIINN
❒ Useful Information – LNB power supply on/off. . . . . . . . . . . . . . . . . 14 – Contrast (video amplitude) . . . . . . . . . . . . . . . 14 – Audio settings . . . . . . . . . . . . . . . . . . . . . . . . . 14 Programming Additional Radio Programme Positions . . . . . . . . . . . . . . . . . . . . . . . . . . . . . . 15 Finetuning the Reception Frequency on Reception Unit B . . . . . . . . . . . . . . . . . . . . . . 16 Examples to Polarization/ Aerial Selection. . . . . . . . . . . . . . . . . . . .
General Useful Information Ǻ Ǻ 3 The GRUNDIG High-End twin receiver STR 622 TWIN is equipped with two reception units A and B. With these two reception units you can: – watch one satellite programme on a TV set and record at the same time another programme with a video recorder, or LNB Adjustment* Ǻ – watch two different satellite programmes on two TV sets, or – record two different satellite programmes on two video recorders.
❒ For this satellite receiver, technology and ecology form a convincing overall idea. Only ecologically high-grade materials are used. A high percentage of the plastic parts have been fabricated with recycled material. The batteries supplied are free of mercury and cadmium. To enable a high-grade recycling after use, the number of plastic parts has consequently been reduced. All large plastic parts are marked.
The Receiver at a Glance POWER Ǽ Ǻ TIMER EXIT OK STR 622 TWIN B ɩ Ƿ ǵ 1 2 B 3 4 A VCR TV TV INPUT-SAT 950-2150 MHz 14/18 V 350 mA É 5 6 7 VIDEO CONTROL R EURO AV TV EURO AV DECODER EURO AV VCR AUDIO OUT 220-240 V~ 50-60 Hz L 1 2 3 4 Rear Side Stand-by button.
All key functions and basic settings can be carried out using the TP 820 SAT universal remote control unit. 2 The remote control unit can also be used to control TV sets from GRUNDIG and many other makes (see chapter on “Universal Remote Control” on page 6). 3 4 5 ❒ Several keys on the remote control have special functions in the menu (see page 11).
The Remote Control ¢ Video mode*. Control of a video recorder by simultaneously pressing this key and the desired function key having the corresponding orange symbol. VIDEO ¢ĭ Mute sound; display: “SAT Mute”. Universal Remote Control 1 2 The TP 820 SAT Telepilot supplied can be used to control not only the STR 622 TWIN satellite receiver, but also many GRUNDIG SAT receivers and units of identical design of other manufacturers.
Connection Example R L HiFi-Amplifier A B VCR TV TV INPUT-SAT 950-2150 MHz 14/18 V 350 mA É ŀ Connection ŀ VIDEO CONTROL R EURO AV TV EURO AV DECODER 220-240 V~ 50-60 Hz EURO AV VCR AUDIO OUT L Decoder VCR 1 The 3 EURO-AV sockets on the satellite receiver have many uses. The drawing shows standard wiring. A second video recorder can be connected to the decoder socket (DEC). The menus can only be displayed via the EURO AV TV socket.
Connection How to Connect the SAT Aerial Reception of Two Satellites 1 Connect the satellite receiver (see connection example on page 7). 2 Select the AV programme position on the TV set. 3 The receiver is pre-programmed for an LNB-oscillator frequency of 9750 MHz. If a different LNB is used, the corresponding frequency must be entered in the menu. 4 If the aerial is correctly installed and directed at the desired satellite, the receiver will work at once.
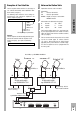
Reception of Four Satellites Ǻ For the reception of four satellites it is necessary to use a 22 kHz multi-switch and an additional ToneBurst switch (see figure). Explanation of terms used in the tables: Polarization: CL: Circular, left-handed CR: Circular, right-handed The following table shows the menu settings required for this. The settings are explained in the “Menu” chapter on page 13. Pol./Ant. : H a / D2MAC: Digital, can only be received with D2MAC decoder.
Using the Receiver (With the Keys on the Remote Control) ❒ ❒ ❒ 10 Use the ]| keys to step through the programme positions, or use the numeric keys to directly enter the programme position number. ❒ Ǻ Stand-by Use the b key to switch the receiver to stand-by. The programme position indications disappear on the receiver. The red LED for the reception unit A signals the stand-by mode.
Ǻ Ǻ Ǻ Ǻ Ǻ Ǻ The receiver is already preprogrammed to the current stations of many satellites (see Station table). The Menu Items 1 New stations arrive again and again and station frequencies are changed. The following sections describe how to make the required corrections. The current transmission frequencies can be called up via the teletext pages of various channels (e.g. SAT 1: Teletext page 675 or 3SAT: Teletext page 620) or they can be found in a satellite magazine.
The On-Screen Menu Guide 2 Use the ] | keys to select a programme position. Use the x c keys to go to the preceding or next page. Copying programme positions 1 Use the blue g key to copy the selected programme position. Press the g key to select the programme position to copy (indication: “Copy”). Select a not needed programme position (this will be overwritten) and confirm with the key. ❒ Pol./Ant. Ǻ Ǻ The SORT function allows you to swap the programme positions around.
Ǻ 1 As your receiver has 2 separate reception units but only 1 decoder socket, the decoder socket has been assigned at the factory to the reception unit A (setting: “Decoder: Vorrang A”). In order to make a connected decoder also available to the reception unit B, you must give priority to the reception unit B for the programme positions concerned. For this, select for the programmes which can be decoded by your decoder “Decoder: Vorrang B” in the first line of this sub-menu.
The On-Screen Menu Guide ❒ LNB power supply on/off LNB Spg. 1 : Ǻ 14/18 V In order to change the LNB power supply setting, press the . MENUE key when in the “LNB LO” line of the main menu. Ǻ LNB LO 1 LNB LO 2 LNB LO 3 LNB LO 4 : : : : 9,750 9,750 10,600 11,475 LNB Spg : 14/18 Volt ĵŁ ļĻ TXT = Exit 2 ❒ Ǻ 1 Ǻ Ǻ pos pos pos pos 2 Select the “Kontrast” line in the main menu. 3 Press the . MENUE key to display the following submenu.
For exceptional cases, the audio settings 24 to 32 are provided. You can define these settings as required in a sub-menu which is displayed by pressing the . MENUE key. Ǻ In the “Audio BW” (Bandwidth) menu line, the sound quality can be optimized. Programming Additional Radio Programme Positions Audio Nr : 1 Audio L Audio R : : 7,02 7.
The On-Screen Menu Guide 3 Copying the programme position: press the blue g RADIO key (indication: ”Copy”), move the marked programme position to the desired location and store with the O key. Exit the station table by pressing the 4 ¢ TXT EXIT key. 2 Ń! Select the “Audio” menu line then repeatedly press one of the x c keys until the desired radio station is found. The frequency of the sound carrier is shown between brackets.
Reception of two frequency ranges of one satellite with a universal twin LNB ❒ Reception of the high and low frequency ranges of two satellites with ToneBurst switch and quattro LNBs Universal Twin LNB, e.g. GRUNDIG LNC UNI T1 B A VCR TV TV INPUT-SAT 950-2150 MHz 14/18 V 350 mA É Quattro LNBs e.g. GRUNDIG LNC UNI Q1 1 VIDEO CONTROL R EURO AV TV EURO AV DECODER 2 220-240 V~ 50-60 Hz EURO AV VCR AUDIO OUT L Ǻ Meaning of the settings in the “Pol/Ant.” line of the main menu. Pol./Ant.
Video Recordings and Timer Menu Programming Video Recordings Ǻ 1. By means of the four integrated Timers, up to four programmes can be switched on and off on the reception unit B for recording at programmed times. 2. Via the VIDEO CONTROL socket, the satellite receiver can be controlled by a GRUNDIG video recorder which is prepared for this function. Depending on the video recorder, recording of up to 8 different broadcasts can be programmed. Ǻ Ǻ Timer programming is very easy.
Ǻ Ǻ 1 Ǻ In connection with the Timer of a GRUNDIG video recorder which is prepared accordingly, it is possible to switch the reception unit B on and off with a preselected programme position. In this case, Timer programming is exclusively performed on the video recorder. The reception unit B can be started and stopped with up to 8 Timers of the video recorder. The control signals are sent via a control cable from the video recorder to the receiver.
Opening the Special Menu Special Functions Ǻ 1 2 Security Function The special menu is provided for changing various basic settings. In order to prevent an inadvertent change of these settings, the access to this menu has been made more difficult. To access the special menu, first switch the receiver to stand-by by pressing the b key. Ǻ ❒ 1 Ǻ Then press the . MENUE key for 5 seconds. The special menu is displayed. 2 Ǻ IR Ebene : SAT 1 Security : ....
1 Ǻ 2 Ǻ 3 Ǻ 4 Ǻ ❒ Ǻ 1 Ǻ 2 Ǻ Open the special menu as described further up. When the security function is activated, “Security: * * * *” is displayed in the second menu line. Ǻ Use the | key to select this line and enter the fourdigit code with the numeric keys. After entering the correct code number, “Security : . . . .” appears in the second menu line. Enter the new four-digit code number with the numeric keys.
Reception range: Internal: 950 … 2150 MHz, two signal inputs LNB oscillator frequency: Freely selectable between 3.00 … 12.5 GHz in 1 MHz steps. Technical Data Tuning system: Frequency synthesizer with direct frequency entry. Finetuning in 0.5 MHz steps. Frequency search: ATS for horizontal and vertical polarization Stations: In total 250 TV and radio stations, last station memory Timer: Programming of 4 TV or radio programmes for reception unit B.
Possible cause Rectification Does not function No power supply Check mains power plug No picture or sound.
Menu Overview Main menu (if reception unit A is selected) . MENUE Programm Name Frequenz Pol./Ant Decoder : : : : : 1 A TV ARD . . 11494,0 MHZ Hor. / a 0 kHz Ein . MENUE . MENUE . . LNB LO Kontrast Audio : : : 1 3 1 MENUE MENUE (9,750 GHz) (37) (7,02 ST) .
GRUNDIG AG • D – 90762 FÜRTH Ķķ 8/43 (GDP) WÜ/NM 21618–941.