
Operation Manual


ENGLISH 11
INFORMATION
___________________________________
Before cleaning your appliance, turn off and
unplug.
Caution
7
Never use gasoline, solvent, corrosives, metal
objects or hard brushes for cleaning your ap-
pliance.
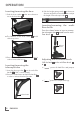
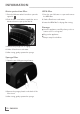
Replacing the dust bag
Replace the dust bag when the dust indicator on
the display
B
“ ” is on.
1 Press the lid button at the front side to open the
upper lid
C
.
2 Lift up the dust bag and remove it from the bag
holder.
3 Pull the dust bag from the bag holder to
remove it from its rails.
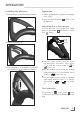
Holder
Bag
holder
Caution
7
The holder of the dust bag must be pushed
down into the bag holder so that the cover of
the vacuum cleaner can be closed.
7
Do not force the upper lid
C
to close it; oth-
erwise, the plastic components may get dam-
aged.
7
Do not wash a dust bag.
7
We recommend using dust bags of Swirl
®
,
Y 12
®
MicroPor
®
Plus or from Menalux,
Menalux1900 for VCC 9450 A. You may also
use similar sized dust bags of other brands.
7
Swirl
®
, Y 12
®
MicroPor
®
Plus are registered
trademarks of a company of the Melitta Group
which is not associated with Grundig.
4 Close the cover of the dust bag and dispose.
5 Insert the new dust bag into the bag holder.
Make sure it fits in the place properly.
6 Close the upper lid
C
of the appliance.
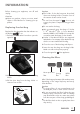
Cleaning the filters
Sponge
filter
Motor protection
filter
HEPA
filter
After 5 dust bag replacements (this number varies
depending on the usage frequency and area),
clean the filters.
Caution
7
For drying filters, do not use appliances such
as hairdryers, stoves or other sources of hot air.
7
Do not mount back the filters before they are
dried properly; otherwise a smell of humidity
may disseminate on the air, water may splash
from the rear part or filters may get damaged.
7
Put the filters back to their original place when
they are dry.