CONTENTS------------------------------------------------------------------------------------------------ 2 4 SET-UP AND SAFETY 8 CONNECTION/PREPARATION 8 9 Connecting the antenna and the mains cable Inserting batteries in the remote control 10 OVERVIEW 10 11 12 Connections on the television Controls on the television The remote control 14 SETTINGS 14 15 17 18 Searching for television stations Changing stored channels for digital stations Picture settings Audio settings 21 TELEVISION OPERATI
44 OPERATION WITH COMMON INTERFACE 44 44 Inserting the CA module Access control for CA module and smart card 45 SPECIAL SETTINGS 44 46 48 Tuning digital television stations Tuning analogue television stations Changing stored channels for analogue stations 50 INFORMATION 50 50 51 52 52 52 53 54 Displaying signal information Updating software Dismantling the stand of the unit Technical data Service information for dealers Environmental note Troubleshooting Additional Information for units sold in t
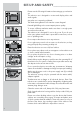
SET-UP AND SAFETY------------------------------------------------------------Please note the following information when setting up your television set. This television set is designed to receive and display video and audio signals. Any other use is expressly prohibited. The ideal viewing distance is 5 times the screen diagonal. External light falling on the screen impairs picture quality. To assure sufficient ventilation make sure there is enough space around it in the wall unit.
SET-UP AND SAFETY------------------------------------------------------------The screen of your LCD television meets the highest quality standards and has been checked for pixel faults. Despite the great care taken in manufacturing, technological reasons make it impossible to completely discount the possibility that some pixels may be faulty. Provided they are within the thresholds specified by the DIN norm, pixel faults of this kind cannot be regarded as a defect as defined by the warranty.
GENERAL INFORMATION---------------------------------------Special features of your television Your television set enables you to receive and watch digital stations (via DVB-T), including in High Definition (HD). At present, reception for these digital television stations in High Definition is only possible in some countries in Europe. This television can receive and process all analogue and all unencrypted digital stations. This television set has an integrated digital and analogue receiver.
GENERAL INFORMATION---------------------------------------Environmental Precautions If you will not be using the TV set for several days, the TV set should be disconnected from the mains for environmental and safety reasons. TV will not consume energy in this condition. As the TV set is not disconnected from the mains when the TV set is just turned off, pull the plug from the mains to disconnect the TV set completely. If the TV set has main switch, it will be enough to turn the TV off via main switch.
CONNECTION/PREPARATION----------------------Connecting the antenna and the mains cable 3 2 1 1 Plug the cable of the rooftop or indoor antenna (passive or active indoor antenna with its own power supply for digital television stations) into the antenna socket »ANT IN« on the television set; or plug the rooftop antenna cable (for analogue television stations) into the »ANT IN« socket on the television.
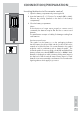
Connection/preparation----------------------Inserting batteries in the remote control 1 Open the battery compartment by removing the lid. 2 I nsert the batteries (3 x 1.5 V micro for example R03 or AAA). Observe the polarity (marked on the base of the battery compartment). 3 Close the battery compartment. Note: If the television no longer reacts properly to remote control commands, the batteries may be flat. Be sure to remove used batteries.
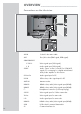
OVERVIEW----------------------------------------------------------------------------------------------Connections on the television AC IN Socket for the mains cable. AV1 Euro/AV socket (FBAS signal, RGB signal). COMPONENT 10 Y Pb Pr Video signal input (YUV signal). L R Audio signal input (YUV signal). SPDIF Audio output sockets (coaxial) for PCM/AC3 signals. For connecting to a digital multi-channel audio/video amplifier or AV receiver. PC Audio Audio signal input for PC.
OVERVIEW----------------------------------------------------------------------------------------------Controls on the television 8/I witches the television on and back into S standby. The only way to disconnect the television from the mains supply is to pull the plug. V– V + djust the volume. A Select menu functions. MENU pens the main menu. O Select menu item with »P+« or »P–«. Activate the function with »V+« or »V–«. Set the function with »V+« or »V–«. Switch off the menu with »MENU«.
OVERVIEW----------------------------------------------------------------------------------------------The remote control 8 Switches off the television set (stand-by). 1...0 Switches the television on from standby mode selects channels directly v Enlarges the picture. y Select different subtitles (in digital TV operation) d Select different language (in digital TV operation) Key has no function. ECO ? Displays the number and name of a station. ECO ECO mode on/off.
OVERVIEW----------------------------------------------------------------------------------------------5 elects different sound settings (in analogue TV S operation); switches to double character size in teletext mode; selects the next track/the next picture in the file browser. 6 elects various picture settings; S updates a page in teletext mode; selects the previous track/the previous picture in the file browser.
SETTINGS----------------------------------------------------------------------------------------------------Searching for television stations The television has an automatic tuning function, which first searches for digital TV channels and then analogue ones. You start the search and can then sort the television stations into your order of preference.
Settings----------------------------------------------------------------------------------------------------Changing stored channels for digital stations You can change the order of the channels found as required, delete channels you do not need and block access to certain presets (parental control). Press » « (blue) to switch between »Programme Table – ALL TYPE«, »Programme Table – DTV«, »Programme Table – RADIO« and »Programme Table – ATV«. Press » « (red) to display the channels assigned to a network.
SETTINGS----------------------------------------------------------------------------------------------------Creating a list of favourites You can select your favourite channels and save them in up to four lists (FAV1 to FAV4).
Settings----------------------------------------------------------------------------------------------------Picture settings 1 Open the menu with »i«. –The »PICTURE« menu is displayed. PICTURE Brightness Vivid 45 ●●●●●●●● Contrast ●●●●●●●●●●●●●● 88 Colour ●●●●●●●●●● 55 Sharpness ●●●●●●●●● 50 Colour Temperature Select Medium Z 3 Switch to the second menu page with »V« and confirm »Advanced Picture Settings« with »●«. Back Exit 4 Select »DNR«, »MPEG NR.
Settings----------------------------------------------------------------------------------------------------Audio settings 1 Open the menu with »i«. – The »PICTURE« menu is displayed. SOUND Volume ●●●● Balance ●●●●●●●●●●●●●● 29 AVL 0 Off Sound Type Stereo Sound Mode Normal Equalizer s Headphone 21 ●●● s Z Select 2 Select the »SOUND« menu with »<« or »>« and confirm with »●«. Note: Additional operations are explained in the following sections.
Settings----------------------------------------------------------------------------------------------------SRS TruSurround XT* SOUND Volume ●●●● Balance ●●●●●●●●●●●●●● AVL 29 0 Off Sound Type Stereo Sound Mode SRS 1 Select the »Sound Mode« line with »V« or »Λ«. Equalizer s Headphone 21 ●●● Z Select The equaliser offers you four preset sound settings (Music, Sports, Movie and Speech) and one which you can create yourself (User).
Settings----------------------------------------------------------------------------------------------------TruBass and Dialog Clarity The »TruBass« setting gives you an increased bass effect. »Dialog Clarity« recognises dialogue sections in audio recordings and improves dialogue reproduction. The two functions can be found on the second page of the »SOUND« menu. SOUND Audio Description s TruBass On Dialog Clarity Off Note: The »SRS« setting must be selected in the »Sound Mode« line.
TELEVISION OPERATION------------------------------------------Basic functions Switching on and off 1 Press »8«, »1…0« or »P+« or »P–« to switch on the device from standby mode. 2 Press the »8« button to switch the television to standby mode. Selecting channels 1 Use »1…0« to select channels directly. 2 Press »P+« or »P–« to move up and down channels. 3 Open the channel list by pressing »●«, select the station with »V« or »Λ«, press »●« to confirm the channel, then press »i« to switch off the channel list.
TELEVISION OPERATION------------------------------------------Freeze-frame If you wish to view a particular scene for longer, you can freeze the frame of the current programme. 1 Press »3« button. 2 To quit this function, press »3« again. Picture settings You can select different picture settings. 1 Select the desired picture setting from »User«, »Sports«, »Movie«, »Natural« or »Vivid« with »6«. – You can alter the »User« picture setting, see the ”Picture settings” chapter on page 17.
TELEVISION OPERATION------------------------------------------Zap function This function allows you to save the television channel which you are currently watching and switch to other channels (zapping). 1 Select the channel you want to save in the zap memory with »1…0« or »P+«, »P–« (e.g. channel 1, BBC 1) and save by pressing »Z«. 2 Change channels with »1…0« or »Λ« »V«. 3 You can now use »Z« to switch between the saved channel (in the example, BBC1) and the channel you were watching before.
TELEVISION OPERATION------------------------------------------Changing the picture format The television automatically switches to the 16:9 format if this format is detected via the Euro-AV socket. 1 Select the picture format with » « (blue). The selected picture format, for example »16:9«, appears on the screen. – You can choose between the following picture formats: »AutoMATIC« format The picture format is automatically switched to »16:9« for 16:9 programmes.
TELETEXT MODE----------------------------------------------------------------------------TOP text or FLOF text mode 1 Press »TXT« to switch to teletext mode. 2 Use »1...0« to enter the page number directly or »V« and »Λ« to switch up and down pages (to return to page 100, press »i«. Note: At the bottom of the screen, you will see an information line consisting of a red, green and, depending on the station, yellow and blue text field. Your remote control has buttons with the corresponding colours.
TELETEXT MODE----------------------------------------------------------------------------Page stop A multiple page may contain several sub-pages, which are automatically scrolled by the transmitting station. 1 Stop the sub-pages with »m«. 2 Press »m« to quit the function. Calling up a sub-page directly If the selected teletext page contains further pages, the number of the current sub-page as well as the total number of pages is displayed. 1 Call up the sub-page with »y«.
CONVENIENCE FUNCTIONS------------------------------Convenience functions 1 Open the menu with »i«. OPTIONS – The »PICTURE« menu is displayed. Language Settings s Restore Factory Defaults Country s Deutschland Game Mode Off Software Update s SPDIF Output PCM Z Select 2 Select »OPTIONS« with »<« or »>« and press »●« to confirm. Note: Additional operations are explained in the following sections.
CONVENIENCE FUNCTIONS------------------------------Game mode This function is only available for preset channels »HDMI1«, »HDMI2«, »HDMI3«, »YPBPR« or »PC«. OPTIONS Language Settings s Restore Factory Defaults Country s Deutschland Game Mode Off Software Update s SPDIF Output PCM Z Select 2 Press »<« or »>« to switch the function on or off. Back 3 Press »i« to end the setting.
CONVENIENCE FUNCTIONS------------------------------Changing the PIN code PARENTAL CONTROL Lock System Off Set PIN s Block Programme Parental Guidance Panel Lock s 4 Off Instead of the default code »0000«, you can enter a personal code. Please take note of your personal code. 1 Select »Set PIN« with »V« or »Λ« and press »●« to confirm. 2 Enter your new personal PIN code with »1 ... 0« in four digits. Z Select Back 3 Enter your personal PIN code again with »1 ... 0« and press »●« to confirm.
CONVENIENCE FUNCTIONS------------------------------Timer functions 1 Open the menu with »i«. TIMER Clock – The »PICTURE« menu is displayed. 19 /Jun 2008 14:35 Off Time Off On Time Off Sleep Timer Off Auto Sleep Off Time Zone Berlin GMT+1 Z Select Back 2 Select the »TIMER« menu with »<« or »>« and press »●« to confirm. Notes: The correct time is shown in »Clock«. Additional operations are explained in the following sections.
CONVENIENCE FUNCTIONS------------------------------Enter the switch-off time (Sleep Timer) TIMER Clock 19 /Jun 2008 14:35 Off Time Off On Time Off Sleep Timer Off Auto Sleep Off Time Zone Berlin GMT+1 Z Select In the »Sleep Timer« menu you can enter a time for the television to switch off. After this time has elapsed, the television switches to standby mode. 1 Select »Sleep Timer« with »V« or »Λ«. Back Exit 2 Select the switch-off time with »<« or »>«.
USB-MODE----------------------------------------------------------------------------------------------The file formats Your television can be operated via the USB input with the following file formats: MP4 video data The MP4 process was designed to compress video files. An MP4 video is an encoder/decoder, based on the MPEG-4 compression system, which is used to decrypt and display compressed video data. This enables the televsion to play back videos compressed in the MPEG 4 SP format.
USB-MODE----------------------------------------------------------------------------------------------Connecting external data media Before connecting the data medium, switch the television to stand-by with »8«. Connect the device and then switch the television on again. Before connecting the data medium, the television must first be switched to standby, otherwise files can be damaged.
USB-MODE----------------------------------------------------------------------------------------------The file browser The file browser displays the data (AVI., JPEG, MP3, MP4 or WMA data) that the external data medium offers. If a data medium contains different file formats, you can deactivate data you do not need for the playback using a filter function (All Supported, Text, Movie, Music, Photo).
USB-MODE----------------------------------------------------------------------------------------------Settings in the USB setup menu Opening the USB setup menu 1 Open the menu with »i«. – The »PICTURE« menu is displayed. 2 Select the »USB setup« menu with »<« or »>«. Note: Additional operations are explained in the following sections. Switching on automatic preview If the automatic preview is switched on, you can see the selected JPEG picture in the main menu of the file browser.
USB-MODE----------------------------------------------------------------------------------------------5 Select the track or picture with »V« or »Λ« and start play by pressing »8«. – You can view information on the film by pressing »?«. – For playing MP3 or WMA data, information on the album, track and singer is displayed at the right of the menu. – When playing picture data, information about the resolution and the size is displayed at the right of the menu.
USB-MODE----------------------------------------------------------------------------------------------Forward search (only MP4 video files) You can select different speeds (2-fold, 4-fold, 8-fold and 16-fold forwards and backwards). 1 Select the playback speed during playback by pressing »m« or »,«. 2 Press »8« to resume playback. Enlarge/reduce picture (only JPEG/MP4 video files) This function allows you to enlarge or reduce various picture sections. 1 Press »v« during pause or playback.
USING EXTERNAL DEVICES----------------------------------DVD player, DVD recorder, video recorder or set-top box Note: Which television socket(s) you connect your external devices to depends on the sockets the external device is equipped with and the signals which are available. Note that with many external devices the resolution of the video signal must be adapted to the input sockets on the television (check the external device’s instruction manual).
USING EXTERNAL DEVICES----------------------------------With an analogue video signal (progressive) Video signal: YUV; resolution: standard 576p; HDTV 720p, 1080i, 1080p. Audio signal: stereo, analogue. Channel position »YPBPR«. 1 Connect the »COMPONENT Y Pb Pr« sockets on the television and the corresponding sockets on the external device using cinch cables (video signal).
USING EXTERNAL DEVICES----------------------------------Using a video recorder, DVD player or set-top box 1 Switch on the video recorder, DVD player or set-top box and select the function you wish to use. 2 Press »AV«, select the input signal channel with »Λ« or »V « (»SCART«, »AV«, »S-Video«, »HDMI1«, »HDMI2«, »HDMI3« or »YPBPR«) and press »●« to confirm. Headphones Connecting the headphones 1 Plug the headphone jack (3.5 mm ø jack plug) into the headphone socket on the right side of the television.
USING EXTERNAL DEVICES----------------------------------Decoder or satellite receiver In order for the television to receive encoded programs from a privately operated station, a decoder is needed. Connecting a decoder or satellite receiver Decoder 1 Connect the »AV 1« socket on the television set and the appropriate socket on the decoder using a EURO-AV cable. Using a decoder or satellite receiver 1 Switch on the television and the decoder or the satellite receiver.
USING EXTERNAL DEVICES----------------------------------Camcorder Connecting the camcorder 1 Connect the yellow socket »Video« on the television and the corresponding socket on the camcorder (VHS, Video 8) with a cinch cable (picture signal); or connect the »S-VHS« socket (picture signal) on the television and the corresponding socket on the camcorder (S-VHS, Hi 8) with a S-Video cable.
PC MONITOR MODE-----------------------------------------------------------Connecting a PC 1 Connect the socket »PC-IN« on the television to the corresponding socket on the PC using a VGA cable. 2 Connect the socket »PC Audio« on the television to the corresponding socket on the PC using a cinch cable (audio signal). Note: Adjust your PC to the monitor (for example, picture resolution 1280 x 768, picture frequency 60 Hz).
OPERATION WITH COMMON INTERFACE Inserting the CA module Note: Switch off the appliance before inserting the CA module in the »CI« slot. 1 Insert the smart card into the CA module. 2 Insert the CA module with the smart card into the »CI« slot on the television. Note: To see which CA module is in the Common Interface slot, go to the »CA - Module« submenu. Access control for CA module and smart card 1 Open the menu with »i«. CHANNEL SETUP – The »PICTURE« menu is displayed.
SPECIAL SETTINGS------------------------------------------------------------------Tuning digital television stations This search deletes all television stations included in the channel list! Tuning all digital television stations using the search 1 Open the menu with »i«. CHANNEL SETUP – The »PICTURE« menu appears. Auto Tuning s Digital Manual Tuning s Analogue Manual Tuning s Programme Table s 3 Select »Auto Tuning« with »V« or »Λ« and confirm with »●«.
SPECIAL SETTINGS------------------------------------------------------------------Tuning analogue television stations This setting is only necessary if you cannot receive any digital stations and you have not carried out an analogue search during initial setup. The television station can be set directly or using the search. Switching the television to analogue channels 1 Open the »INPUT source« menu by pressing »AV«. 2 Select input source »ATV« with »V« or »Λ« and press »●« to confirm.
SPECIAL SETTINGS------------------------------------------------------------------Tuning the analogue television channels by entering the channel numbers 1 Open the menu with »i«. Analogue Manual Tuning System BG Current Channel S 21 Fine Tuning a s Search a s Programme No + 00 1 Skip Yes Frequency 443.25 MHz Save Select Z Back – The »PICTURE« menu appears. 2 Select the »CHANNEL SETUP« menu with »<« or »>«. 3 Select »Analogue Manual Tuning« with »V« or »Λ« and press »●« to confirm.
SPECIAL SETTINGS------------------------------------------------------------------Changing stored channels for analogue stations If channels were stored with the automatic channel search during the tuning of the television channels, you can delete them. You can also store stations in a different preset, change or enter the name of a stations as well as skip channels. Select channel lists 1 Open the menu with »i«. CHANNEL SETUP – The »PICTURE« menu is displayed.
SPECIAL SETTINGS------------------------------------------------------------------Skipping television channels You can highlight television stations to be skipped when you select with »Λ« or »V«. It is still possible to select using the number buttons. 1 In the »Programme Table« menu, select the desired channel with »Λ«, »V«, »<« or »>«. 2 P ress »>« to switch to the »-« symbol and press »●« to highlight the television channel. – The channel is marked with »-«. Note: Channels can be enabled again.
INFORMATION------------------------------------------------------------------------------Displaying signal information (only for digital television channels) 1 Open the menu with »i«. CHANNEL SETUP – The »PICTURE« menu appears. Autotuning s Digital Manual Tuning s Analogue Manual Tuning s Programme Table s Signal Information CA - Module Removed Active Antenna Power On Z Select s Back 2 Select the menu »CHANNEL SETUP« with »<« or »>«.
Information------------------------------------------------------------------------------Dismantling the stand of the unit If you want to attach your television to the wall with a wall bracket, you need to dismantle the stand. 1 Place the television carefully front down on a table on top of a suitable base, such as foam. 2 Unscrew the four screws (A). D A 3 Remove the stand (B). 4 Attach the cover (C) provided and fasten with two screws.
Information------------------------------------------------------------------------------Technical data Operating voltage: Power consumption: Max.
Information------------------------------------------------------------------------------Troubleshooting If the remedies given below do not work, please consult an authorised GRUNDIG dealer. Please bear in mind that malfunctions can also be caused by external devices such as video recorders or satellite receivers.
Information------------------------------------------------------------------------------Additional Information for units sold in the UK. Units sold in the UK are suitable for operation from a 240V ac, 50Hz mains supply. The range of multi-system receivers is built to work in most European countries. However, the mains plug and socket system for the UK differs from many European countries. This appliance has been supplied with a fitted, non-removable, approved converter plug for use in the UK.
Grundig Multimedia B.V. Atrium, Strawinskylaan 3105 • NL-1077 ZX Amsterdam • http://www.grundig.