G.T.POWER’ €6Djmin; 10A100W/ Mac Balance b er Operating Manual Thank you for purchasing the balance charger. This Is a rapid charger discharge with bully In balance, computerized with microprocessor and specialized operating software. Please read this entire operating manual completely and attentively before using.
Contents 1. Features 2 Exterior of the unit gloamings and safety notes 4 Program flow chart S.Initial Parameter set up (Users' set up) 6 Lithium 6.1 Charging Lithium Battery 6.2 Charging Lithium battery at balance mode 6.3 'FAST' charging Lithium battery 6.4 'STORAGE' contra! Lithium battery 6.5 Discharging Lithium battery -6.6 Voltage balancing and monitoring during the discharge battery program 74 Charging HARMONICA battery 7.2 Discharging HARMONICA battery 7.3 Cycling NMH & Ni Cd batteries 8.
Optimized operating software When charging or discharging, It has an AUTO" function that chats tha feeding current automatically. Especially for Lithium batteries, It can prevent the over-charging can lead to an explosion by users fault. Every program In the unit Is controlled with mutual links and communication for every possible error so it Introduces a maximum safety. These can be set at users option.
Maximization — Delta-peak sensitivity: The automatic charge termination program works on the principle of the Delta-peak voltage detection. (NICENESS) Aug-charge current limit: When charging NIC or NIGH at ‘AUTO current mode, You can set the upper Iimkt of change current to avoid from high current charging. This is very useful when charging the low impedance and small capacity Nigh battery In AUTO" mods. Capacity mit: The changing capacity sways calculated by multiple of the charging current and time.
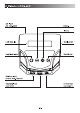
AC Input AC 100-240V DEC} INC{+) LED Display Caving fan Stop/Main menu Balance lead socket XH2 54 ports Cheeseparing connector
+ Never leave the charge unsupervised when It Is connected to Its power supply. If any malfunction Is observed Immediately terminate the process and refer to the operation manual. + Keep away the unit from dust, damp, rain, heat direct sunshine and vibration. Do not drop It. + The culture of the unit is designed to be powered by a 100-240V AC only. + This unit and the battery to charge or discharge should bs set up on a headmistress, non-Inflammable and non-conductive surface.
+ Do not attempt to disassemble tha battery pack arbitrarily. You have to pay attention to verify the capacity and the voltage of the Lithium battery pack It may be composed of parallel and series connection mixed. In parallel Ink the capacity of the battery pack Is multiples by the number of calls but the voltage remains same. That kind of voltage Imbalance causes a fire or explosion during charge process. We recommend you comps the Lithium battery pack In series only.
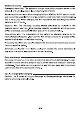
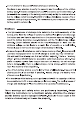
= og EEE ES CAREER Shi Shi He = Lad 5 Oli SEED EEE Tomes inst] = Prion o> Bsn Er s REE IRE = td Es EEE ES SEE as a) EE ERE 5
5. Finial Parameter set up (Users set uj It will be operated with the default value of the essential user settings when It Is connected to power for the first time. The screen displays the following Information In sequence and the user can change the value of parameter on each screen, When you are willing to after the parameter value in the program, press Starts Enter key to make ft boink then change the value with INC or DEC key. The vagus wii be stored by pressing Start/Enter kay once.
«ee es You can set the maximum temperature at which the charger shooed allow battery to reach during charge. Once a battery reaches this temperature during charge, the process wil be terminated ta protect the battery. The battery is on the cyclic process of charge and discharge can often become warm after charge or discharge period. The program can Insert a time delay to scour after each charge and discharge process to allow the battery adequate time to cool down before being subjected to the next process.
Press Enter for 3 seconds to restore factory setting (default. This program aims to indicate the current software version number and hardware ID number. Use these programs only when charging a Lithium battery { LIO/LIPo/LIHV/LIFe) with nominal voyage of 3.6, 3.7V, 3.6V or 3.3V per cell, respectively. The charge current going Into the battery will vary depending on the chemistry types so It Is VERY IMPORTANT that you select the correct type for your bestiary.
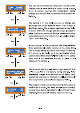
This shows the number of cal you set up and the processor detects. 'R:’ shows the number of cells found by the charger and ‘S:' Is the number of cells selected by you at the previous screen. If both numbers are Identical you can start charging by press Start/Enter button. If not, pass Bart Ty pa/ Stop button to go back to previous screen. Then carefully check the number of cal of the battery pack to charge again. The screen shows the present situation during charge process.
6.3 FAST charging Lithium battery — The charging current Is getting smaller as the process goes to the near end term of Lithium battery charging. To finish charging process earlier, this program eliminate certain term of CV process. Actually, the charging current will goes to 1/5 from the Initial value to end the process while the normal chafing goes to 1/10 during CV term.
6.5 Discharging Lithium battery The value of discharge current on the left side af screen may not exceed 1C for a maximum safety, the discharge current ranges from 0.1 to 20A and the final cottage on the right shooed not be under the voltages level that Is recommended by the battery manufacturer to avoid deep surcharging. To start to discharge, press Start/ Enter key for more than 3 seconds. This shows the present state of discharge. To stop discharging press Bart type/Stop key once. 6.
value using INC or DEC key The values wil be stored by pressing Start/Enter key onc. To start the process, press Start/ Enter button for more than 3 seconds. 71 Charging HARMONICA battery This program simply charge the battery using the current You set. In %' made, you need to set the upper Emit of charge current to vol from higher feeding current that may damage the battery.
73CygNMHANCdbatterles Set the sequence on the left and the number of cycle on the right. You can use this function for balancing, refreshing and break-in the battery. To avoid rising temperature of the battery, there will a brief cool-off period that already fixed at ‘User setting’ after each charge and discharge process. The eyeing number ranges from 110 5. To stop the process, press Bart type/Stop key once can change the discharge or charge current by pressing Start/Enter key once during the process.
The screen displays the state of charging process. To stop charging forcibly, press Bart type/Stop key once The audible sound Indicates you at the end of process. Set discharge current on tha left and final voltage on the right. The discharge current ranges from 04 to 208 To start the process, press Start/Enter key for mots than 8 seconds. The screen displays the current state of discharge. You can alter the discharge cement by pressing Start/Enter key during the process.
enter into it Show the data of Battery Pack IR. Press'INC' to check the total data of the Battery Pack again to back to show the data of the single call IR} Under the better type Interface, press “INC” or “DEC” key to select storage number for quick operation. Press" Enter” 1 ene, users can set end storage common data, set values wil automatically saved to corresponding storage number.
Displayed temperature cut-off function Is tum on. The external temperature s displayed when the temperature probe Is used. Int temperature Is displayed the Internal temperature of changer. The battery Is connected with each port through cable; you can check voltage of each cell In the battery pack When the cable is connected with the ports an the charger, the program will display voltage batteries.
Cottage of one cel in the battery pack is 10 low, please check the voltage of each cell Cottage of one cell In the battery pack Is toa high; please check the voltage of sate cell Wrong connection of the connector detach; please check the connector and cable. The Internal temperature of the unit goes too high. Cool down the unit. The processor cannot control the feeding current, please repair it. The battery balance port or the power ine to connect incorrect.