AccuTab VI 1
AccuTab VI 2 Table of Contents Introduction Parts Checklist What You Will Need to Use AccuTab VI PC Requirements For a USB Installation For an Optional Serial Installation AccuTab VI Overview Active Area AccuSet Menu Indicator Light Transducer Setting Up Your AccuTab VI Preparing the AccuTab VI Mounting on the Stand Attaching the Optional Accessory Tray or Plan Holder Software Configuration Configuring Non-Wintab Applications Installing the TabletWorks Driver Hardware Configuration Transducer Connection US
AccuTab VI 3 Mode Options Using the Tablet Configuration Utilities Learning the Basics Using the Cursor Learning Basic Movements Clicking and Double-Clicking Dragging Caring for the Tablet and Transducer Cleaning the Tablet Cleaning the Cursor Troubleshooting Tablet Checklist Computer Checklist Software Checklist Does the tablet work with some software? Did the software work in the past? Troubleshooting Chart Procedure A: Begin Troubleshooting Procedure B: Troubleshooting Returning your Tablet for Repair R
AccuTab VI 4 European Union WEEE Directive Bescheinigung des Herstellers/Importeurs Limited Warranty for the AccuTab VI 41 42 43
AccuTab VI 5 Introduction Designed for the GIS professional, the AccuTab VI series offers a variety of large format digitizers with the highest level of accuracy on the market today. Guaranteed superior data integrity and compatibility with the leading GIS hardware and software packages – including Class One compatibility with ESRI’s ARC/INFO® software – make the AccuTab VI the only choice for your GIS requirements.
AccuTab VI 6 applications have diverse requirements when interacting with a digitizer. AccuTab VI is designed to provide the appropriate serial requirements for a variety of GIS applications using a simple code system. The AccuSet Menu located at the top of the AccuTab VI is used to enter the appropriate code for the software being used. Table 1in Using the AccuTab Menu section of this manual lists the AccuSet Codes for a variety of GIS applications.
AccuTab VI 7 What You Will Need to Use AccuTab VI AccuTab VI is equipped with a standard USB interface and has an optional RS-232 serial interface. It is compatible with most industry-standard PCs. The TabletWorks CD contains drivers provided by GTCO CalComp by Turning Technologies and is the only software described in this manual. TabletWorks supports reduced functionality Wintab and TabConcompatible applications. If you are not sure which drivers are required, consult with your application vendor.
AccuTab VI 8 AccuTab VI Overview The AccuTab VI digitizer consists of: Active Area The drawing area – the Active Area – is that portion of the tablet surface designated for digitizing. Its boundaries are marked at each corner by a right-angle crop mark. AccuSet Menu Row of keys located across the top of the digitizer. It provides a means of configuring your tablet so that it sends the appropriate information for a serial connection to the software being used on the computer.
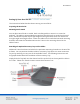
AccuTab VI 9 Setting Up Your AccuTab VI The instructions below describe how to set up your AccuTab VI. Preparing the AccuTab VI Mounting on the Stand You can place AccuTab VI on a table, desk or drafting table or mount it on a stand or pedestal. The tablet’s Universal Mounting Brackets attach directly to stands that have tilt arms. Stands with tilt pads require right-angle mounting brackets, which are attached to the right-angle mounting brackets.
AccuTab VI 10 Software Configuration Software drivers provide the communication bridge between your digitizing software application and AccuTab VI. You should install only the drivers necessary for the AccuTab VI to work with your application software. If you are not sure which drivers are required, consult with your application vendor. Configuring Non-Wintab Applications Many application programs provide configuration information for specific digitizers.
AccuTab VI 11 Transducer Connection 1. Connect the corded high-accuracy cursor to the appropriate jack on the digitizer’s Connector Panel. The connector is keyed and will fit only the correct jack. Do not force it. USB Connection The AccuTab VI USB port connection is USB 1.1and 2.0 compatible. When the digitizer is connected to the USB port, Windows will recognize that there is a new device connected.
AccuTab VI 12 Optional RS-232 Serial Connection 1. Connect the RS-232 serial cable to the serial jack on the Connector Panel. The connector is keyed and will fit only the correct jack. Do not force it. Join the other end of an RS-232 serial port on your computer. 2. Plug the power supply into an AC outlet. Connect the power supply to the appropriate jack on the AccuTab VI Connector Panel. Turn the power switch on.
AccuTab VI 13 tablet will beep four times. The Indicator Light will glow steadily when the transducer is inside the Active Area of the tablet. When the transducer moves outside the Active Area, the Indicator Light will go off. Using the AccuSet Menu [RS-232 Only] The AccuSet Menu is the row of buttons printed across the top of the digitizer. It allows you to configure your AccuTab VI to send the appropriate information through an RS-232 serial connection to the software being used on the computer.
AccuTab VI 14 The button toggles the digitizer alarm off and on. The grid in the Active Area. button tests the digitizer When using the AccuSet Menu, a tone will sound indicating a successful selection when you click on the button. Four tones will sound when you click on the button. (See the AccuTab VI Tones section of this manual for a complete table of the AccuTab VI tones.) The number buttons activate Select Mode.
AccuTab VI 15 2. Move your cursor around in the Active Area. If there is a break in the grid or the cursor is out of prox, the digitizer will beep. 3. Click the button again to end the test. NOTE: The following is relevant only for RS-232 serial installations. USB does not require configuration. Configuring Your AccuTab VI for Specific Applications To configure AccuTab VI for use with specific applications: 1. In Table 1, find the application program you will be using with your AccuTab VI.
AccuTab VI 16 You will hear four short tones, indicating that the configuration is complete. The AccuTab VI is now configured to operate with AutoCAD. Select Mode is no longer active and you can begin digitizing. NOTE: For more information about digitizer software application driver requirements, please visit the Technical Support section of the GTCO CalComp by Turning Technologies website.
AccuTab VI 17 Table 2: Configuration Details for AccuSet Menu Codes NOTE: Max = 100 coordinates/second lpi = lines per inch lpmm = lines per millimeter
AccuTab VI 18
AccuTab VI 19
AccuTab VI 20 AccuTab VI Tones The AccuTab VI produces an alarm in the form of audio tones to inform you of various events. The table below describes the kinds of tones you might hear while operating the digitizer. Table 3: AccuTab VI Tones NOTE: You might hear tones produced by AccuTab VI which are actually sent by your application program. (Programs can send commands to the digitizer to turn the audio tone generator on and off.
AccuTab VI 21 NOTE: This information applies to serial installations only. Introduction to the Tablet Configuration Utilities The AccuTab VI with its Controller uses the Tablet Configuration Utilities to control baud rate, data format and other operating characteristics for the RS-232 interface. It is used to relay configuration information to the AccuTab VI in cases where Table 1 and Table 2 do not supply the information or an AccuSet Menu Code for the graphic application software being used.
AccuTab VI 22 GTCO: Selects GTCO-compatible formats. See Advanced Programing Information in the AccuTab VI Online Help for greater detail on GTCO format structure. Choices are: Binary or ASCII. CalComp: Selects CalComp-compatible formats. See Advanced Programming Information in the AccuTab VI Online Help for greater detail on CalComp format structure. Choices are: Binary, ASCII 1, ASCII 2, ASCII 3 or ASCII 4. Summa: Selects Summagraphics-compatible formats.
AccuTab VI 23 Rate: Determines how fast output reports will be transmitted from the digitizer. Choices are: 12, 50 or 100 reports per second. Resolution: The smallest reported value returned by the digitizer. Choices are: 1000 lpi, 2000 lpi, 4000 lpi, 40 lpmm, 100 lpmm or 150 lpmm. See the Advanced Programming Information section in the Super L VI Online Help at www.gtcocalcomp.com for more details.
AccuTab VI 24 NOTE: The Tablet Configuration Utilities can use the TabletWorks driver to test the tablet, but it must be communicating directly with the tablet, via the Serial Port, in order to configure it. 5. Once the AccuTab VI has been found on a Serial Port, select Advanced Configuration from the Options dropdown list at the top of the screen. a. If Advanced Configuration is not an option, make sure Wintab Compatible Driver is not listed under Device Info. 6.
AccuTab VI 25 i. You can click on the AccuSet Menu buttons on the tablet using the tablet’s cursor to activate these configurations: through plus . 8. When you have finished, select Exit or Close from the File menu. a. Exit will close the Tablet Configuration Utilities. b. Close will exit the Advanced Configuration Screen and return to the Tablet Configuration Utilities window. Learning the Basics You will find that the AccuTab VI tablet is as easy or easier, than using a mouse.
AccuTab VI 26 button. The same procedure turns the illumination off. The illumination defaults to off when the tablet is first powered on. Since you will always need one right column button and one left column button free to control the cursor illumination, you should reserve one button in each column from any macro recording. Learning Basic Movements The AccuTab VI cursor provides all the basic movements of a mouse, including clicking, double-clicking and dragging.
AccuTab VI 27 Cleaning the Tablet To clean the tablet’s surface, use a soft, non-abrasive cloth. Hardened dirt can be removed with a slightly dampened cloth. Do not clean pencil lines with a soft cleanser or pencil eraser. This could create an undesirable shiny spot on the tablet’s surface that cannot be removed. Cleaning the Cursor To clean the cursor body, use a mild cleanser. Do not spray the cleanser directly on the cursor – instead, dampen a soft cloth with a mixture of water and the cleanser.
AccuTab VI 28 guide. The GTCOTEST application referenced there can be found in AccuTab VI Online Help. Record any unusual observations. Your notes will be useful if you need assistance from the GTCO CalComp by Turning Technologies Technical Support Team. 3. If your system still does not work. Call GTCO CalComp by Turning Technologies Technical Support at 1-866-746-3015 (in the U.S. or Canada) or email us at gtco.support@gtcocalcomp.com. Outside the U.S.
AccuTab VI 29 If your communications connection is USB, does the USB port work? If serial, does the serial port work? The only way to test the port without special equipment is to reinstall something that has worked in the past and see if it still works.
AccuTab VI 30 Reinstall the software from its master diskettes. The program files may have been corrupted. Troubleshooting Chart The following table lists common AccuTab VI problems, their causes and their solutions. Problem Frozen screen pointer Screen pointer appears to shake or jitter Cause Cordless transducer is in Sleep Mode. Solution Press any button on the cursor. Tablet plugged into the wrong serial port on the computer.
AccuTab VI 31 Unable to use the entire tablet surface Incorrect format selected. Software application set up incorrectly. Check your selections using the Tablet Configuration Utilities. Check that the tablet is identified in your software application. Procedure A: Begin Troubleshooting NOTE: This procedure should only be used to troubleshoot serial connections.
AccuTab VI 32 Procedure B: Troubleshooting
AccuTab VI 33 Returning your Tablet for Repair If you believe you have a defective tablet, first see all topics in this section (above) and visit our website at www.gtcocalcomp.com for the latest support information. If you’re still unable to properly operate your digitizer system, please call Technical Support at 1.866.746.3015 or email us at gtco.support@gtcocalcomp.com.
AccuTab VI 34 transducers get their power from the digitizer. Cordless transducers are powered by batteries. They will go into a battery-saving Sleep Mode when no button has been pressed for one to five minutes, depending on the type of transducer you are using. To reactivate a sleeping transducer, press one of its buttons. Cursors The optional cursors are similar in appearance to a mouse, except that they have an attached lens with crosshairs for highly accurate detail work.
AccuTab VI 35 sensitivity. The software assigns values to the pressure levels and uses this data to vary such parameters as line width and color. To use the pressure pen, press down on the tip and release for a mouse pick action. Press down and hold for the pressure action. Pressure increases as you continue pressing down on the tip. To decrease the pressure, ease up on the tip. Care and Maintenance Replacing the Pen Tip To replace the pen tip, grasp the tip and pull straight out (see figure).
AccuTab VI 36 Replacing the Cordless Pen Batteries The cordless pens require two 393 silver oxide batteries. The average battery life is 200 hours. To replace the batteries: 1. Unscrew the pen cap. Hold the pen from the bottom and gently slide off the pen cover to expose the batteries. 2. Remove the old batteries by turning the pen over and gently tapping it, letting the batteries fall into your other hand. 3. Insert the new batteries as they are shown in the figure above (+ towards pen tip). 4.
AccuTab VI 37 Replacing the Cordless Cursor Batteries The cordless cursor requires two AAA batteries. The average battery life for the cursor batteries is 2,000 hours. To replace the batteries: 1. Place the cursor face down in the palm of your hand. Use a Phillips screwdriver to remove the two screws located on the bottom of the cursor (see figure). Remove the cursor base. 2. Remove the old batteries from the battery casings. 3.
AccuTab VI 38 Transducers with the following FCC ID numbers support two frequencies: ECPPPP, ECPPP2, ECPPLTP, ECPPCURSOR4, ECPPCURSOR16 and ESPPCURSORII. Transducers with FCC ID numbers other than those listed must have their frequency changed by GTCO CalComp by Turning Technologies. Changing the Frequency of the Cordless Cursor 1. Place the cursor on the tablet surface. 2. Press Buttons 1 and 2 simultaneously and hold for approximately three seconds. 3. The cursor turns itself off.
AccuTab VI 39 user is encouraged to try to correct the interference by one or more of the following measures: Reorient or relocate the receiving antenna. Increase the separation between the equipment and the receiver. Connect the equipment into an outlet on a circuit different from that to which the receiver is connected. Reorient or coil cables. Consult the dealer or an experienced Radio/TV technician for help.
AccuTab VI 40
AccuTab VI 41 Japan European Union Emission Directive This product is in conformity with the protection requirements of EU Council Directive 89/366/ECC on the approximation of the laws of the Member States relating to electromagnetic compatibility. This product has been tested and found to comply with the limits for Class B Information Technology Equipment according to CISPR 22/European Standard EN55022.
AccuTab VI 42 Bescheinigung des Herstellers/Importeurs Heirmit wird bescheinigt, dass der/die/das AccuTab VI (Geraet, Typ, Bezeichnung) im Uebereinstimmung mit den Bestimmungen der Vfg 1046/1984 (Amtsblattverfuegung) Funk-Entstort ist. Der Deutschen Bundespost wurde das Inverkehrbringen dieses Geraetes angezeigt und die Berechtigung zur Ueberpruefung der Serie auf Einhaltung der Bestimmungen eingeraumt. GTCO CalComp by Turning Technologies, Inc.
AccuTab VI 43 Limited Warranty for AccuTab VI GTCO CalComp by Turning Technologies, Inc. warrants these products to be free from defects in material and workmanship under the following terms. Complete and return the enclosed warranty registration card to ensure that your products are covered with this warranty. Coverage Parts and labor are warranted for two (2) years from the date of the first consumer purchase for the digitizer tablet, controller, transducers and tablet accessories.
AccuTab VI 44 2. Costs for initial technical adjustments (set up), including adjustment of user controls. 3. Certain shipping charges. (Payment of shipping charges is discussed in the next section of this warranty.) 4. Packaging costs. (Customers should keep their boxes.) Warranty Service Procedures 1.
AccuTab VI 45 consequential damages. The price stated and paid for the equipment is a consideration in limiting GTCO CalComp by Turning Technologies liability. Notice Some states and provinces do not allow the exclusion or limitation of incidental or consequential damages, so the above exclusion may not apply to you. This warranty gives you specific legal rights, and you may have other rights, which vary from state to state, or province to province.
AccuTab VI 46 Corporate Headquarters 14557 N. 82nd Street Scottsdale, Arizona 85260 Tel: 1-866-746-3015 Support: 1-866-746-3015 Fax: 480-998-1751 Copyright© 2014 GTCO CalComp by Turning Technologies, Inc. AccuTab VI is a trademark of GTCO CalComp by Turning Technologies, Inc. All other products and company names are the trademarks or registered trademarks of their respective owners. The information contained in this document is subject to change without notice.