Summagraphics 1 Table of Contents Overview Parts Checklist ADB Interface for the Microgrid III ADB Interface for the Summagrid III ADB Interface for the Summagraphics LCL ADB Interface for the Microgrid II Installing the Tablet Driver Removing the Tablet Driver Changing the Tablet Setup Tablet Mode (or Absolute Mode) Mouse Mode (or Relative Mode) Orientation Units Offset PixScale Mouse Button OK Origin on Screen # Mapping the Screen to the Tablet – the Viewport The Default Viewport How to Change the Viewpo
Summagraphics 2 Overview This manual is your guide to using the Summagraphics ADB interface with a large format Summagraphics tablet. Included is information on the Microgrid III, Summagrid III, Summagraphics LCL and Microgrid II tablets.
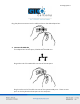
Summagraphics 3 2. Connect the Microgrid III to the computer. The ADB kit comes with a ten foot ADB cable. Plug either end of the cable into an ADB port on the Microgrid III controller. The controller has two ADB ports: plug the cable into either of the ADB ports. Plug the other end of the cable into one of the computer’s ADB ports. 3. Power up the Microgrid III 4. Turn on the computer. Your tablet is now up and running with the ADB interface. Note that the tablet comes up in mouse mode.
Summagraphics 4 9600 baud Even or odd parity Two stop bits Echo off Proximity Transmission on, “always transmit” 1000 lpi fixed resolution Binary format Stream Mode on UIOF format Summagrid III DIP Switch Settings Set A Set B Set C 1 ON OFF ON 2 OFF ON ON 3 OFF ON OFF 4 ON OFF ON 5 ON OFF * 6 ON ON * 7 OFF OFF * 8 OFF OFF * *factory set 2. Connect the tablet to the ADB adapter box. The ADB kit contains a PC cable with a 25-pin D connector and a phone connector.
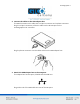
Summagraphics 5 Plug the phone connector into the tablet socket on the ADB adapter box. 3. Connect the ADB adapter box to the computer. The adapter box has two ports, labeled with the ADB icon: Plug either end of the ADB cable into one of the two ports. Plug the other end of the cable into one of the system’s ADB ports. There are two ports on the keyboard and two ports on the computer.
Summagraphics 6 4. Start the tablet. 5. Start the computer. Turn on the computer. The light on the ADB adapter box will be lit, indicating that it’s receiving power from the computer. (Although the ADB adapter box contains a power port, it receives power from the computer directly. The tablet receives power from the external power supply.) At this time, the tablet is working with your computer, but it is in mouse mode. For it to be in tablet mode, install the tablet driver.
Summagraphics 7 2. Connect the tablet to the ADB adapter box. The ADB kit contains a PC cable with a 25-pin D connector and a phone connector. Plug the 25-pin D connector of the PC cable into the RS-232 port on the Summagraphics LCL controller. Plug the phone connector into the tablet socket on the ADB adapter box. 3. Attach the ADB adapter box to the computer. The adapter box has two ports, labeled with the ADB icon: Plug either end of the ADB cable into one of the two ports.
Summagraphics 8 Plug the other end of the cable into one of the system’s ADB ports. There are two ports on the keyboard and two ports on the computer. 4. Start the tablet. Start the tablet as described in its installation guide. 5. Start the computer. Turn on the computer. The light on the ADB adapter box is lit, indicating that it is receiving power from the computer. (Although the ADB adapter box contains a power port, it receives power from the computer directly.
Summagraphics 9 Proximity Transmission, on “always transmit” Grid Diagnostics off, “no prompts to host” 1000 lpi fixed resolution Binary format Stream Mode on Microgrid DIP Switch Settings DIP Switch 1 (SW1) DIP Switch 2 (SW2) 1 ON OFF 2 OFF ON 3 OFF OFF 4 ON ON 5 ON ON 6 OFF ON 7 ON ON 8 OFF ON 2. Connect the tablet to the ADB adapter box. The ADB kit contains a cable with a 25-pin D connector and a phone connector. Plug the D connector into Port 1 (J4) on the Microgrid controller.
Summagraphics 10 3. Attach the ADB adapter box to the computer. The adapter box has two ports, labeled with the ADB icon: Plug either end of the ADB cable into one of the two ports. Plug the other end of the cable into one of the system’s ADB ports. There are two ports on the keyboard and two ports on the computer. 4. Start the tablet. Start the tablet as described in its installation guide. 5. Start the computer. Turn on the computer.
Summagraphics 11 Installing the Tablet Driver In order for the SummaSketch tablet to communicate with the software application, the system must contain a driver. A driver is a program that collects tablet data and converts it into information that can be read, understood and used by the application. The Summagraphics ADB driver is found on the Summagraphics ADB Utilities diskette that comes with the tablet.
Summagraphics 12 3. Click on Install to set up the driver. If you wish to install the driver on a disk other than a startup disk, select Switch Disk first to choose the appropriate disk drive and then click on Install. 4. When the driver installation is complete, the below screen appears: 5. Confirm that the tablet is turn on and click on Restart to restart the system. The tablet is now running under the driver. You install the driver only once.
Summagraphics 13 Removing the Tablet Driver If you need to remove the driver from your system, follow the steps listed below. 1. Insert the Summagraphics ADB Utilities diskette into your disk drive. The following window opens: 2. Double click on the Installer icon. The Easy Install dialog box appears.
Summagraphics 14 3. Select Customize. The below screen will appear. Highlight the items that you wish to remove by clicking on them. 4. Press Option on your keyboard. Notice that the Install button changes to read Remove. 5. While holding down the option key, select Remove. When the driver removal is complete, the below screen appears: 6. Click on Restart to restart the system.
Summagraphics 15 Changing the Tablet Setup The tablet is shipped in the following default setup: Mode: Orientation: Mouse Button: Units: Offset: PixScale: Screen: Tablet Landscape (applicable only for users with rectangular tablets) Button 1 Inches X = 1 inch, Y = 1 inch X = 72, y = 72 pixels per inch 1 (applicable only for users using multiple monitors) You may change the default setup options.
Summagraphics 16 Tablet Mode (or Absolute Mode) Coordinates are measured from the tablet’s origin. Each point on the tablet maps to its unique counterpart on the screen. Since there is a direct correlation between the tablet and screen, tablet mode is ideal for tracing and drawing. Mouse Mode (or Relative Mode) Tablet tracks like a mouse. The screen pointer only tracks when the stylus/cursor is moving. The main uses of mouse mode are pointer steering, clicking, dragging, etc.
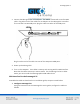
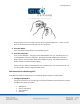
Summagraphics 17 Barrel Switch (Button 2) Tip Switch (Button 1) Button 1 Button 2 If you are using the 16-button cursor, you may select cursor switch 1 (button 1), cursor switch 2 (button 2) or both.
Summagraphics 18 OK When you’re finished making selections, click OK. OK implements and saves the changes. If you do not wish to implement the changes, select the close box in the upper left hand corner of the Control Panel window. The close box closes the utility, leaving the setup unaltered. Origin on Screen # This set up option is for Macintosh II systems with two or more monitors. It allows you to select the screen on which the tablet origin will be located.
Summagraphics 19 Mapping the Screen to the Tablet – the Viewport Viewport only applies when the tablet is in tablet mode. The viewport is in the area of the tablet that is directly correlated or mapped to the computer screen. This direct mapping of the tablet and screen is what gives you the ability to trace or draw with precision. When moving the stylus/cursor inside the viewport, the pointer tracks with it.
Summagraphics 20 How to Change the Viewport You can define the viewport size and shape with the PixScale function. You define the viewport location with the Offset function. Both of these options are available in the Control Panel under the SummaTablet icon. The Control Panel can be accessed at any time and change the tablet setup options without closing the application currently being used.
Summagraphics 21 Two scroll bars control PixScale. Each click on an arrow changes the PixScale by 1 pixel. Each click in the gray area changes the PixScale by 5 pixels. To make large changes, drag the scroll box. The minimum PixScale is 1 ppi. The maximum PixScale is 1000 ppi. These are extremes and it would be unlikely that you would use them. A PixScale of one means that moving the stylus/cursor one inch on the tablet would only move the pointer one pixel.
Summagraphics 22 along the Y axis. These resolutions do not correspond to the maximum screen dimensions, but only to the active area of the screen – the desktop. For tablet and screen images to have the same relative appearance, the viewport must have the same aspect ratio as the screen active area. Aspect ratio is the relationship of height to width or Y axis to X axis. If the ratio is different, the screen images are distorted.
Summagraphics 23 Scenario 3: The screen resolutions are X = 80 ppi, Y = 90 ppi. You want a one-to-one mapping of the screen and tablet. Use X PixScale = 80, Y PixScale = 90 Scenario 4: Enlarging a tablet image – you want the screen image to be twice the size of the tablet image. If the screen resolutions were X = 72 ppi, Y = 72 ppi, use X PixScale = 144, Y PixScale = 144. Scenario 5: Reducing a tablet image – you want the screen image to be half the size of the tablet image.
Summagraphics 24 Two scroll bars control the offset. Each click on an arrow changes the offset by 0.1 inch (mm). Each click in the gray area changes the offset by 0.5 inch (mm). To make large changes, drag the scroll box. You Can Define the Viewport Right Off the Tablet The maximum offset is the lower right corner of the tablet. The maximum offset places the viewport off the tablet entirely. To get out of this predicament, use the mouse to readjust the offset.
Summagraphics 25 Screen Pointing vs. Application Control The Summagraphics ADB interface box and driver conform to the Apple ADB digitizing tablet specifications and Tablet Memory Structure. These ADB specifications allow application software to utilize additional operating parameters that are different from the standard Control Panel setup options.