Super L III 1
Super L III 2 Table of Contents Standard Operating Information Parts Checklist What You Need to Use Super L III Caring for the Tablet and Transducer Cleaning the Tablet Replacing the Pen Tip Replacing the Pen Batteries Installing Super L VI Mounting a Large Super L III Tablet Connecting to Your Computer Connecting to the Power Supply Connecting the Transducer Applying Power to Super L III Configuring Your Computer Mounting the Transducer Holders Using the SuperSet Menu Configuring for Specific Application
Super L III 3 Changing the Frequency of the Cordless Pen Tablet Checklist Computer Checklist Software Checklist Troubleshooting Chart Super L III Specifications Advanced Operating Information Super L III Interfacing Character Format and Baud Rate Cabling Flow Control Remote Commands GTCO Super L III Commands Functional Control Commands Format Selection Commands Alarm Commands Diagnostic Commands Programming Example CalComp Emulation Commands Summagraphics Emulation Commands Command Mode Basics A Hint for P
Super L III 4 Line Incremental Mode Continuous Incremental Mode Remote Request Mode Controlling the Alarm Using Remote Commands Programming Examples General Product Information Radio and Television Interference Bescheinigung des Herstellers/Importeurs Limited Warranty for Super L III 67 68 68 68 69 71 71 72 73
Super L III 5 Standard Operating Information Parts Checklist Super L III Series digitizer with attached Controller Transducer (cursor or stylus) Power supply Computer interface cable with 9-pin connector and 9 to 25 adapter TabletWorks CD, which includes an electronic User’s Manual NOTE: Super L III Controller is the small enclosure attached to the back of the tablet. The Controller contains the electronics that drive the digitizer.
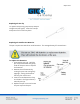
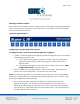
Super L III 6 Replacing the Pen Tip To replace the pen tip, grasp the tip and pull straight out (see figure). Insert the new tip and press until it clicks into place. Replacing the Cordless Pen Batteries The pen requires two 393 silver oxide batteries. The average battery life is 200 hours. To replace the batteries: 1. Unscrew the pen cap. Hold the pen from the bottom and gently slide off the pen cover to expose the batteries. 2.
Super L III 7 NOTE: When you replace the pen batteries, the pen will reset to the default frequency. If you changed the frequency of the pen before replacing the batteries, you will need to do so again after replacing the batteries (see the Reducing Monitor Interference section in Troubleshooting). Replacing the Cordless Cursor Batteries The cordless cursor requires two AAA batteries. The average battery life for the cursor batteries is 2,000 hours. To replace the batteries: 1.
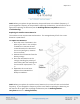
Super L III 8 Installing Super L III The following topics provide instructions for putting the Super L III system together and attaching it to your computer. NOTE: Before you begin, please take a moment to fill out and mail the Warranty Registration Card or register your digitizer on our website at http://www.gtcocalcomp.com/warranty-information. Mounting a Large Super L III Tablet Super L III can be placed on a table, desk or drafting table.
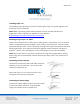
Super L III 9 Connecting the Transducer Six standard transducers are available for the Super L III. Cordless Stylus Corded Stylus Cordless 4-button Cursor Corded 4-button Cursor Cordless 16-button Cursor Corded 16-button Cursor If you are using a corded transducer, attach the connector to the jack labeled POINTER on the tablet’s Controller.
Super L III 10 Mounting Transducer Holders Each transducer comes with a holder. Remove the protective paper, exposing the adhesive layer on the bottom of the holder. Place the holder in a convenient location on the tablet, outside the marked active area. Using the SuperSet Menu Configuring for Specific Application Programs To Configure Super L III for Use with Specific Application Programs: 1. In Table 1, select the application program you will be using with Super L III.
Super L III 11 To cancel a menu selection before it is complete, digitize a point in the tablet’s main active area. Three long beeps will indicate that the SuperSet selection process has been aborted. The proximity light on the tablet will also flash three times. 4. Run the corresponding application program on your computer. NOTE: Hardware flow control is not support by the Super L III Controller.
Super L III 12 Table 1: SuperSet Menu Codes for Selected Application Programs
Super L III 13
Super L III 14
Super L III 15
Super L III 16
Super L III 17
Super L III 18 Table 2: Configuration Details for SuperSet Menu Codes NOTE: Max = 100 coordinates/second lpi = lines per inch lpmm = lines per millimeter
Super L III 19
Super L III 20
Super L III 21 Introduction to the Tablet Configuration Utilities The Super L III with its Controller uses the Tablet Configuration Utilities to control baud rate, data format and other operating characteristics. Communication Options Baud: The rate, in bits/second, at which characters are transmitted across the RS232C serial interface. Choices are: 1200, 2400, 4800, 9600, 19200 or 38400. Data Bits: Data bits represent the actual data being sent from one device to another.
Super L III 22 ASCII formats can be modified by including or excluding a button code, decimal point, carriage return or line feed, depending on whether GTCO, CalComp or Summa formats have been selected. Button: Defines whether the Pushbutton (Pb) value is included in the ASCII output report. This option is available only with GTCO formats. Choices are: Include or Exclude.
Super L III 23 Using the Tablet Configuration Utilities If your application is not represented in the SuperSet Menu and does not have a SuperSet Code or if a different configuration is required, you can use the Tablet Configuration Utilities to structure the Super L III. The Tablet Configuration Utilities replace the 24 switches that were associated with older Type 5A Controller and the Custom Configuration Menu Card used with the Super L II Plus.
Super L III 24 6. Select a predefined (01-89) SuperSet Codes or select one of the User Defined (90-99) SuperSet Codes to customize. a. User Defined (01-89) SuperSet Codes are initially read from the tablet when the Advanced Configuration screen opens. This is to prevent loss of custom settings. Selecting Read Current Settings from the Options menu will: i. Read the Power-Up settings and User Defined SuperSet Codes from the tablet. ii. Overwrite all Custom Settings not yet saved to the tablet. b.
Super L III 25 Controlling the Alarm There are five ways to toggle the alarm on or off and set the tone: Select the SuperSet Menu Alarm block (which toggles the alarm tone on and off). Use the following remote commands. Controlling the Alarm Using Remote Commands An alarm (audio tone) is provided so Super L III can inform you of certain conditions. The alarm can be enabled or disabled by the SuperSet Menu or commands.
Super L III 26 Resetting Super L III There are four ways to reset Super L III: Enter SuperSet code 00 on the SuperSet Menu Turn the power switch off and back on Unplug and re-plug power supply Send remote commands described in the Advanced Operating Information section When one of these events occurs, the Super L III will revert to the configuration that was last defined. Any remote commands that were active before the reset will be lost.
Super L III 27 Troubleshooting Guide As with any computer peripheral, Super L III problems sometimes do occur. This troubleshooting guide provides clear instructions for finding and solving all common Super L III issues. In a majority of cases, you will be able to quickly resolve the problem yourself by following the below steps. 1. Install properly first.
Super L III 28 Procedure A: Begin Troubleshooting
Super L III 29 Procedure B: Troubleshooting
Super L III 30 Procedure C: Troubleshooting
Super L III 31 Using GTCOTEST GTCOTEST is a program that runs on the PC. It can be used to perform communication and diagnostic tests on an installed Super L III. GTCOTEST is provided on the TabletWorks CD with your system. 1. Select SuperSet Code 01 on Super L III (9600, N, 8, 1, GTCO Binary, 1000 lpi, Cont, 100). 2. To run GTCOTEST, insert the TabletWorks CD in the CD-ROM drive. GTCOTEST will work only if no Wintab drivers are installed.
Super L III 32 When you move the transducer around the active area, the X and Y coordinate data should change. When you press different cursor buttons, the pushbutton code should change. If GTCOTEST indicates that the digitizer is functioning properly, check your software application setup and SuperSet code for accuracy. If you have any questions about your results or need assistance running GTCOTEST, contact our Technical Support Department.
Super L III 33 The power light will blink if the transducer has gone into sleep mode. Press any button on the transducer to activate it. If the power light continues to blink and the transducer is in the drawing area, change the battery. Are all cable connections tight? Power cable to serial connector? Pointer cable to tablet? Serial cable to tablet? Serial cable to computer? Check that the cable is connected to the serial port specified in your software package.
Super L III 34 Did the software work in the past? If the software package worked with the tablet in the past, then the problem lies with the new setup. Check all the connectors. Is the tablet still plugged into the same port? If yes, reset the tablet by turning the power switch OFF and ON. Also, you may want to restart the software.
Super L III 35 Screen pointer appears to shake or jitter Unable to use the entire tablet surface Software application set up incorrectly. Check that the tablet is identified in your software application. Another device is connected to a COM port that shares the same IRQ as the tablet COM port (i.e., tablet is connected to COM1 IRQ4 and the modem is connected to COM3 IRQ4). Move one of the devices to another COM port. Contact your system manufacturer for assistance in relocating the device.
Super L III 36 Super L III Technical Specifications Technology Resolution Absolute Accuracy Repeatability Proximity Self-Diagnostics Operating Modes Baud Rates Power Supply Operating Temperature Humidity Range Storage Temperature Altitude Range Certifications Cursor Switches Emulations Patented electromagnetic Up to 2540 lpi or 100 lpmm real resolution ± 0.010 inch 1 lease significant bit 1.0 inch (25.4 mm) on corded transducers and .
Super L III 37 Advanced Operating Information Super L III Interfacing NOTE: The following information is not required for normal Super L III operation. Connecting Super L III to a computer is a simple operation (see the Installing Super L III section in this manual). If you do not have a typical interfacing situation, the information in this section will help you set up the Super L III and connect it to another device.
Super L III 38 Data Terminal Equipment (DTE), such as printers, digitizers and computers, usually (but not always) transmit data on Pin 2 and receive data on Pin 3. Data Communications Equipment (DCE), such as modems, generally transmits data on Pin 3 and receives data on Pin 2. Thus, connecting a terminal (DTE) to a modem (DCE) may be as simple as connecting them with a straight-through cable that is wired pin-to-pin (i.e., 1 to 1, 2 to 2, etc.). The figure below shows such a cable.
Super L III 39 Your computer may have a 25-pin RS-232C connector, rather than a 9-pin connector. If so, use the 9- to 25-pin adapter supplied with Super L III. This figure shows how this adapter is wired internally. Flow Control Flow control is the process of regulating the traffic or flow of data between two RS-232C devices. Flow control prevents the transmission and subsequent loss of data if the receiver is not ready to accept it.
Super L III 40 There are two kinds of flow control: Software flow control is often used over communication links where only a 3-wire cable is used (Transmit Data, Receive Data, Ground), or over telephone lines. The sending device (such as Super L III) will immediately stop sending data when it receives an ASCII XOFF character (CTRL-S, hex 13). Transmission will resume when it receives an ASCII XON character (CTRL-Q, hex 11).
Super L III 41 Super L III responds to three kinds of commands: GTCO CalComp by Turning Technologies Super L III standard commands (with some omissions and additions) CalComp emulation commands Summagraphics emulation commands The topics listed below describe each kind of command.
Super L III 42 Functional Control Commands Reset Code: RS The Reset command will reset the Controller to the last known configuration, clearing all previous commands sent to the Controller. If a SuperSet Menu configuration has been selected, the Reset command will reset the Controller to the SuperSet Menu value.
Super L III 43 Read Current Coordinate Code: hex 02 (Ctrl-B) The Read Current Coordinate causes Super L III to output a coordinate while it is in Remote Request Mode. This command can be sent to the Super L III only when it is digitizing and only when Remote Request Mode has been selected by command RM. The Read Current Coordinate command will be ignored if the Super L III is in Command Mode. Please note that this command is not two ASCII characters. It is the one-byte-long STX character, CTRLB (hex 02).
Super L III 44 Set Digitizing Rate Code: Rx Coordinates can be sent from Super L III at rates from 5 to 100 coordinates per second. The second character in this command sets the rate, as shown in the table below. Actual rates are limited by the communication baud rate and coordinate type you have selected. The rates shown here are, therefore, maximum rates.
Super L III 45 Format Selection Commands ASCII Format Output Code: AS Command causes coordinates to be transmitted in ASCII. ASCII coordinates can be modified by the Low/High/Highest Resolution, Pushbutton, Space, Carriage Return and Line Feed commands and by menu settings. Binary Format Output Code: BI Command causes coordinates to be transmitted in binary format. Binary coordinates can be modified by the Low/High/Highest Resolution commands and by menu settings.
Super L III 46 Highest Resolution Code: H1 Command modifies ASCII and binary formats. If ASCII formats have been selected, the Highest Resolution command causes the least significant digits to represent 0.0005 inch or 0.01 millimeter, depending on whether English or metric scale has been selected. Both X and Y portions of each ASCII format will be six digits long. If binary formats have been selected, the least significant bits represent 0.0005 inch or 0.
Super L III 47 Sound Tone Code: T1 Tone Pause Code: T0 The Sound Tone command allows a remote device to sound the Super L III’s audible alarm. Tone Pause provides a pause between tones. Tones and pauses are in 0.25 second intervals. Tone commands are not affected by the Disable Alarm command. Diagnostic Commands Transmit Version Number Code: VR Command causes Super L III to determine and transmit the version number of the firmware currently installed.
Super L III 48 Programming Example: To Send Version Command and Display Results This QBASIC program interacts with Super L III in Command Mode. In this example, the program activates Command Mode, sends the VR command and displays the resulting firmware version transmitted by the Super L III. 1. Configure Super L III for 9600, N, 8, 1, GTCO ASCII and Point (SuperSet 42). 2. Enter and run this QBASIC program: CalComp Emulation Commands Super L III recognizes a subset of the CalComp 3400 command set.
Super L III 49
Super L III 50
Super L III 51 Summagraphics Emulation Commands Super L III recognizes a subset of the Summagraphics UIOF command set. Space does not permit a detailed description of Summagraphics commands. However, most of the commands in this subset have equivalent Super L III commands. For further information about the operation of those commands, please refer to the Super L III command or function description in the GTCO CalComp by Turning Technologies Super L III Command Summary.
Super L III 52
Super L III 53 Command Mode Basics To enter GTCO CalComp by Turning Technologies Command Mode: Send an ASCII CTRL-A (hex 01) character to Super L III. When Super L III receives the CTRLA, two things happen: Digitizing stops and new coordinates are not generated. If Command Mode is invoked during transmission of a coordinate, that coordinate transmission will be completed. Super L III sends a “>” (hex 3E) as a prompt to the commanding device. Super L III is now ready to accept commands.
Super L III 54 After the last command or if you are entering only one command, use an . The Escape delimiter takes you directly back to Digitizing Mode. If the command entered is not recognized as a valid command, it will be ignored and Super L III will send a “?” (question mark). If the delimiter following an invalid command was an (indicating your desire to leave Command Mode), Super L III stays in the Command Mode, awaiting a valid command.
Super L III 55 Advanced Programming Information NOTE: The following information is not required for normal Super L III operation. If you are programming for the Super L III product line, the topics listed below will be useful: Coordinate Formats Measurement Scales Digitizing Modes Controlling the Alarm Using Remote Commands Programming Examples These topics refer to commands that put Super L III in a different operating state.
Super L III 56 Binary Formats Binary formats encode coordinate information compactly. Binary coordinate formats are shorter than ASCII formats, transmit faster and take up less space if stored. On the other hand, binary formats cannot be directly displayed on a terminal or printed-they must be converted first into displayable characters. Binary formats use the high order bit in each byte as a synchronization bit. The first byte in each format has its high order bit set to 1.
Super L III 57 Table 4: GTCO/CalComp High Resolution Binary Format To set up the GTCO/CalComp Binary Format: Tablet Configuration Utilities: 1. Select GTCO Binary or CalComp Binary (under Output Format Options). 2. Choose the desired resolution (under Mode Options). GTCO Commands: 1. Send command BI for Binary format. 2. Send command IN for English or command MT for metric measurements. 3. Send command HR for 1000 lpi/40 lpmm or command H1 for 2000 lpi/100 lpmm resolution.
Super L III 58 Summagraphics Binary Format This eight-byte format is compatible with the Summagraphics 2000 lpi UIOF format. Table 5 shows the structure of this format at the bit level. To set up the Summagraphics Binary Format: Tablet Configuration Utilities: 1. Select Summa Binary (under Output Format Options). 2. Choose the desired resolution (under Mode Options).
Super L III 59 Low Resolution Binary Format Low resolution binary format conforms to an existing industry standard method of encoding small digitizer coordinate data. It is a fast, efficient and commonly used format. Low resolution binary formats are appropriate for applications needing low precision and using tablets up to 20” x 20”. This format is five bytes long and is frequently transmitted at 9600 baud. It is used whenever the system resolution is set to 100 lpi, 200 lpi or 10 lpmm.
Super L III 60 By examining the button code in the format, the application program can use this information appropriately. Binary formats include five bits which encode the button. The bits transmitted in the format depend on the button pressed. Table 7 and Table 8 show which bits will be sent.
Super L III 61 ASCII Formats ASCII is a commonly used method for encoding text. ASCII coordinate formats can be directly displayed on most printers and terminals, and can be easily handled by QBASIC programs. On the other hand, ASCII coordinate formats are longer than binary ones, so they take longer to transmit and they occupy more space when stored in memory. Table 9, Table 10 and Table 11 show the range of ASCII formats available on the Super L III.
Super L III 62 Tablet Configuration Utilities: Select the “Include” option for the corresponding character. GTCO Commands: Send command PI to include the Cursor Button Code character. Send command SI to include the Space character. Send command CI to include the Carriage Return character. Send command LI to include the Line Feed character.
Super L III 63 Table 10: CalComp ASCII Formats Table 11: Summagraphics ASCII Formats Cursor Button Codes in ASCII Formats When the cursor button code is included in an ASCII format, the character transmitted in the format depends on the button pressed. Table 7 and Table 8 show which character will be sent. Instructions in the previous sections show how to include or exclude the cursor button character in certain of the ASCII formats.
Super L III 64 Measurement Scales You can choose either English or metric scaling for the coordinates you digitize. Super L III applies the required conversion factor before constructing a coordinate format for output. The numbers appearing in coordinate formats depend on resolution. Table 12 shows how the resolution settings affect the data in coordinate formats. To set the measurement scale: Tablet Configuration Utilities: Select a resolution in the “Resolution” column of Mode Options. GTCO Commands: 1.
Super L III 65 Digitizing Modes Digitizing mode refers to the method Super L III uses to determine when to output a coordinate format. Six digitizing modes are available, but only one can be used at a time: Point Mode Line Mode (sometimes called Switched Stream Mode) Continuous Mode (sometimes called Stream Mode) Line Incremental Mode Continuous Incremental Mode Remote Request Mode Table 14 will help you compare digitizing modes.
Super L III 66 Table 13: Rate Commands Point Mode In Point Mode, one coordinate is sent when a transducer button is pressed. Output occurs only when the transducer is in the active area. To select Point Mode: Tablet Configuration Utilities: Select the Point option under Mode. GTCO Commands: Send command PT. Line Mode In Line Mode, coordinates are sent as long as a transducer button is pressed. Output occurs only when the transducer is in the active area.
Super L III 67 Note that digitizing rate is also dependent on the communication baud rate and format type you have selected. The rates shown in Table 13 are therefore maximum rates. Surprisingly, if your system seems to respond slowly to digitizer input, it may be because the digitizer coordinate output rate is set too high. This may occur when a program buffers excess coordinate data, thus causing a time delay.
Super L III 68 Continuous Incremental Mode In Continuous Incremental Mode, one coordinate is sent when the transducer is moved farther than a preset increment or a transducer button is pressed or released. Default increment is 0.01”. Output occurs only when the transducer is in the active area. To select Continuous Incremental Mode: Tablet Configuration Utilities: Select the “Cont Incr” option under Mode.
Super L III 69 To hear all tones, turn the alarm on: SuperSet Menu: Select the Alarm menu block. GTCO Commands: Send command AE. When you move the cursor over the Alarm block on the SuperSet Menu, the Proximity indicator (green) will light if the alarm is currently enabled.
Super L III 70 Programming Example: To Read ASCII Formats 1. Configure the Super L III for 9600, N, 8, 1, GTCO ASCII and Continuous (SuperSet 74). 2.
Super L III 71 General Product Information Radio and Television Interference The user is cautioned that any changes or modifications not expressly approved by the party responsible for compliance could void the user’s authority to operate the equipment. This equipment has been tested and found to comply with the limits of a Class B digital device, pursuant to Part 15 of the FCC rules. These limits are designed to provide reasonable protection against harmful interference in a residential installation.
Super L III 72 Bescheinigung des Herstellers/Importeurs Heirmit wird bescheinigt, dass der/die/das Super L III (Geraet, Typ, Bezeichnung) im Uebereinstimmung mit den Bestimmungen der Vfg 1046/1984 (Amtsblattverfuegung) Funk-Entstort ist. Der Deutschen Bundespost wurde das Inverkehrbringen dieses Geraetes angezeigt und die Berechtigung zur Ueberpruefung der Serie auf Einhaltung der Bestimmungen eingeraumt. GTCO CalComp by Turning Technologies, Inc.
Super L III 73 Limited Warranty for Super L III GTCO CalComp by Turning Technologies, Inc. warrants these products to be free from defects in material and workmanship under the following terms. Complete and return the enclosed warranty registration card to ensure that your products are covered with this warranty. Coverage Parts and labor are warranted for two (2) years from the date of the first consumer purchase for the digitizer tablet, controller, transducers and tablet accessories.
Super L III 74 GTCO CalComp by Turning Technologies will pay all labor and material expenses for covered items, but will not pay for the following: 1. Removal or installation charges. 2. Costs for initial technical adjustments (setup), including adjustment of user controls. 3. Certain shipping charges. (Payment of shipping charges is discussed in the next section of this warranty.) 4. Packaging costs. (Customers should keep their boxes.) Warranty Service Procedures 1.
Super L III 75 warranty above stated is otherwise applicable, it is expressly understood and agreed that GTCO CalComp by Turning Technologies sole liability whether in contract, tort, under any warranty, in negligence or other shall be for the repair or replacement of the defective parts and under no circumstances shall GTCO CalComp by Turning Technologies be liable for special, indirect or consequential damages.
Super L III 76 Corporate Headquarters 14557 N. 82nd Street Scottsdale, Arizona 85260 Tel: 1-866-746-3015 Support: 1-866-746-3015 Fax: 480-998-1751 Support: 1.866.746.3015 Copyright© 2014 GTCO CalComp by Turning Technologies, Inc. Super L III is a trademark of GTCO CalComp by Turning Technologies, Inc. All other products and company names are the trademarks or registered trademarks of their respective owners. The information contained in this document is subject to change without notice.