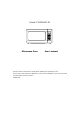
Model: P110N30AP-D2 Microwave Oven User's manual Please read these instructions carefully before installing and operating the oven. Record in the space below the SERIAL NO. found on the nameplate on your oven and retain this information for future reference. SERIAL NO.
PRECAUTIONS TO AVOID POSSIBLE EXPOSURE TO EXCESSIVE MICROWAVE ENERGY 1. 2. 3. 1. 2. 3. 4. Do not attempt to operate this oven with the door-open since open-door operation can result in harmful exposure to microwave energy. It is important not to defeat or tamper with the safety interlocks. Do not place any object between the oven front face and the door or allow soil or cleaner residue to accumulate on sealing surfaces. Do not operate the oven if it is damaged.
IMPORTANT SAFETY INSTRUCTIONS the fuse or circuit breaker panel. When using electrical appliances, basic safety precautions should be followed, including the following: d. Do not use the cavity for storage purposes. Do not leave paper products, cooking utensils or food in the cavity when not in use. WARNING - To reduce the risk of burns, electric shock, fire, and injury to persons or exposure to excessive microwave energy: 9.
appliance beneath this appliance. basement, near a swimming pool, or similar locations. 20. Be certain the glass tray and roller rings are in place when you operate the oven 16. Do not operate this appliance if it has a damaged cord or a plug, if it is not working properly or if it has been damaged or dropped. 21. This appliance should be serviced only by qualified service personnel, contact nearest authorized service facility for examination, repair, or adjustment. 17.
INSTALLATION GUIDE 1. 2. 3. 4. Make sure that all the packing materials are removed from the inside of the door. Check the oven for any damage, such as misaligned or bent door, damaged door seals and sealing surface, broken or loose door hinges and latches and dents inside the cavity or on the door. If there is any damage, do not operate the oven but contact qualified service personnel.
b) The extension cord must be a grounding-type 3-wire cord, and The longer cord should be arranged so that it will not drape over the counter top or table top where it can be pulled on by children or tripped over unintentionally.
8 Not Recommended the microwave. Glass jars and bottles — Regular glass is too thin to be used in a microwave. It can shatter and cause damage and injury. Metal utensils — These can damage your oven. Remove all metal before cooking. Paper bags — These are a fire hazard, except for popcorn bags that are designed for microwave use. Should you wish to check if a dish is safe for microwaving, place the empty dish in the oven and microwave on HIGH for 30 seconds.
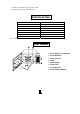
so that the heat disperses evenly. Add a small amount of water to dry food to help it cook. SPECIFICATIONS Power Consumption: 120V~60Hz, 1600W (MICROWAVE) Output: 1100W Operation Frequency: 2450MHz Outside Dimensions(H×W×D): 11.8×21.2×15.7 in. Oven Cavity Dimensions(H×W×D): 9.5×13.9×14.1 in. Oven Capacity: 1.06 cu.ft Cooking Uniformity: Turntable System Net Weight: Approx. 35.3lb. Note: The above data may be further confirmed or updated. PART NAMES 1. 2. 3. 4. 5. 6. 7. 8.
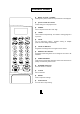
CONTROL PANEL MENU ACTION SCREEN Cooking time, power, indicators and present time are displayed. Q QUICK COOK BUTTONS Instant settings to cook popular foods Q POWER Use to set power levels other than high. Q TIMER Timer functions independently, even while a cooking program is in process. Q COOK Use for multi-stage cooking. Enables cooking at multiple power and time settings automatically. Q COOK BY WEIGHT Programmed cooking based on weight of foods cooked.
OPERATION INSTRUCTIONS SIGNALS DURING OVEN SETTINGS ONE SIGNAL: Oven accepts the entry. TWO SIGNALS: Oven does not accept the entry, check and try again. can set the power level from 0% to 100%. 3. SETTING THE CLOCK 1. Touch CLOCK pad. 2. Use the number pads to enter the correct time. 3. Touch CLOCK pad again. Touch START/STOP to start cooking. Use single digits to set a cooking power level: Number pad NOTE: ·This is a 12 hour clock.
2. Enter desired defrosting time by touching correct number pads. .22 to .27 4 .28 to .34 5 3. Touch START/STOP. .35 to .40 6 .41 to .46 7 .47 to .53 8 .54 to 59 9 .60 to .65 10 .66 to .71 11 .72 to .78 12 .79 to .84 13 .85 to .90 14 .91 to .97 15 above .97 go to next even NOTE: ·After time has elapsed four signals sound and END appears in display. Touch RESET pad or open door to clear END before starting another cooking function.
To set, press and hold RESET for 3 seconds. LOCK is indicated on the display. SETTING CHILD LOCK To cancel, press and hold RESET for 3 seconds. LOCK indication disappears. The safety lock prevents unsupervised operation by children. QUICK COOK SETTINGS The QUICK COOK settings allow you to cook or reheat food automatically without entering power level or time. For the large potatoes (8 to 10 oz. per entries): For smaller portions, simply touch the applicable pad and start.
dinners: 1. Touch FROZEN DINNER once. REHEAT 2. For 1 entree or 2 entrees, touch the number pad “1” or “2” For a plate of cool food(11-14 oz.) 3. Touch START/STOP pad. 1. 2. Microwaving one large (10-12 oz. per share) frozen dinner: 1. Touch FROZEN DINNER twice. 2. For 1 entree or 2 entrees, touch the number pad “1” or “2”: 3. Touch START/STOP. Touch REHEAT pad. Touch START/STOP. Note: This setting lets you reheat a dinner plate of chilled leftovers with good results. CLEANING AND CARE 1.