4+ INSTRUCTIONS FOR USE X500Pro FOLDABLE DRONE +1 718-312-0558 (US) +44(0)7723708421 (UK) +49 335-4551-9201 (DE) User Manual Accreditation standard: GB/T26701-2011 4K 5G WIFI Camera GPS tracking One key to retrun Circle flight Human tracking Palm control Optical flow positioning Take-off/landing Flight plan Waypoint flight Camera with 500 m Image transmission range (Please ensure your mobile phone supports with 5G WiFi ) Long battery life Dual-frequency technology
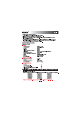
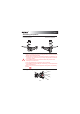
English Aircraft components ş ŝ Ś ś š Ŝ Ş Š Ś Motor ś Propeller blades Ŝ Power switch ŝ Front camera Ş Battery ş Front LED indicator Š Rear LED indicator š Bottom camera Remote control š Ś ś Ţ ţ Ŝ ŝ ŞşŠ ① Photo button ② Record button ③ Left joystick ④ On / Off button ⑤ One Key Take Off / Landing ⑥ Calibrating the compass ⑦ Home button ⑧ Phone holder ⑨ Lens up ⑩ Lens down Right joystick
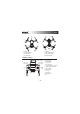
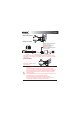
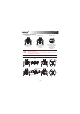
English Assembling the product Installing the propellers Clockwise propellers ! Anticlockwise propellers 3 3 2 2 1 1 Attach the propellers as shown in the diagrams above. Ensure that they are attached in the correct orientation. Ensure that the clockwise and anticlockwise propellers are attached to the correct arms. The aircraft will not fly correctly if the propellers are attached in the wrong position. The propellers are made from a delicate material.
English Charging the aircraft battery 1 Remove the battery 2 Charge the battery Indicator in slow flashing green: Charging in progress Indicator in constant green: Battery is fully charged Indicator in rapid flashing green: Battery is defective USB 1 Battery 2 USB charging cable 3 5V2A A adapter * Charge the aircraft with the USB charging cable that came with the product. * The battery will take longer to charge when you use an adapter with a smaller rated current.
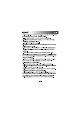
English Attaching the phone holder Open the remote control 1 2 2 Close the remote control 1 1 2 Inserting the remote control batteries 2 1 Switch off the remote controller during charging Charging : red light is on Finish charging: light is off 5V 1-2A * When installing the batteries, ensure that you match the + and – ends of the battery with the + and – signs on the controller.
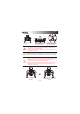
English 3 Calibrating the compass 2 1 Press to calibrating the compass ! Hold the aircraft horizontally and rotate 360 degrees for few time. Indicator flashes from slowly to rapidly. Hold the aircraft vertically and rotate 360 degrees for few times. Indicator flashes from rapidly to constant. Do not calibrate the compass near strong electromagnetic fields or large pieces of metal, e.g. magnetite, car parks or buildings with underground steel reinforcements.
English Turning the aircraft off Method one Method two Method three Push the left joystick downwards for 2-3 seconds. Push the left and right joysticks downwards in a V shape for 2 seconds. Press the take-off/landing button to make the aircraft land automatically and switch off. ! The aircraft will switch off automatically if its angle of inclination exceeds 90 degrees. Maximum radio-frequency power transmitted < 10 dBm.
English Flight modes Optical flow positioning Front indicator is constant white, rear indicator is constant yellow. ! If the rear indicator starts to flash rapidly, this indicates that the optical signal is weak and the aircraft cannot determine its position. Performance may be impaired in dark surroundings, areas with reflective surfaces (e.g. water), or at altitudes of more than 6 m. Optical flow positioning only supports altitudes of less than 6 m.
English ! Photo and video recording gestures cannot be used when the bottom camera is on. The camera may accidentally take a photo or start a video recording if there are surrounding objects that resemble the or gestures. If there is no memory card in the aircraft, photos and video recordings will be saved to your phone. If there is a memory card inserted in the aircraft, photos and video recordings will be saved to the memory card and your phone.
English Low battery Automatic return due to low battery When the aircraft battery is low, the aircraft will automatically return to the take-off position. During the return flight, you can use the joystick to control the aircraft ascend, descend and move left/right in order to avoid obstacles. If the aircraft is further than 20 m from the landing position, the return flight cannot be terminated. If the aircraft is less than 20 m from the landing position, the return flight can be terminated.
English Accessories (available separately) The following section contains a list of optional accessories that are available to purchase. Accessories can be purchased from your local retailer. Please indicate your preferred colour when making your purchase.
English Warning: Changes or modifications to this unit not expressly approved by the party responsible for compliance could void the user’s authority to operate the equipment. NOTE: This equipment has been tested and found to comply with the limits for a Class B digital device, pursuant to Part 15 of the FCC Rules. These limits are designed to provide reasonable protection against harmful interference in a residential installation.
English
English
English