
User's Manual
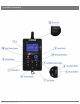


Controller Description
© 2016 Cine Gears INC. All Rights Reserved. 10
Photo Number: The number of REC Start/Stop triggers that the Pegasus will transmit to the camera;
each trigger will turn the recording on or off (if it is on, and receives a signal, it will turn off, and vice
versa).
Run Time: How long it takes the Pegasus to travel from the start to stop point during a single program.
Divide the run time by the photo number to determine how long the camera will record each shot.
Cycle Times: The number of program cycles (i.e., the number of times the Pegasus will travel between
the start and the stop points). One cycle is complete when the photo numbers have counted down to
zero and the Pegasus has traveled completely between the start and the stop places.
Photo Remain: How many photos remain to be taken during the active program.
Programming Automatic Mode
Begin by setting the start and stop places: this is the distance your Pegasus will travel to complete one
cycle.
Set press time: press time is not quintessential to the programming process, but make sure to set it at
a greater value than 1 second so recordings are not accidentally ceased when pressing the button
unintentionally.
Set photo number: This is the amount of times the camera will record; each value is either on or off, so
the amount of active recording times will be half the set value.
Set run time: this establishes how long one cycle will take; if there are too many photos for too short of
a run time, the controller interface will automatically set a mandatory minimum value for the run time.
Set cycle times: this feature is for repeated cycles, so if you want to repeat the program several times,
use the cycle times to tell the Pegasus how many times to repeat the program in succession.
Once your program is set, hold the Download Button to transfer it to the Pegasus. Press the Start button
to begin.
(5) V (Volt Output)
Actively monitors the volt output of the Pegasus. Both the Manual and Automatic modes show the
Volt Output at the bottom of the LED Screen, labeled V.
(6) Arrow Buttons
The 4 arrow buttons are used primarily for the navigation of the Auto and Manual mode parameters.
(7) Set Button
To navigate an options menu, press the Set Button.
Setting Menu Parameters
When in the menu screen, press the UP or DOWN arrows to cycle through the difference options.
Once you have selected the parameters you want to change (e.g., Max Speed), press the Set Button
once more, this will allow you to finely adjust the values of the parameters by pressing UP, DOWN,
LEFT, or RIGHT. UP and DOWN adjusts the quantity one unit at a time, and pressing left or right adjusts
the larger or smaller increments. Once you have set the desired parameters, press the Set Button one
more time to deselect the option; you can now scroll up and down along the column of options again.