
Product Manual
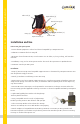


Guardian Fall Protection 6305 S. 231st St., Kent, WA 98032 phone: (800) 466-6385 fax: (800) 670-7892 www.guardianfall.com
4
Installation and Use
Prior to use, plan your system:
1. Ensure all PFAS equipment is selected and deemed compatible by a Competent Person.
2. Eliminate or minimize all risk of swing fall.
3. Determine desired location for HLL; ensure location is free of debris, rot, decay, cracking, and hazardous
materials.
4. Installation, set-up, and use of HLL system must be done under the supervision of a Qualified Person.
5. Maximum 2 workers per HLL System.
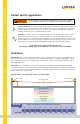
Installation:
1. Wrap (1) Cross Arm Strap around compatible support structure as determined by a Competent Person. Cross
Arm Strap must fit snugly to structure.
2. Attach (1) Carabiner to small O-ring on Cross Arm Strap.
3. Repeat steps #1 and #2 on opposite support structure for second Cross Arm Strap and Carabiner. Cross Arm
Straps must be directly across from each other, so that Lifeline will be completely level and not slope in any
way when installed.
4. Connect HLL to Cross Arm Straps. It is also permitted to connect HLL to anchorage connectors other than
Cross Arm Straps, provided applicable anchorage connectors are deemed compatible with HLL by a Competent
Person.
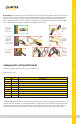
5. Tighten HLL by pulling loose Lifeline end through Rope
Tensioner/Ratchet Tensioner.
6. Using a compatible wrench or steel rod, tighten Rope
Lifeline by turning Tensioner Nut clockwise until rope slips.
7. Take excess Rope Lifeline and tie in knot close to Rope
Tensioner. For #04670, store excess Web Lifeline in Carrying Bag.
8. Attach complete and compatible PFAS to HLL O-ring. Maximum 1 connection per O-ring. Guardian Fall
Protection snap hooks and carabiners may be directly connected to Guardian rope HLLs, however connecting
to O-rings is considered best-practice use.
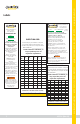
Ultra Sack (1)
Cross Arm Strap (2)
Carabiner (2)
O-ring (2)
Rope Tensioner (1)
Rope Lifeline (1)
Tensioner Nut