SlfiNIN~~IJ(_ User Manual ~~-r~ ~ Zhiyun
Disclaimers and warnings Shining User Manual Disclaimers and warnings Congratulations on purchasing your new Zhiyun product. Please read this manual and disclaimer carefully before using this product. By using this product, you hereby agree to this disclaimer and signify that you have read it fully. You agree that you are responsible for your own conduct and any content created while using this product, and for any consequences thereof.
Shining User Manual Shining Contents I, Disclaimers and Warnings II, Using the Manual Ill, Summary IV, Shining Introduction 1 .Shinning Features 2.Packing List 3.Shining Diagram 3 4 6 V, Getting Started 1 . 18650 Li-ion Battery 2.Turning on the Shining 3.Assembling the Handle Bar 4.1nstalling Handle Bar onto the Gimbal 5.Mounting the Camera 6.Configuring the Handle Bar 7 7 8 9 9 10 VI, Balancing 1 .Balancing the Vertical Tilt 2.Balancing the Roll Axis 3.Balancing the Tilt Axis 4.
Features Shining User Manual Shinning Features 1 .The first professional gimbal with removable 18650 batteries, advanced protection technology from overdischarge, reverse and over-current. 2.Each motor, with the automotive grade magnetic encoders, brings precise sine wave FOG, and very smooth torque. 3. Quick, simple and tool-less camera mounting system saves time and effort. 4.Multiple 1/4 inch screw thread brings more convenience for auxiliary equipment. 5.
Shining User Manual Packing List Gimbal x1 The Shining includes built-in Zhiyun motor drive modules, USB port, an external interface port, a 32-bit DSP processor, a battery protection module, a built-in wireless module, a built-in independent IMU module. Handle Bar x1 , Customizable handle bar for the gimbal. The handle bar is assembled from five parts, including a top handle, two handle bars and two grips. Li-ion Battery Charger x2 Customized for 18650 Li-ion Battery.
Shining User Manual Micro-USB Cable x2 For upgrade and batteries charge. Camera Mounting Plate x1 For mounting your camera onto the gimbal.
Dlegrem Shining UMr llenuel Shining Diagram [16] 1.1/4 Screw thread 2.3/8 Screw thread 3. Top Handle Bar 4.Side Handle 5.Quick Release Mount 6.Pan Motor 7.Pan Aqjustment Slider 8.USB Port 9.Power Button 1O.Batteries compartment 11.Roll Motor 12.TIIt Motor 13.Fore and Aft Adjustment 14.Tilt Vertical Adjustment 15.Roll Adjustment 16.
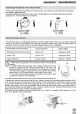
Shining Uaer llanual Getting Started 18650 Li-ion Battery Zhiyun 18650 Li-ion battery was specially designed for the Shining. Before you start using your Shinning, be sure to charge the battery with Zhiyun approved charger. When the 18650 Li-ion batteries are fully charged, the Shining has a maximum run-time of six hours. (When installing the batteries, please note the cathode and anode.) Power Protection Over-Discharge Protection Discharging stops automatically when the battery voltage reaches 3.
Shining User Manual Getting Started Assembling the Handle Bar l.Adjust the handle bar to the angle you need, then tighten the screw. If a re-adjustment of the angle is needed, loosen the screw and pull the handle in radial direction, when the angle is proper, tighten the screw again. 2.Attach the handle bars to both sides of the top handle and tighten the grip screws. 3.Attach the grips to the handle bar and lock them in the preferred position.
Getting Started Shining User Manual Installing Handle Bar onto the Gimbal 1.Piace the handle bar in position as shown below, then slide it horizontally into the gimbal and tighten the lock-knob. 2.Hold the gimbal by the grips, make sure that the gimbal is not obstructed during a 360 degrees pan. The installation is complete. Mounting the Camera The Shining uses an adjustable camera mounting plate that allows you to easily balance, install and remove the camera.
Shining User Manual Getting Started Why do you need a lens support? Certain cameras have a very tight lens securing system, and some cameras such as the Canon 50 MK II and MK Ill have very loose lens securing systems. The Shining balances the camera as one solid unit. If the mounted camera has a loose lens securing system, the lens support must be used.
GeHing Started Shining User Manual 2.Remove the grips from the handle bar. 3.You can remove one or both sides of the handle bar. 4.The resulting configuration is shown below. Balancing To obtain the best performance from the Shining, proper balancing is a must. Accurate balance is critical for shots where the Shining will be subjected to extreme movements or acceleration (running, horseback riding, biking, car mounts, helicopters, etc.). proper balance will also offer a longer battery runtime.
Shining User Manual Step 1: Balancing the Vertical Tilt 1 .Rotate the Tilt Axis so that the camera lens is pointing upward and loosen the two vertical adjustment tabs. 2.Gently slide the camera mount crossbar forwards or backwards until the camera points upwards when released. 3.Tighten the tabs and manually rotate the assembly, simulating tilt, to ensure there is no binding in the tilt motor. When proper balance is achieved, you can rotate the camera to any tilt angle, and it will stay in that position.
Shining User Manual Step 3: Balancing the Tilt Axis 1 .Loosen the camera base's side clamp to allow the camera and mounting plate to slide forwards and backwards. 2.Siide the camera forwards or backwards until the tilt axis remains level. Only very small adjustments are required to achieve the proper balance. 3.Tighten the side clamp to lock the camera and mounting plate in position. If properly balanced, the camera should be able to remain steady at any given tilt angle.
Shining User Manual Operation Modes The Shining can be used in two operation modes: Pan and Tilt Following Mode and Locking Mode. You can change to the Underslung Status, Upright Status and Briefcase Status at any mode. Note: modes only can be switched by using Zhiyun wireless controller or Zhiyun APP(Zhiyun Assistant). Underslung Status The Underslung Status is the default working status. Upright Status Flip the gimbal forward 180 degrees and it will automatically change to Upright Status.
Maintenance Shining User Manual Briefcase Status Briefcase Status allows you to hold the Shining in a narrow space , makes camera more flexible while shooting. To use Briefcase Status, tilt the gimbal go· to the left or right on the roll axis. Maintenance of Gimbal l.Balance the handle bar and keep the gimbal flat. (When putting the gimbal upside down, please ensure the ground is flat and the top handle bar should be down, otherwise the gimbal may fall forward and overturn.) 2.
Shining User Manual Product Parameter Specifications General Built-in Functions • Zhiyun motor drive modules ·Two Operation Modes • 32-bit DSP processor Pan and Pitch Following Mode • Battery protection module • USB connection Locking Mode • Built-in wireless module • External extended interface • Built-in independent IMU module Dimension 520 mm(W) x 260 mm(D) x 420 mm(H) Camera Tray Dimensions Maximum depth from the center of gravity on camera base plate: 120 mm Maximum height measured from top of t
Product Parameter Pan axis controlled rotation range - 360" +25" Tilt axis following rate 1" /S - 50" /S Pan axis following rate 1" /s - ao· /s Load Weight capacity (reference value) 350g - 3.6kg Battery run-time(25"C) - 6h - -10"C 25"C 45"C - 3.
Federal Communication Commission (FCC) Radiation Exposure Statement When using the product, maintain a distance of 20cm from the body to ensure compliance with RF exposure requirements. FCC statements: This device complies with part 15 of the FCC rules. Operation is subject to the following two conditions: (1) this device may not cause harmful interference, and (2) this device must accept any interference received, including interference that may cause undesired operation.