
User's Manual


ITALIANO
Русский
ESPAÑOL
PORTUGUES
NEDERLANDS
DEUTSCH
ENGLISH FRANÇAIS
Hercules HWNP-300
Quick Start Guide – 3/6
Windows Vista
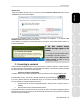
- When the installation Assistant asks you if you wish to install the Hercules network card device, click the
Install button and continue the installation.
The Assistant automatically detects your adapter and continues the installation. If the Windows New
Hardware Found window appears, wait until it closes.
Once installation is complete, the Hercules WiFi Station N icon appears in the taskbar and WiFi Station N is
launched automatically.
If the New network device
installed message appears in the
taskbar:
- Do not click the information bubble: wait for
it to disappear or click the X to close it.
- Please refer to Chapter 5. Welcome to the
Wireless Attitude! for details on how to
configure your network.
2 - Connecting to a network
Thanks to the Hercules Wireless N PCI card, you have access to 2 methods to connect to a network: the quick
and easy method by clicking the button in the WiFi Station N interface, or the standard method by selecting
the network you wish to connect to in the list of networks.
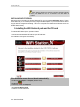
The button connection method (WPS):
The button method is only possible if the network to which you want to connect is equipped with the "WiFi
Protected Setup" function. This function is generally indicated by way of the WPS logo
.
If you own a Hercules device from the "Wireless N" range, you can use this connection method; if not, please
first verify whether your equipment features this function.
1. Press the button on the device managing the network to which you want to connect (a router, for
example).
2. Click the button located in the WiFi Station N interface.
The process takes about 2 minutes from the time you press the button on the device managing the network.
When this amount of time has elapsed, you will be connected to the network and you won't have to repeat this
procedure for the next connection.