HWNPCM-300 Hercules Wireless N PCMCIA CONTENTS Clicking on a title in this table of contents will display the corresponding section INTRODUCTION...................................................................................................................................4 1. HERCULES WIRELESS N PCMCIA SPECIFICATIONS ...............................................................4 1.1. 1.2. 1.3. 2. HERCULES WIRELESS N PCMCIA INSTALLATION............................................................
Hercules Wireless N PCMCIA 5. HWNPCM-300 WELCOME TO THE WIRELESS ATTITUDE!....................................................................... 26 5.1. 5.2. Some requirements.......................................................................................................... 26 Computers running Windows Vista: Sharing folders, a printer or an ADSL connection26 5.2.1. Enabling sharing .................................................................................................. 26 5.2.2.
HWNPCM-300 5.6. Hercules Wireless N PCMCIA Computers running Windows 98 SE: Sharing folders, a printer or an ADSL connection.....................................................................................................65 5.6.1. Windows 98 SE: Creating a workgroup ..............................................................65 5.6.2. Windows 98 SE: Sharing folders .........................................................................65 5.6.3.
Hercules Wireless N PCMCIA HWNPCM-300 INTRODUCTION A local area WiFi network allows users to easily exchange data between computers located in the same room or in different rooms, share an Internet connection and/or a printer among several computers, play network games and, above all, does away with the need for kilometers worth of cables.
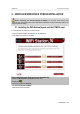
HWNPCM-300 Hercules Wireless N PCMCIA 2. HERCULES WIRELESS N PCMCIA INSTALLATION Before connecting your Hercules Wireless N PCMCIA, you must first install Hercules WiFi Station N, which includes the drivers and the WiFi Station N application, a utility for detecting networks and configuring network settings. 2.1. Installing the WiFi Station N pack and the PCMCIA card To install Hercules WiFi Station N, proceed as follows: - Insert the included installation CD-ROM into your CD-ROM drive.
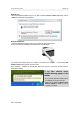
Hercules Wireless N PCMCIA HWNPCM-300 Windows Vista - When the installation Assistant asks you if you wish to install the Hercules network card device, click the Install button and continue the installation. Windows XP/2000/Vista - When the installation Assistant prompts you to connect your WiFi adapter, insert your Hercules Wireless N PCMCIA into the PCMCIA slot as shown below. The Assistant automatically detects your adapter and continues the installation.
HWNPCM-300 Hercules Wireless N PCMCIA Windows 98 SE/Me - Restart your computer when prompted to do so by the Assistant. - Once Windows has restarted, insert your Hercules Wireless N PCMCIA into the PCMCIA slot as shown below. Windows automatically detects your adapter and completes the installation. The Hercules WiFi Station N icon appears in the taskbar.
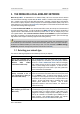
Hercules Wireless N PCMCIA HWNPCM-300 3. THE WIRELESS LOCAL AREA WIFI NETWORK What exactly is WiFi? An abbreviated form of “Wireless Fidelity,” WiFi is the commercial name for wireless local area network technology compliant with the 802.11 standard. Therefore a WiFi network is actually a 802.11 network, but it’s easier to talk about WiFi than the 802.
HWNPCM-300 Hercules Wireless N PCMCIA If you only have two computers and simply wish for them to be able to communicate with one another, the purchase of a router is optional. Without a router, however, your WiFi network will very soon be limited, should you wish to invest in a third computer for example, or if you want to share an Internet connection. To share an Internet connection, one of the two computers must be running and connected to an ADSL modem.
Hercules Wireless N PCMCIA HWNPCM-300 4. THE WIFI STATION N UTILITY The WiFi Station N utility has been specifically developed by Hercules for the Hercules Wireless N family of adapters. It allows you to get the most out of all your adapter’s functionalities via a user-friendly interface that is easy to operate and features a very high level of security, based on WPA-PSK and WPA2 encryption. 4.1.
HWNPCM-300 Hercules Wireless N PCMCIA You then have two minutes to press the WPS button located on the side of the Hercules Wireless N card and connect to the router. You won't have to repeat this procedure for your next connection. Your Hercules Wireless N card connects to your WiFi router using the security key defined on the router. If the connection is not secure, a WPA2 security key is generated automatically.
Hercules Wireless N PCMCIA - Click the HWNPCM-300 logo next to this option. Your Hercules Wireless N card connects to your WiFi router using the security key defined on the router. If the connection is not secure, a WPA2 security key is generated automatically. If the WPS router is only compatible with WPA keys (and not WPA2), a WPA key will be generated. 4.3.3.Connecting to a network with a PIN code - In WiFi Station N, go to the Connection page.
HWNPCM-300 Hercules Wireless N PCMCIA 4.4. Connecting to a network via the list of networks WiFi Station N opens by default to the Connection page and WiFi network detection begins automatically. The List of detected networks displays all secured, unsecured or hidden networks, whether Infrastructure or Ad hoc. To connect to an unsecured network (the value No appears in the Secure field): - Select the network you wish to connect to. - Click the Connect button.
Hercules Wireless N PCMCIA HWNPCM-300 - Enter the security key when prompted to do so by WiFi Station N. - If you wish, you can add the network to your Favorites by ticking the Yes box and giving it a name. If you wish to connect to a secure network, you must know the security key used. Before establishing a connection, WiFi Station N will prompt you to enter this key (a message will help you to identify the type of key required).
HWNPCM-300 Hercules Wireless N PCMCIA Windows Vista After establishing a connection to your network, Vista prompts you to select your network location: Home, Work, Public location. For our purposes, we will consider that you will be using your network at home, which will allow you as well as other network users to view the computers present on the network (the “See and be seen” principle, indispensable to be able to share folders, a printer and an ADSL connection).
Hercules Wireless N PCMCIA HWNPCM-300 4.5. Connecting to a network using the Connection Assistant If you can’t remember your network’s name in the list of networks detected by WiFi Station N: - Click the Connection Assistant button, accessible via the main WiFi Station N window. - Enter the first 6 characters your router’s MAC Address, without including any “:” or “-“ characters that may be present (this address is found on the underside of the router). - If the network is secured, enter the security key.
HWNPCM-300 Hercules Wireless N PCMCIA 4.8. Viewing connection settings Information in the Connection status zone is not accessible or modifiable. corresponding to the network to which the computer is connected: It includes all settings - Network Name (SSID): the SSID (Service Set Identifier) is the unique name shared by clients and the access point in a wireless network.
Hercules Wireless N PCMCIA HWNPCM-300 4.9. Viewing, modifying or adding Favorites – Creating an Ad hoc network A Favorite is a group of settings for connection to a known Infrastructure or Ad hoc network (your own, a neighbor’s, a friend’s). WiFi Station N allows you to easily store the settings for a network in memory, or view or modify existing Favorites. In an Ad hoc (Peer to Peer) network, creating a Favorite is the equivalent of actually creating the wireless link between the computers. 4.9.1.
HWNPCM-300 WPA2 (TKIP) WPA2 (AES) Hercules Wireless N PCMCIA Latest-generation very high level of security, specially designed for environments such as a small business or the home, using a pre-shared key. Password with a minimum of 8 alphanumeric characters. Level of security superior to WPA2 (TKIP), also of the latest generation, specially designed for environments such as a small business or the home, using a pre-shared key. Password with a minimum of 8 alphanumeric characters.
Hercules Wireless N PCMCIA HWNPCM-300 Security tab (accessible after clicking the Modify button) Secure: the network may be unsecured (No) or secure (Yes); in this case, you must select the security type and enter an encryption key. Security type: WEP, WEP (Shared), WPA-PSK (TKIP), WPA-PSK (AES) or WPA2. Security Key: enter an encryption key of 10 or 26 hexadecimal characters for a WEP key, or from 8 to 63 characters for a WPA-PSK key.
HWNPCM-300 Hercules Wireless N PCMCIA - Step 1: enter a name for your Favorite (for example: Work, Sport, etc.). - Step 2: select either Infrastructure or Ad hoc mode for your network architecture; Infrastructure architecture is selected by default. Reminder: Infrastructure is a type of network with an access point + at least two computers, whereas in Ad hoc mode there will be two or more computers without an access point (one of the computers creates the network, while the other only detects it).
Hercules Wireless N PCMCIA HWNPCM-300 - Step 4: indicate whether or not your network is secured. No is selected by default. If you know the security settings, click Yes. Next, select your Security Type from the drop-down list and provide the Security key (10 hexadecimal characters, for example, for WEP encryption). In Infrastructure mode, the security key corresponds to the key entered in the modem router.
HWNPCM-300 Hercules Wireless N PCMCIA 4.10. Advanced Settings The Advanced Settings tab contains the advanced connection settings for the client in your WiFi network. We recommend that you DO NOT modify these settings unless you know exactly what you are doing. - WiFi mode (only in Windows 98SE/Me/XP/2000): select the 802.11b/g mixed mode (the card will function with the 802.11b and g standards only) or the 802.11b/g/n mixed mode (the card will function with the 802.11b, g and n standards).
Hercules Wireless N PCMCIA HWNPCM-300 For example, if bandwidth is insufficient to allow for making a call via the Internet, watching a video, surfing the Internet and downloading files, WMM mode will hold off on the downloads, Internet browsing, and the video. The goal is to guarantee optimal comfort of use for the main task at hand. You can enable or disable this option freely.
HWNPCM-300 Hercules Wireless N PCMCIA 4.13. Temporarily disabling the Hercules Wireless N adapter’s WiFi function In order to avoid completely uninstalling the WiFi application, or disabling your WiFi adapter via Windows or disconnecting it, Hercules has included a function which allows you to very simply cut off WiFi transmission/reception. In this way, you can leave your computer for a few hours with complete peace of mind, secure in the knowledge that any intrusions onto your network are impossible.
Hercules Wireless N PCMCIA HWNPCM-300 5. WELCOME TO THE WIRELESS ATTITUDE! In the following chapters, we will show you how wireless computing is closely linked to user-friendliness and ease of use. Sharing your folders, your printer, or letting friends use your ADSL connection for online gaming are some examples of the things we will help you to do. Enter the world of wireless and join in the Wireless Attitude! 5.1.
HWNPCM-300 Hercules Wireless N PCMCIA Note: To open the Network and Sharing Center, click the network icon in the Windows taskbar, then the Network and Sharing Center link. Enabling file sharing - In the Sharing and Discovery zone, click the Off link or the button located opposite File sharing. - Select the Turn on file sharing radio button. - Click Apply. In the Windows Vista confirmation window, click Continue.
Hercules Wireless N PCMCIA HWNPCM-300 - In the Sharing and Discovery zone, click the Off link or the sharing. button located opposite Public folder - Select the Turn on sharing so anyone with network access can open files radio button (they will only be able to consult files) or select Turn on sharing so anyone with network access can open, change, and create files (there will be no limitations on the contents of these folders in terms of viewing, making changes and additions or other actions).
HWNPCM-300 Hercules Wireless N PCMCIA - In the Media Sharing window that appears, tick the Share my media box. - Click Apply. In the Windows Vista confirmation window, click Continue. - In the following window, you can define the different settings, such as: authorize or refuse groups of users, set parental controls, select media types to be shared, and so on. - When you’re done, click Apply, then OK. 5.2.2.
Hercules Wireless N PCMCIA HWNPCM-300 1. Select the folder that you wish to share, without opening it. Here, your Pictures folder. 2. Right-click the folder. Select Share. 3. In the File Sharing window, select the user(s) who will be able to access this folder, then click Add.
HWNPCM-300 Hercules Wireless N PCMCIA Note: You can provide access to all users with no restrictions (Everyone option) or select specific users previously created on your PC. You can also create new users by clicking Create a new user… in the dropdown list. 4. Select the Permission Level you wish to assign by clicking on the line for that user: Reader (authorization to view only), Contributor (authorization to view, add and delete) or Co-owner (authorization to view, modify, add and delete). 5.
Hercules Wireless N PCMCIA HWNPCM-300 On the computer connected to the printer: 1. Click Start/Control Panel. 2. Under the Hardware and Sound heading, click the Printer link. The list of installed printers is displayed. 3. Right-click the printer and select the Sharing… option.
HWNPCM-300 Hercules Wireless N PCMCIA 4. In the Printer Properties window, click the Change sharing options button. 5. In the Windows Vista confirmation window, click Continue. 6. Tick the Share this printer box. 7. Select the name of the printer which will be displayed on the network under Share name. 8. Click Apply, then OK. 5.2.5. Computers running Windows Vista : Accessing the shared printer On the computers that will use the shared printer: 1. Click Start/Control Panel. 2.
Hercules Wireless N PCMCIA HWNPCM-300 3. Click the Add a printer button. The Add a printer assistant appears. 4. Click Add a network, wireless or Bluetooth printer.
HWNPCM-300 Hercules Wireless N PCMCIA 5. Windows searches for the shared printers on your network. Select the shared printer. 6. Click Next. 7. if required, accept installation of the printer’s drivers when you are being prompted by Windows. 8. Validate the name of your printer, then click Next. 9. Click Finish to close the assistant. 5.2.6.
Hercules Wireless N PCMCIA HWNPCM-300 4. In the Wireless Network Connection Status window, click Properties. 5. In the Windows Vista confirmation window, click Continue. 6. In the Wireless Network Connection Properties tab, select Internet Protocol version 4 (TCP/IPv4). 7. Click Properties.
HWNPCM-300 Hercules Wireless N PCMCIA 8. In the Internet Protocol version 4 (TCP/IPv4) window, select Obtain an IP address automatically and Obtain DNS server address automatically. 9. Click OK to validate. 10. Do the same for Internet Protocol version 6 (TCP/IPv6). To access the Internet, simply launch your Internet browser. 5.3.
Hercules Wireless N PCMCIA HWNPCM-300 The window opposite may appear if The Wizard found disconnected network hardware. 3. If your Hercules Wireless N Adapter wireless network connection is not displayed in the list, tick the Ignore disconnected network hardware box, then click Next. Otherwise, exit the Wizard by clicking Cancel and establish the connection from your network device to your router (for more information, please refer to chapter 4. The WiFi Station N utility).
HWNPCM-300 Hercules Wireless N PCMCIA 7. If the window opposite appears, select the Hercules Wireless N wireless network connection, then click Next. 8. When this warning screen appears, ignore it by clicking Next. If you are using the Hercules modem router, your computers are already protected by the integrated firewall. 9. If your computer has at least three connections (or network devices), the window opposite appears. In this case, let the Wizard determine the appropriate connections. 10.
Hercules Wireless N PCMCIA HWNPCM-300 11. Enter the computer name and a description, if required. Give the computer a name that is unique and sufficiently distinctive, making it easy to recognize on your network (my-computer, wifi-computer or julie, for example). 12. Click Next. 13. Enter the workgroup name (HOME, OFFICE or HERCULES, for example) and a description, if required.
HWNPCM-300 Hercules Wireless N PCMCIA 17. Click Finish to exit the Wizard. Once the procedure is finished, Windows XP may prompt you to restart your computer. The procedures described in this chapter are specific to Windows XP. For all other questions related to sharing folders, a printer or an Internet connection, or on using Windows, please refer to the Windows online help utility. 5.3.2.Windows XP: Using the Network Setup Wizard in an Ad hoc network Proceed as follows for each computer: 1.
Hercules Wireless N PCMCIA HWNPCM-300 The window opposite may appear if The Wizard found a shared Internet connection on the computer. 4. Select No, let me choose another way to connect to the Internet, then click Next. On the computer equipped with the ADSL modem: 5. In the Select a connection method window, select the This computer connects directly to the Internet. The other computers on my network connect to the Internet through this computer option. 6.
HWNPCM-300 Hercules Wireless N PCMCIA 8. Among the connections displayed, leave the box corresponding to your Wireless Network Connection Hercules Wireless N ticked and deselect the others, then click Next. On the computers that will use the shared Internet connection: 5. In the Select a connection method window, select the This computer connects to the Internet through another computer on my network or through a residential gateway option. 6. Click Next. 7.
Hercules Wireless N PCMCIA HWNPCM-300 Proceed as follows for each computer: 9. Enter the computer name and a description, if required. Give the computer a name that is unique and sufficiently distinctive, making it easy to recognize on the network (my-computer, wifi-computer or julie, for example). 10. Click Next. 11. Enter the workgroup name (HOME, OFFICE or HERCULES, for example) and a description, if required.
HWNPCM-300 Hercules Wireless N PCMCIA 16. Click Finish to exit the Wizard. Once the procedure is finished, Windows XP may prompt you to restart your computer. You can now access the Internet simply by launching your browser (Internet Explorer or Netscape Navigator). Sharing folders or a printer, however, requires a few additional operations, but by following the step-by-step instructions in the next chapters, the subtleties involved will no longer remain a mystery to you.
Hercules Wireless N PCMCIA HWNPCM-300 5.3.3.Windows XP: Sharing folders After having configured all of your computers using the Network Setup Wizard, you can now share data located on different disk drives, as long as the user has authorized access. 1. Select the folder you wish to share, without opening it. 2. Right-click the folder. Select Sharing and Security.... 3. In the Network sharing and security section of the Sharing tab, tick the Share this folder on the network box. 4.
HWNPCM-300 Hercules Wireless N PCMCIA 5.3.4. Computers running Windows XP: Accessing shared folders To easily access folders set up for sharing by several computers, it is preferable that the computers belong to the same workgroup. In Windows XP, the workgroup name has been defined using the Network Setup Wizard. 1. Click Start/My Computer. 2. Click My Network Places, then click View workgroup computers. You directly access the list of computers in your workgroup. 3.
Hercules Wireless N PCMCIA HWNPCM-300 On the computers that will use the shared printer: 1. Click Start/Control Panel/Printers and Other Hardware/ Printers and Faxes. In the Printer Tasks section, select Add a printer. 2. The Add Printer Wizard is launched. Click Next. 3. Select the A network printer, or a printer attached to another computer option, then click Next. 4. In the window that appears, click Next to launch the search for shared printers. 5.
HWNPCM-300 Hercules Wireless N PCMCIA 5.3.6.Windows XP: Modifying a workgroup name It may happen that you need to change the name of your workgroup (advanced users only). To do so, proceed as follows: 1. Click Start/Control Maintenance/System. Panel/Performance and 2. In the System Properties window, select the Computer Name tab. 3. Click the Change… button. 4.
Hercules Wireless N PCMCIA HWNPCM-300 5.3.7.Windows XP: Manually enabling or disabling your adapter’s WiFi connection (advanced users) You can manually enable or disable your adapter’s WiFi connection for a variety of reasons: to temporarily avoid connecting to networks, save battery power, etc. - Click Start/Connections/Show All Connections. Verify that your Hercules Wireless N wireless network connection is listed.
HWNPCM-300 Hercules Wireless N PCMCIA 4. In the Computer name zone, enter a name sufficiently distinctive that it can easily be recognized in the list of computers for the workgroup (my-computer, wificomputer or julie, for example). 5. In the Workgroup zone, enter a name for the group (HOME, OFFICE or HERCULES, for example). The workgroup name must be identical (be sure to respect the case of letters) for all computers you wish to link together in a network. 6. Click OK.
Hercules Wireless N PCMCIA HWNPCM-300 5.4.4.Windows 2000: Sharing a printer It is possible to put a printer on the network and share it with all computers in the house equipped with a WiFi adapter. To access a printer on the network, the printer must be set up for sharing on the computer where it is connected and installed. On the computer connected to the printer: 1. Click Start/Settings/Printers. 2. Right-click the printer and select Sharing…. 3.
HWNPCM-300 Hercules Wireless N PCMCIA 7. If you wish, set the shared printer as the default printer, then click Next. 8. Click Finish to close the Wizard. You can now use the network printer thanks to your WiFi connection. For more information on sharing a printer, please refer to your printer’s manual. 5.4.5.Windows 2000: Modifying a workgroup name It may happen that you need to change the name of your workgroup (advanced users only). To do so, proceed as follows: 1. Click Start/Settings/Control Panel.
Hercules Wireless N PCMCIA HWNPCM-300 5.4.6.Windows 2000: Sharing an ADSL connection in an Infrastructure network Proceed as follows for each computer that will use the shared Internet connection: 1. Click Start/Settings/Network and Dial-up Connections. 2. Select the connection to the local area network corresponding to your Hercules Wireless N device. 3. Right-click the connection and select Properties. 4. In the Local Area Connection Properties window, select Internet Protocol (TCP/IP). 5.
HWNPCM-300 Hercules Wireless N PCMCIA 5.4.7.Windows 2000: Sharing an ADSL connection in an Ad hoc network The computer equipped with the ADSL modem must be running Windows XP (Windows 2000 has difficulties managing Internet connection sharing). The computers that will use the shared Internet connection can be running Windows 2000. To find out how to configure the computer equipped with the ADSL modem, please refer to chapter 6.2.2. Windows XP: Using the Network Setup Wizard in an Ad hoc network.
Hercules Wireless N PCMCIA HWNPCM-300 6. In the Internet Protocol (TCP/IP) Properties window, select Obtain an IP address automatically and Obtain DNS server address automatically. 7. Click OK to close the windows. Windows may prompt you to restart your computer. To access the Internet, you can now simply launch your Internet browser. With some Internet service providers, it may happen that the connection is not established automatically.
HWNPCM-300 Hercules Wireless N PCMCIA 5.5. Computers running Windows Me: Sharing folders, a printer or an ADSL connection A simple solution for sharing folders, a printer or an ADSL connection in Windows Me is to use the Home Networking Wizard. This Wizard will help you create a real home network. 5.5.1.Windows Me: Using the Home Networking Wizard in an Infrastructure network 1. Click Start/Programs/Accessories/Communications/ Home Networking Wizard. The Wizard is launched. 2. Click Next.
Hercules Wireless N PCMCIA HWNPCM-300 7. Enter the computer name. Give the computer a name that is unique and sufficiently distinctive, making it easy to recognize in the list of workgroup computers (my-computer, wifi-computer or julie, for example). 8. Select the Use this workgroup name option and enter the workgroup name (HOME, OFFICE or HERCULES, for example). The workgroup name must be identical (be sure to respect the case of letters) for all computers you wish to link together in a network. 9.
HWNPCM-300 Hercules Wireless N PCMCIA 5.5.2.Windows Me: Using the Home Networking Wizard in an Ad hoc network The computer equipped with the ADSL modem must be running Windows XP (Windows Me has difficulties managing Internet connection sharing). The computers that will use the shared Internet connection can be running Windows Me. To find out how to configure the computer equipped with the ADSL modem, please refer to chapter 6.2.2. Windows XP: Using the Network Setup Wizard in an Ad hoc network.
Hercules Wireless N PCMCIA HWNPCM-300 5. Enter the computer name. Give the computer a name that is unique and sufficiently distinctive, making it easy to recognize in the list of workgroup computers (my-computer, wifi-computer or julie, for example). 6. Select the Use this workgroup name option and enter the workgroup name (HOME, OFFICE or HERCULES, for example). The workgroup name must be identical (be sure to respect the case of letters) for all computers you wish to link together in a network. 7.
HWNPCM-300 Hercules Wireless N PCMCIA With some Internet service providers, it may happen that your shared connection is not established automatically when you launch your Internet browser. If this occurs, you must first establish an Internet connection on the computer equipped with the modem. 5.5.3.Windows Me: Sharing folders After having configured all of your computers using the Home Networking Wizard, you can now share data located on different disk drives, as long as the user has authorized access.
Hercules Wireless N PCMCIA HWNPCM-300 5.5.4. Computers running Windows Me: Accessing shared folders To easily access folders set up for sharing by several computers, it is preferable that the computers belong to the same workgroup. In Windows Me, the workgroup name has been defined using the Home Networking Wizard. 1. Click Start/Programs/Windows Explorer. 2. Double-click Network Neighborhood and expand it. You access the list of the computers in your workgroup. 3.
HWNPCM-300 Hercules Wireless N PCMCIA 1. Click Start/Settings/Control Network. Panel. Double-click 2. In the Network window, click the File and Print Sharing… button. 3. Tick the I want to be able to allow others to print to my printer(s) box. Windows may prompt you to restart your computer. On the computers that will use the shared printer: 1. Click Start/Settings/Printers. Printer icon. Double-click the Add 2. The Add Printer Wizard is launched. Click Next. 3.
Hercules Wireless N PCMCIA HWNPCM-300 5.5.6.Windows Me: Modifying a workgroup name It may happen that you need to change the name of your workgroup (advanced users only). To do so, proceed as follows: 1. Click Start/Settings/Control Network. Panel. Double-click 2. Select the Identification tab. 3. In the Computer name zone, enter a name sufficiently distinctive that it can easily be recognized in the list of computers for the workgroup (my-computer, wificomputer or julie, for example). 4.
HWNPCM-300 Hercules Wireless N PCMCIA 5.6. Computers running Windows 98 SE: Sharing folders, a printer or an ADSL connection To create a network of computers, share data, a printer or an ADSL connection in Windows 98 SE, it is preferable that the computers belong to the same workgroup. 5.6.1.Windows 98 SE: Creating a workgroup 1. Click Start/Settings/Control Network. Panel. Double-click 2. Select the Identification tab. 3.
Hercules Wireless N PCMCIA HWNPCM-300 1. Click Start/Settings/Control Panel. Network. Double-click 2. In the Network window, click the File and Print Sharing… button. 3. Tick the I want to be able to give others access to my files box, then click OK. 4. Click OK to close the window. Windows may prompt you to insert the installation CD-ROM and restart the computer. 5.6.3. Computers running Windows 98 SE: Accessing shared folders 1. Click Start/Programs/Windows Explorer. 2.
HWNPCM-300 Hercules Wireless N PCMCIA On the computer connected to the printer: 1. Click Start/Settings/Printers. 2. Right-click the printer and select Sharing. 3. In the Sharing tab, select Shared As and enter a name for your printer. Give the printer a name that is unique and sufficiently distinctive, making it easy to recognize (printer or wifi printer, for example). 4. Click Apply, then OK. If the Sharing tab does not appear, you must enable file sharing. 1. Click Start/Settings/Control Network.
Hercules Wireless N PCMCIA HWNPCM-300 5. In the list displayed, double-click the computer connected to the printer. 6. Select the shared printer, then click OK. 7. Click Next. 8. If you wish, set the shared printer as the default printer, then click Next. 9. Click Finish to close the Wizard. You can now use the network printer thanks to your WiFi connection. For more information on sharing a printer, please refer to your printer’s manual. 5.6.5.
HWNPCM-300 Hercules Wireless N PCMCIA 4. In the IP Address tab, select Obtain an IP address automatically. 5. In the Gateway tab, if there are gateways installed, select them and click Remove. 6. Click OK to close the windows. Windows may prompt you to restart your computer. To access the Internet, you can now simply launch your Internet browser. 5.6.6.
Hercules Wireless N PCMCIA HWNPCM-300 Proceed as follows for each computer that will use the shared Internet connection: 1. Click Start/Settings/Control Network. Panel. Double-click 2. In the Configuration tab of the Network window, select the TCP/IP -> Hercules Wireless N component. 3. Click Properties. 4. In the IP Address tab, select Obtain an IP address automatically.
HWNPCM-300 Hercules Wireless N PCMCIA 5. In the Gateway tab, if there are gateways installed, select them and click Remove. 6. Click OK to close the windows. Windows may prompt you to restart your computer. To access the Internet, you can now simply launch your Internet browser. With some Internet service providers, it may happen that the connection is not established automatically. If this occurs, you must first establish an Internet connection on the computer equipped with the modem. 5.6.7.
Hercules Wireless N PCMCIA HWNPCM-300 6. GLOSSARY 802.11 Standard established in 1997 by the IEEE (Institute of Electrical and Electronics Engineers, an American organization), defining wireless networks in the 2.4 – 2.48GHz frequency range and offering transfer speeds of between 1 and 2Mbits/s. Revisions have been made to the original standard in order to optimize transfers (this is the case for the 802.11a, 802.11b and 802.11g standards, referred to as physical 802.
HWNPCM-300 Hercules Wireless N PCMCIA DHCP (Dynamic Host Configuration Protocol) Protocol managing the allocation of IP addresses to computers. DSSS (Direct Sequence Spread Spectrum) Technique for using radio frequencies in broad-spectrum wireless networks meant to increase the range of transmissions. ESSID (Service Set Identifier) 8 to 32-character identifier, often abbreviated as SSID, serving as the unique name for a network shared by clients and the access point.
Hercules Wireless N PCMCIA HWNPCM-300 PPPoE (Point-to-Point Protocol over Ethernet) Protocol allowing for connection to the Internet of computers linked over an Ethernet network via a high-speed modem. Static IP Permanent IP address assigned to a computer by the access supplier. Subnet mask Part of an IP address indicating the class of the network used (class C, type 255.255.255.0 for a local area network).
HWNPCM-300 Hercules Wireless N PCMCIA WPA (WiFi Protected Access) Wireless network security standard put in place by manufacturers, employing a data encryption algorithm relying on dynamic key management, which was lacking in WEP, the difference being that once communication is established, the key changes randomly for enhanced security.
Hercules Wireless N PCMCIA HWNPCM-300 7. TECHNICAL SUPPORT If you encounter a problem with your product, please go to http://ts.hercules.com and select your language. From there you will be able to access various utilities (Frequently Asked Questions (FAQ), the latest versions of drivers and software) that may help to resolve your problem.
HWNPCM-300 Hercules Wireless N PCMCIA Trademarks Hercules® is a registered trademark of Guillemot Corporation S.A. Intel® and Pentium® are registered trademarks of Intel Corporation. Wireless AttitudeTM ! is a trademark of Guillemot Corporation S.A. Microsoft® Windows® 2000, XP and Vista are either trademarks or registered trademarks of Microsoft Corporation in the United States and/or other countries.
Hercules Wireless N PCMCIA HWNPCM-300 FEDERAL COMMUNICATION COMMISSION INTERFERENCE STATEMENT Hereby, Guillemot Corporation SA Carentoir France declares under our sole responsibility that the product, HWNPCM-300 to which this declaration relates, has been tested and found to comply with the limits for a Class B digital device, pursuant to Part 15 of the FCC Rules. These limits are designed to provide reasonable protection against harmful interference in a residential installation.
HWNPCM-300 Hercules Wireless N PCMCIA Copyright © Guillemot Corporation S.A. 2008. All rights reserved. This publication may not be reproduced in whole or in part, summarized, transmitted, transcribed, stored in a retrieval system, or translated into any language or computer language, in any form or by any means, electronic, mechanical, magnetic, photocopying, recording, manual or otherwise, without the prior written permission of Guillemot Corporation S.A. Disclaimer Guillemot Corporation S.A.