Gun Vault. Q THE ORIGINAL.
Leaders in Responsible Firearm Storage Since 1990, Gun Vault has been an industry leader and innovator of quick access personal safes. We pride ourselves on our commitment to manufacture a responsible firearm storage solution with the highest in quality and patented design. At Gun Vault we stand behind our products. We understand that in a time of crisis you rely on the security and protection Gun Vault provides. Thank you for your trust and welcome to the Gun Vault family.
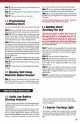
Quick Start GUISE «oii 02 3 Product Features for Digital Units 03 « Battery Installation * Programming Digital Keypad « Resetting Digital Pass code 33 Safety Features for Digital Units 04 » Tamper Detection * Low Battery Warning Indicator » Security Sleep Mode » Audio Control »3 Added Features for Deluxe Units 04 » Motion Detection Alarm Feature » Setting the Sensitivity Level for Motion Alarm « AC/DC Power Adapter for External Power Supply * Interior Courtesy Light »2 Product Features for Bio metric Units
Quick Start Guide Need a quick start solution so you can begin using your brand new Gun Vault? We got you covered. Our easy quick start guide will help you set up your safe in no time. Quick Battery Installation When installing or replacing your battery, always hold the battery connecting cap while disconnecting or attaching. Do not pull on the power cables, this could cause the power supply to become disconnected from the lock.
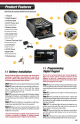
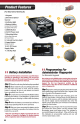
Product Features (Mini Vault Standardization Deluxe) 1. Key port 2. Digital Keypad 3. Indicator light 4. AC/DC Power Jack (Deluxe Model Only) 5. Battery Holder (Located on the inside top panel of the unit) 6. Mounting Holes (2) Key-Slot Holes and (4) Round Holes 7. Internal Courtesy Light (Deluxe Model Only) 8. Learn Button (Inside the Unit) 9. AC/DC Power Supply Cable (Deluxe Model Only) 10.
Step 7: Press the Lean button third time. The indicator light will flash green and beep six times confirming that the new code has been accepted. If the indicator light illuminates in red and beeps six times an error has occurred and you will need to repeat steps 3-7. Step 8: est your combination to confirm that your unit has accepted your new access code. Step 9: Now you are ready to use your safe.
3} } Setting the Sensitivity Level for Motion Detection Alarm The Motion Detection Alarm has four levels of sensitivity. Level one is the most sensitive and level four is the least sensitive. The factory default sensitivity setting is programmed to level two. Step 1: Press and hold the Lean button for two seconds. The indicator light will flash green and beep. Step 2: press and hold the Learn button again and wait for the green light and beep.
(For Bio metric Mini Vault) 1. Key port 2. Bio metric Optical Scanner 3. Indicator light 4. Battery Holder (Located on the inside top panel of the unit) 5. Delete Button 6. AC/DC Power Jack 7. Mounting Holes (2) Key-Slot holes and (4) Round Holes 8. Internal Courtesy Light 9, Learn Button (Inside the Unit) 10. AC/ DC Power Supply Cable 11. Backup keys Battery Installation Always hold the battery connection cap while disconnecting or attaching a new battery.
Step 4: Test your unit to ensure your that fingerprint was successfully programmed. Step 5: To add additional administrative fingerprints repeat all steps. Step 6: Now you are ready to use your safe. Programming Additional Users Leave the unit door open while you program your safe. Step 1: After enrolling the first two administrator fingerprints open the unit by using the bio metric scanner.
} } AC/DC Power Adapter for External Power Source The External AC/DC power supply is not a battery charger. It is an external power supply to be used only when the batteries are installed. + When the unit battery is low use the external AC/DC power supply cable to power the unit while you replace the battery.
beekeeper PB BP Cl The backup key is for emergency use only in the event of fingerprint failure or forgotten pass code. For Key Replacement visit the to complete the online key replacement form. In order to receive a replacement key you will need to know the key number associated with your unit. You can find this information on the unit engraved on the key port. Replace the batteries once a year regardless of whether or not the low battery indication is triggered.
10 Gun Vault's Exclusive 5 Year Warranty 1. Gun Vault (the “Company”) warrants to the original consumer (the “Purchaser”) of any Gun Vault safe (the “Gun Vault safe”) purchased after January 1, 2014 against any damage caused by fire, burglary or attempted burglary for a period of five (5) years from the date of purchase. 2. The Company warrants to the purchaser that the Gun Vault safe will be free from defects in workmanship and materials for a period of one (1) year from the date of purchase. 3.
WARRANTY REGISTRATION INFORMATION This is not a Registration Form To submit your warranty registration go to or call our Customer Service Department at (800) 222 1055. For key replacement visit the to complete the online key replacement form. In order to receive a replacement key you will need to know the key number associated with your unit. You can find this information on the unit engraved on the key port. PLEASE FILL OUT THE SECTION BELOW AND STORE IN A SAFE LOCATION OUTSIDE OF YOUR UNIT.
® THE ORIGINAL. SIN G 1390 \ For Additional Support Visa or call our Customer Support (800) 222 1055 SAFE QUICK STRONG SMART" ) ALPHA GUARDIAN \ A Safe in Every Home © 2018 ALPHA GUARDIAN Las Vegas, NV 89119 USA Alphanumerical | Vaulting