SAFE ● QUICK ● STRONG ● SMART Owners Manual Models: HV3000 HomeVault GV5500 Gun Safe GV5900 Gun Safe 216 South 2nd Avenue Building No.
TABLE OF CONTENTS ● ●● Warnings and Recommendations Congratulations on Your Purchase of a GunVault Safe 1) Gun Vault Safe Features and Functions……………………………………………………… Pg. 5 2) Getting Started (HV3000 only)……………………………………………………………… Pg. 5 a. Securing Your Keys b. Locating Battery Tray Kit c. Loading the Battery Tray d. Installing the Battery Tray 3) Getting Started (GV5500/5900 only)………………………………………………………... Pg. 7 a. Locating the Battery Tray b. Loading the Battery Tray c.
WARNINGS & RECOMMENDATIONS Anything in this manual that has been written in boldface type is a WARNING. Failure to observe these instructions constitutes a MISUSE of this product and may result in serious physical injury or DEATH. NO UNAUTHORIZED REPAIR Gun vault safes are serviceable at the factory only. Any tampering, unauthorized repair and/or modification will void all warranties, and may cause the safe to fail unexpectedly, or be damaged. If in doubt, call GunVault technical support.
Congratulations on Your Purchase of a GunVault Safe! Your new GunVault safe is a high quality product, which will give you years of service, backed up by excellent Technical Support and a strong Warranty. Before you get started reading this manual, please take a few moments to fill out your Warranty Registration Card and mail it in. Or register online at www.gunvault.com.
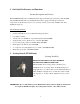
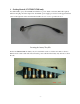
1. GunVault Safe Features and Functions Product Description and Features The HV3000 GunVault safe is manufactured from 16ga steel with a pry-resistant door. The GV5500 and GV5900 GunVault safes are manufactured from heavy gauge steel with pry-resistant ¾” composite doors. Both may be used to store a variety of items out of reach of children and other unauthorized persons.
Locating the Battery Tray Kit The battery tray is located on the left hand side of the compartment. Gently pull back the foam cover and remove the two thumb screws located at both ends. Disconnect the power cable from the battery tray and remove from the safe. Loading the Battery Tray Make sure that the ends of each battery match the positive (+) and negative (-) marking in the tray exactly. Make sure that the batteries are not loose.
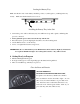
3. Getting Started (GV5500/GV5900 only) You will initially open your GunVault safe with the 9v power. Attach a 9v batter (Duracell required) and insert the plug end of the adaptor into the AC/DC power supply port located on the upper left hand corner of the right side of the safe. Enter the default code of 1-2-3-4 to open the safe door. Locating the battery Tray Kit For the GV5500/GV5900, the battery tray is located inside on the roof of the safe. Remove the two thumb screw located at both ends.
Loading the Battery Tray Make sure that the ends of each battery match the positive (+) and negative (-) marking in the tray exactly. Make sure that the batteries are not loose. Installing the Battery Tray in the Safe • Connect the power cable to the battery tray. You will hear a beep audio signal, confirming that power is connected. • • • • Do not pinch the power cable between the tray and the side. Press the tray into position, aligning the slots/holes onto the mounting studs.
Choosing your Own Access Code • • Don’t tell anyone your code. An access code is a series of entries on the keypad. WARNING: This is not a numeric keypad, you cannot program digits (there is no 5, 6, 7, 8, 9, or 10). • • • An “entry” is a single press of one or more buttons at the same time. You can use a minimum of three entries, or a maximum of six entries, for your access code. For each entry of the access code, you may choose one, more than one or ALL of the buttons on the keypad in combination.
will blink green five times. And you will hear five beeps, confirming that the new code has been accepted. If the red light blinks 5 times with 5 beeps at this point, and error has occurred. Just start over by depressing the Learn Button for two seconds. 5. Turning off Keypad Sound To disable the Keypad Sound (beeps), press and hold the Learn Button for two seconds, three times. The green light will blink three times and you will hear three beeps. Release the button.
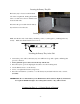
Compare the Mounting Template to the safe. Notice the mounting holes in the bottom of the safe. There are two “key-slot” holes, and four round holes. • Using a drill motor and drill bit, drill starter holes with drill bits appropriate for your installation. Drive screws only into the two key-slot holes. Drive the screws in until just enough room is left between the head of the screw and the mounting surface to permit you to slide the Vault’s key slots over the screws.
Any interruption of power will cause the computer memory to reset to the factory code: one, two, three, four. If this occurs, anyone who enters the one-two-three-four code will gain access to the safe and its contents. Warning: Never attempt to plug in a battery charger of any kind. Fire or explosion of batteries could result. Never use rechargeable batteries of any kind in a GunVault safe. Their power characteristics are not compatible with the safe.
Fees & Charges Under warranty; repair or replacement at GunVault’s option, and free UPS ground return shipping within the continental U.S. Out of warranty; minimum fee for examination and handling is $19.95. Shipping, Parts, and labor will be extra. • GunVault safes delivered without a pre-arranged Return Authorization Number may be returned or destroyed. • GunVault safes sent for repair with heavy objects inside may be damaged in shipping, and corresponding repairs may be charged to the owner.
13. “Limited Warranty” 1. 2. 3. 4. 5. 6. 7. 8. 9. GunVault (the “Company”) warrants to the original consumer (the “Purchaser’) that the GV5500, GV5900 and HV3000 (the “Safe”) safe will be free from defects in workmanship and materials for a period of one (1) year from the date of purchase. These warranties are not assignable or transferable to any other person.
Inquiries or questions regarding GunVualt safes should be directed to : Customer Support 800-242-1055 - 15 -