SpeedVault Model SV 500 User Manual Patented Rev 1 (10/11)
Firearm Safety WARNING: The SpeedVault safe or any other firearm storage device cannot take the place of other safety procedures including advising children of the dangers of firearms. WARNING: The manufacturers and distributors of the SpeedVault safe do not recommend, suggest, advise, promote or otherwise condone the ownership or use of firearms. We at GunVault Inc.
Getting Started Set your keys to the side. Don’t lock them inside the safe! ● Pull open the battery cover. ● Pull out the battery holder. ● Insert new 9v battery. Following the Positive (+) and Negative (-) guides on the holder. ● When power has been connected, the green light blinks one time and then the red light blinks one time, with a long beep during the process. ● Use the factory-default code to open the unit, which is: Press each button one time, from left to right -- 1 , 2 , 3 , 4.
Choosing Your Own Access Code ● An access code is a series of entries on the keypad. WARNING: This is not a numeric keypad, you cannot program digits (there is no 5, 6, 7, 8, 9, or 10). ● An “entry” is a single press of one or more buttons at the same time. ● The user can use a minimum of three entries, or a maximum of six entries, for access code. ● For each entry of the access code, the user may choose one, more than one or ALL of the buttons on the keypad in combination.
Tamper Detect Feature Entering an invalid access code sets the Tamper Indicator. Hold down buttons two “2” and three “3” for five seconds to activate the Tamper Indicator. ● If tampering has been detected, the red light will glow until buttons two “2” and three “3” are released. ● If tampering hasn’t been detected, the green light will glow until buttons two and three are released. Security Sleep Mode The SpeedVault has a Security Sleep Mode.
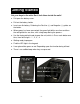
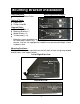
Mounting Bracket Installation Tools Required: Phillips-Head Screw Driver Mounting Bracket Images: Optional Tools: Power Drill Phillips-Head Bit Supplied Parts: SpeedVault Safe x 1 Mounting Bracket x 1 Wood Screws x 4* Thumbscrew(s) x 5 * Mounting screws provided are for solid wood surface only. If mounting to another surface type, drywall, cement, and etc, the appropriate hardware can purchased through a local hardware store.
Installing the SpeedVault: IMPORTANT: When mounting the SpeedVault make sure the drawer has enough space to drop open. The drawer requires gravity to fully release, always install in a vertical position (see image below) 1. Secure the “Mounting Bracket” to the desired location using the “Wall Mounting Holes” on the bracket and the provided wood screws. IMPORTANT: Mounting screws provided are for solid wood surface only.
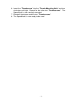
6. Insert the “Thumbscrew” into the “Thumb Mounting Hole” and turn clockwise until tight. Repeat for the other two “Thumbscrews”. The SpeedVault is now securely mounted. 7. Reinstall the drawer and the two “Thumbscrews”. 8. The SpeedVault is now ready to be used.
Technical Support If you have followed the above steps carefully and still have a problem operating your GunVault, phone GunVault Technical Support. Almost all problems can be solved within minutes over the telephone. 800-222-1055 Requirements for Return & Repair If possible, do not return your GunVault safe to your dealer. Instead, call GunVault Technical Support, most problems can be solved over the telephone, making return unnecessary.
Limited Warranty 1. GunVault (the “Company”) warrants to the original consumer (the “Purchaser’) of any GunVault safe (the “GunVault safe”) purchased after January 1, 2014 against any damage caused by fire, burglary or attempted burglary for a period of five (5) years from the date of purchase. 2. The Company warrants to the purchaser that the GunVault safe will be free from defects in workmanship and materials for a period of one (1) year from the date of purchase. 3.
Notes: - 10 -
Inquiries or questions regarding the SpeedVault should be directed to: GunVault, Inc.