Stainless Steel Micro-Mesh GUTTER GUARD DIY Kit FREE GUTTER GUARD BRUSH * by registering for your 25 year warranty! *Shipping and handling not included gutterguard.com/registration RECOMMENDED TOOLS Not Included Proper installation is very important to ensuring optimal performance from your gutter guards. GLOVES We encourage you to review the full guide prior to installing.
IMPORTANT INFORMATION BEFORE YOU BEGIN SAFETY IS OUR #1 PRIORITY. During Installation we recommend that you... ■ Wear gloves & safety glasses. ■ Use an extension ladder and ladder standoff for stability. DO IT RIGHT. DO IT ® ONCE. ■ Make all cuts and bends to the gutter guards on the ground. Also make sure to: ■ Obey local building codes. ■ Check to see if your roofing material is adhered to your underlayment. Do not pry up your shingles or tear your underlayment. Use alternate installation method.
INSTALL OVERVIEW PRE-INSTALL The Basics...................................................... 2 Preparing Your Gutters................................... 3 Determining Roof Slope/Pitch........................ 4 Choose Your Install Method........................... 5 Choose Your Securing Method...................... 7 INSTALLATION IMPORTANT STEPS....................................... 7 Typical Install Guide....................................... 8 Cutting & Joining Sections...........................
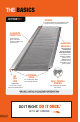
THE BASICS IN YOUR KIT TROUGH Provides maximum water filtration while vastly improving overall performance. ALUMINUM FRONT RAIL Holds mesh in place and offers superior strength and performance. ALUMINUM REAR RAIL The rear rail is intentionally shorter in length than the front rail. This allows room between installed pieces for any shifting/settling of the home over the lifespan of the gutter guards. EXTENDED MESH 3M VBH TAPE For overlapping mesh when joining sections.
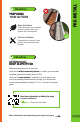
PRE-INSTALL X PREPARING YOUR GUTTERS Clean Your Gutters Clean all leaves, pine needles, and other debris from your gutters and downspouts. PRE-INSTALL 1 Take Care of Repairs Complete any repairs to your gutters and downspouts as needed. 2 PRE-INSTALL DETERMINING ROOF SLOPE/PITCH Determine the slope/pitch of your roof. If the roof is mildly to moderately pitched (1–6 pitch), you can install the gutter guards at the same slope (5º–25º).
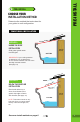
PRE-INSTALL DETERMINING ROOF SLOPE/PITCH CONTINUED STEEP ROOF SLOPE/PITCH 4 ROOF & GUTTER GUARD MILD/MODERATE ROOF SLOPE/PITCH SLOPE 5º-25º or PITCH 1-6 ROOF SLOPE 26º-45º or PITCH 6-12 GUTTER GUARD SLOPE 5º-10º or PITCH 1-2 You will need to use one of the bending methods shown on p. 13 to achieve the recommended installation slope.
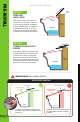
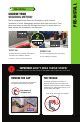
PRE-INSTALL 3 PRE-INSTALL CHOOSE YOUR INSTALLATION METHOD Determine the method that works best for your gutter-to-roof configuration. TRADITIONAL INSTALLATION IN F SH ROO METHOD A GU TT ER GU AR D UNDER THE ROOF INSTALLATION Slide gutter guard under roof shingles. GL E FASCIA WOOD GUTTER IMPORTANT: If your roofing material is adhered to your underlayment, do not use this method. Use one of the bending methods instead.
G LE IN SH BEND UP METHOD O F METHOD C STEEP ROOF INSTALLATION RO PRE-INSTALL INSTALL METHODS CONTINUED GU TT ER GU AR D BEND DOWN METHOD Slide it under the roof shingle, if it causes the roof shingle to ramp up or your roofing material is adhered to your underlayment, see Method B and bend the mesh up or down and fasten to the gutter, drip edge or fascia with screws.
PRE-INSTALL CHOOSE YOUR SECURING METHOD We’ve designed Gutter Guard by Gutterglove® with a simple installation in mind. Manageable sections slide right into place. Then, either tape them on with the 3M high-bond tape, or screw them on. Most homes are completed in an afternoon. PRE-INSTALL 4 SECURING TAPE IT ON SCREW IT ON ❏ Clean off front lip of gutter with acetone. ❏ Use 3 self-tapping screws per section. ❏ Install in 65º weather or warmer. ❏ Pre- drilling not required.
INSTALLATION TYPICAL INSTALLATION This section provides general guidance on getting started and working your way through an install. Remember to check pages 4 – 6 to determine the installation method that will work best with your gutter-to-roof scenario. 1 2 3 FOLLOW ALL PRE-INSTALL STEPS Decide how you will fasten your gutter guards, tape or screws. If you use the tape option, make sure to clean the top front lip of the gutter using acetone. STARTING OUT We recommend starting at an inside corner.
FOR JOINING SECTIONS INSTALLATION 5 For joining sections together- lay one end of the mesh so it overlaps directly over the other section. 6 7 8 TAPE INSTRUCTIONS If taping it on, peel back the first couple inches of the red protective layer on the adhesive foam tape. Place the gutter guard and press the top down firmly to seal. OR SCREW INSTRUCTIONS If screwing it down, use the guides on the front rail to place the screw. Fasten with 3 screws for each section of gutter guard.
INSTALLATION DO IT RIGHT. DO I T ON C E . Cutting & Joining Sections CUTTING SECTIONS Use a sharp pair of tin snips to cut through the aluminum rail and the mesh. Commercial-grade scissors can also be used to cut the mesh. HAVING TROUBLE? Check out this video to see our recommended method for cutting the rails. JOINING SECTIONS Each section has mesh that extends past the aluminum rail. Lay one end of the mesh so it overlaps directly over the other section.
IT R I GCST H T. D O IT O N C E . gutterguard.com/contact | (866) 892-8442 | M-FDO 8am-7pm Inside Corners INSIDE CORNERS Slide one piece so that it is flush with the back corner. On a second piece, trim back the aluminum rails by approximately 1 inch. Tuck the exposed mesh down inside the gutter adjacent to the piece already in place. 1 2 3 4 INSTALLATION NEED HELP? RAINWATER DIVERTERS Roof valleys can cause excessive rain water and debris build up creating challenges for all gutter guards.
INSTALLATION DO IT RIGHT. DO I T ON C E . End Caps & Outside Corners OUTSIDE CORNERS Let the piece run long to the end of the gutter. Bend down the back aluminum rail into the gutter. Mark the adjoining piece at the same angle as the roof edge, then use tin snips to cut away the outlined piece. Once cut, fit it into the outside edge so that it’s aligned with the opposite piece. 1 2 3 4 END CAPS Trim back the aluminum rails and tuck the exposed mesh down into the gutter.
IT R I GCST H T. D O IT O N C E . gutterguard.com/contact | (866) 892-8442 | M-FDO 8am-7pm Bending The Mesh BENDING THE MESH What you’ll need: ❏ Bending the mesh allows you to fit the gutter guard on any gutter-to-roof scenario. ❏ ❏ ❏ ❏ 1 Two - 1”x2” boards that are 4.
INSTALLATION DO IT RIGHT. DO I T ON C E . Removing The Gap IMPORTANT: Don‘t Miss these Steps Rainwater may run over the front lip of your gutter if these steps are overlooked. REMOVING THE GAP X INCORRECT CORRECT PUSH TROUGH DOWN Make sure gutter guard sits flat on gutter lip. Mesh trough should be at least 1/8” below gutter lip. Use fingers if necessary to push mesh trough down. REMOVE THE GAP There should be no space between the front rail and the gutter lip when you install the gutter guards.
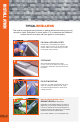
gutterguard.com/contact | (866) 892-8442 | M-F 8am-7pm CST CUSTOMIZATION OPTIONS Below are several examples of how to customize an install by bending the mesh or notching the gutter guards.
EXTRAS Follow All Safety Guidelines Complete the Pre-Installation Plan See pages 3-7. Acknowledge Important Install Steps See page 7. Install Gutter Guards See pages 8-14. Register Your Product & Leave a Review Receive a free “The Gutter Guard Brush” when you register your product. See page 17. Learn How To Maintain Your Gutter Guards See page 17.
gutterguard.com/contact | (866) 892-8442 | M-F 8am-7pm CST EXTRAS NEED HELP? MAINTAINING YOUR GUTTER GUARDS Your new gutter guards are designed to be easy to maintain.
25 YEAR LIMITED PARTS WARRANTY Gutterglove, Inc. (herein referred to as GGI) warrants to the original purchaser that its specially designed Gutter Guard by Gutterglove will be free from defects in manufactured parts and agrees that it will, at its option only, either repair the defect or replace the defective part thereof with a new or reconditioned equivalent. This Limited Warranty is valid for 25 (twenty-five) years for parts only and does not include cost of labor for re-installation.