
User manual Manual


GDM-8261A User Manual
140
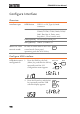
5. To continue to the GPIB
address configuration, press the
Enter key. The GPIB address
configuration menu appears.
AUTO
ENTER
1st display
Shows the GPIB address.
2nd display
Indicates GPIB address setting
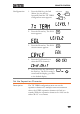
6. Change the address using the
Left/Right and Up/Down keys.
HOLD TRIG
Range
0~30 (Default = 15)
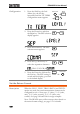
7. Press the Enter key followed by
the Exit key. The GPIB setting
is stored and the display goes
back to the default display.
AUTO
ENTER
/ EXITSHIFT
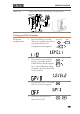
8. Connect the GPIB cable to the
rear panel optional
communication port after the
GPIB card has been installed
(page 134).
GPIB pin
assignment
Pin
Signal
Pin
Signal
1
12 24
13
1
Data I/O 1
13
Data I/O 5
2
Data I/O 2
14
Data I/O 6
3
Data I/O 3
15
Data I/O 7
4
Data I/O 4
16
Data I/O 8
5
EOI
17
REN
6
DAV
18
Ground
(DAV)
7
NRFD
19
Ground
(NRFD)
8
NDAC
20
Ground
(NDAC)