
User manual
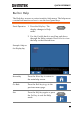

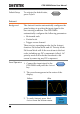
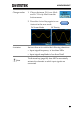
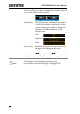
Table Of Contents
- SAFETY INSTRUCTIONS
- GETTING STARTED
- QUICK REFERENCE
- Menu Tree / Operation Shortcuts
- Convention
- Acquire Key
- Acquire Key - Segments
- Autoset Key
- CH1 ~ 4 Key
- Cursor Key
- Display Key
- Help Key
- Math Key
- Measure Key
- Hardcopy Key
- Run/Stop Key
- REF Key
- Save/Recall Key
- Test Key
- Test Key – Go-NoGo
- Trigger Type Menu
- Trigger Edge Menu
- Trigger Delay Menu
- Trigger Pulse Width Menu
- Trigger Video Menu
- Trigger Pulse Runt Menu
- Trigger Rise & Fall Menu
- Trigger Timeout Menu
- Utility Key
- Utility Key – I/O
- Utility Key – File Utilities
- Utility Key – Wave Generator - Demo Outputs
- Search - Edge
- Search – Pulse Width
- Search - Runt
- Search – Rise/Fall Time
- Zoom Key
- Option Key
- Default Settings
- Built-in Help
- Menu Tree / Operation Shortcuts
- MEASUREMENT
- CONFIGURATION
- OPTIONAL SOFTWARE and APPS.
- SAVE/RECALL
- FILE UTILITIES
- HARDCOPY KEY
- REMOTE CONTROL CONFIG
- MAINTENANCE
- FAQ
- I connected the signal but it does not appear on the display.
- I want to remove the (Measurement result / FFT result / Help contents) from the display.
- The waveform does not update (frozen).
- The probe waveform is distorted.
- Autoset does not catch the signal well.
- I can’t save files to the internal memory.
- The display image printout is too dark on the background.
- The date and time settings are not correct.
- The accuracy does not match the specification.
- APPENDIX
- INDEX

MEASUREMENT
67
Change modes
1. Choose between Fit Screen Mode
and AC Priority Mode from the
bottom menu.
2. Press the Autoset key again to use
Autoset in the new mode.
Autoset
Fit Screen Mode
AC Priority
Limitation
Autoset does not work in the following situations.
Input signal frequency is less than 20Hz
Input signal amplitude is less than 30mV
Note
The Autoset key (page 66) does NOT automatically
activate the channels to which input signals are
connected.