
User manual
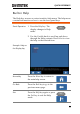
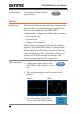
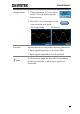
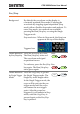
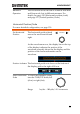
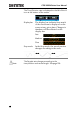
Table Of Contents
- SAFETY INSTRUCTIONS
- GETTING STARTED
- QUICK REFERENCE
- Menu Tree / Operation Shortcuts
- Convention
- Acquire Key
- Acquire Key - Segments
- Autoset Key
- CH1 ~ 4 Key
- Cursor Key
- Display Key
- Help Key
- Math Key
- Measure Key
- Hardcopy Key
- Run/Stop Key
- REF Key
- Save/Recall Key
- Test Key
- Test Key – Go-NoGo
- Trigger Type Menu
- Trigger Edge Menu
- Trigger Delay Menu
- Trigger Pulse Width Menu
- Trigger Video Menu
- Trigger Pulse Runt Menu
- Trigger Rise & Fall Menu
- Trigger Timeout Menu
- Utility Key
- Utility Key – I/O
- Utility Key – File Utilities
- Utility Key – Wave Generator - Demo Outputs
- Search - Edge
- Search – Pulse Width
- Search - Runt
- Search – Rise/Fall Time
- Zoom Key
- Option Key
- Default Settings
- Built-in Help
- Menu Tree / Operation Shortcuts
- MEASUREMENT
- CONFIGURATION
- OPTIONAL SOFTWARE and APPS.
- SAVE/RECALL
- FILE UTILITIES
- HARDCOPY KEY
- REMOTE CONTROL CONFIG
- MAINTENANCE
- FAQ
- I connected the signal but it does not appear on the display.
- I want to remove the (Measurement result / FFT result / Help contents) from the display.
- The waveform does not update (frozen).
- The probe waveform is distorted.
- Autoset does not catch the signal well.
- I can’t save files to the internal memory.
- The display image printout is too dark on the background.
- The date and time settings are not correct.
- The accuracy does not match the specification.
- APPENDIX
- INDEX

MEASUREMENT
65
Basic Measurement
This section describes the basic operations required in capturing
and viewing the input signal. For more detailed operations, see the
following chapters.
Cursor Measurement → from page 85
Configuration → from page 101
Before operating the oscilloscope, please see the Getting Started
chapter, page 10.
Channel Activation
Activate Channel
To activate an input channel,
press a channel key.
When activated, the channel
key will light up. The
corresponding channel menu
will also appear.
CH1CH1
Each channel is associated with the color shown
beside the VOLTS/DIV dial: CH1: yellow, CH2:
blue, CH3: pink and CH4: green.
When a channel is activated, it is shown above the
bottom menu system.
CH1 CH3CH2 CH4
De-activate
Channel
To de-activate a channel, press
the corresponding channel key
again. If the channel menu is
not open, press the channel key
twice (the first press shows the
Channel menu).
CH1CH1