FR 2-3 / 16 EN 4-5 / 16 DE 6-7 / 16 ES 8-9 / 16 RU 10-11 / 16 NL 12-13 / 16 IT 14-15 / 16 73502 V1 Remplacement des ferrites Replacement of ferrites Austausch von Ferritkernen Reemplazo de ferritas Замена феррита Vervangen van inductie-ferrieten Sostituzione delle ferriti 21/09/2022 Find more languages of user manuals www.gys.
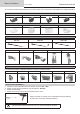
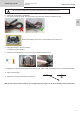
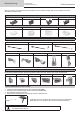
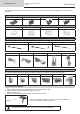
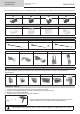
Manuel d’utilisation Remplacement des ferrites Notice originale Si un inducteur a dans sa dénomination le nom d’une ferrite, alors ce dernier est remplaçable sans outillage spécifique. Ferrites B1 B2 B3 B4 B3 B4 Protection ferrites B1 B2 Inducteurs concernés C20 / B1 S20 / B1 C180 / B1 S180 / B1 C180 / B2 S180 / B2 S180 / B3W L20 / B4 Inducteurs non concernés Pour les autres modèles, remplacer l’inducteur complet ou contacter le SAV. S90 S70 S180 L90 L70 L180 REMPLACER UN FERRITE 1.
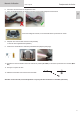
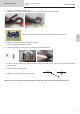
Manuel d’utilisation Notice originale Remplacement des ferrites FR 6. Finir avec du scotch brite ou du papier de verre. 7. Pour un résultat optimum du collage, il faut que le cuivre soit exempt de toutes traces. Avant remontage de la ferrite, il faut l’emboiter dans la protection en PTFE. 8. Déposer de la colle à l’aide du kit de colle (075948). tube de colle supplémentaire (054851) 9. Positionner l’ensemble sur l’inducteur précédemment préparé (nettoyage). 10.
Operating manual Translation of the original instructions Replacement of ferrites If the name of a complete inductor includes the name of a ferrite, then it can be replaced without specific tools. Ferrites B1 B2 B1 B2 B3 B4 B3 B4 Ferrite protectors Relevant inductors C20 / B1 C180 / B1 S20 / B1 S180 / B1 C180 / B2 S180 / B2 S180 / B3W L20 / B4 Irrelevant inductors For other models, replace the complete inductor or contact the Aftersales department.
Operating manual Translation of the original instructions Replacement of ferrites Do not mount the inductor at more than 100°C at the risk of damaging the joints. EN 6. Finish with Scotch-Brite or sandpaper. 7. For optimum bonding results, the copper piping must be clean and free of all traces of glue. Before reassembling the ferrite, it must be fitted in the PTFE cover. 8. Apply glue using the glue kit (075948). extra tube of glue (054851) 9.
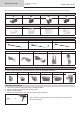
Betriebsanleitung Übersetzung der Originalbetriebsanleitung Ferritkerne austauschen Wenn ein Induktor in seiner Bezeichnung den Namen eines Ferritkerns trägt, dann ist der Ferritkern ohne Spezialwerkzeug austauschbar.
Betriebsanleitung Übersetzung der Originalbetriebsanleitung Ferritkerne austauschen DE 6. Vorgang mit Schleifring oder Schleifpapier durchführen 7. Um ein optimales Ergebnis beim Kleben zu erzielen, muss das Kupfer frei von Schmutz sein. Bevor der Ferritkern wieder zusammengesetzt wird, muss er in der PTFE-Schutzkappe eingepasst werden. 8. Kleber aus dem Klebest (075948) auftragen. weitere Tube Klebstoff (054851) 9. Positionieren Sie die Baugruppe auf dem zuvor vorbereiteten Induktor (gereinigt).
Manual de uso Traducción de las instrucciones originales Sustituir los ferritas Si un inductor tiene el nombre de una ferrita en su nombre, entonces la ferrita es reemplazable sin herramientas especiales. Ferritas B1 B2 B1 B2 B3 B4 B3 B4 Protección de la ferrita Inductores pertinentes C20 / B1 C180 / B1 S20 / B1 S180 / B1 C180 / B2 S180 / B2 S180 / B3W L20 / B4 Inductores no pertinentes Para otros modelos, sustituya el inductor completo o póngase en contacto con el Servicio Postventa.
Manual de uso Traducción de las instrucciones originales Sustituir los ferritas 6. Acabar con scotch brite o papel de lija. 7. Para obtener un resultado óptimo de adhesión, el cobre debe estar libre de toda traza. ES Antes de volver a montar la ferrita, debe introducirse en la tapa de PTFE. 8. Aplique el pegamento con el kit de pegado (075948). tubo de pegamento adicional (054851) 9. Coloque el conjunto sobre el inductor previamente preparado (limpieza). 10.
Инструкция по применению Перевод оригинальных инструкций ЗАМЕНА ФЕРРИТА Если в названии индуктора есть название феррита, то феррит можно заменить без специальных инструментов. Ферриты B1 B2 B3 B4 Защитная крышка для феррита B1 B2 B3 B4 Соответствующие индукторы C20 / B1 S20 / B1 C180 / B1 S180 / B1 C180 / B2 S180 / B2 S180 / B3W L20 / B4 Неподходящие индукторы Для других моделей, полностью замените весь индуктор или обратитесь в службу послепродажного обслуживания.
Инструкция по применению Перевод оригинальных инструкций ЗАМЕНА ФЕРРИТА 6. Обработайте скотч-брайтом или наждачной бумагой. 7. Для достижения оптимальных результатов склеивания, медь должна быть очищена от всех следов. 8. Нанесите клей с помощью набора для клея (075948). дополнительный тюбик клея (054851) RU Перед установкой, необходимо вставить феррит в тефлоновую защитную крышку. 9. Установите комплект на предварительно очищенный и подготовленный индуктор. 10.
Gebruikershandleiding Vervangen van inductie-ferrieten Vertaling van de originele handleiding Als een inductor de naam van een inductie-ferriet in z»n omschrijving heeft, kunt u deze zonder speciaal gereedschap vervangen.
Gebruikershandleiding Vertaling van de originele handleiding Vervangen van inductie-ferrieten Verhit de inductor niet boven de 100°C, dit zou de pakkingen kunnen beschadigen. 6. Maak het geheel glad met Scotch Brite of schuurpapier. 7. Voor een optimaal lijm-resultaat moet het koper ontdaan zijn van alle oude lijmresten. Voordat u de inductie-ferriet weer monteert, moet deze in z’n PTFE bescherm-element worden ingebracht. 9. Plaats het geheel op de reeds geprepareerde en goed schoongemaakte inductor.
Manuale di utilizzo Traduzione delle istruzioni originali Sostituzione delle ferriti Se un induttore ha nel suo nome il nome di una ferrite, allora la ferrite è sostituibile senza strumenti speciali. Ferriti B1 B2 B1 B2 B3 B4 B3 B4 Protezione ferriti Induttori interessati C20 / B1 S20 / B1 C180 / B1 S180 / B1 C180 / B2 S180 / B2 S180 / B3W L20 / B4 Induttori non interessati Per altri modelli, sostituire l’induttore completo o contattare il servizio di assistenza.
Manuale di utilizzo Traduzione delle istruzioni originali Sostituzione delle ferriti 6. Rifinire con scotch brite o carta vetrata. 7. Per ottenere risultati ottimali di incollaggio, il rame deve essere privo di tracce. Prima di rimontare la ferrite, è necessario inserirla nella protezione in PTFE. 8. Applicare la colla utilizzando il kit di colla (075948). tubo di colla supplementare (054851) IT 9. Posizionare il gruppo sull’induttore precedentemente preparato (pulizia). 10.
GYS France Siège social / Headquarter 1, rue de la Croix des Landes - CS 54159 53941 Saint-berthevin Cedex France www.gys.fr +33 2 43 01 23 60 service.client@gys.fr GYS UK Filiale / Subsidiary Unit 3 Great Central Way CV21 3XH - Rugby - Warwickshire United Kingdom www.gys-welding.com +44 1926 338 609 uk@gys.fr GYS GmbH Filiale / Niederlassung Professor-Wieler-Straße 11 52070 Aachen Deutschland www.gys-schweissen.com +49 241 / 189-23-710 aachen@gys.