
Installation Instructions Manual


H & H Specialties Inc. 500 Series Installation
South El Monte, CA 91733 February 20, 2007
Page 1 of 3
500 SERIES STANDARD DUTY
CURVED TRACK
INSTALLATION INSTRUCTIONS
PLEASE READ INSTRUCTIONS THOROUGHLY
BEFORE BEGINNING.
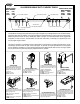
A. BI-PARTING TRAVEL
1. Lay track section on the floor or on sawhorses in the
configuration of the finished track. When laying out the track,
make sure that the track is overlapped correctly.
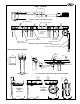
2. Before raising track into position, place all cable guides and
hangers. A cable guide must be placed adjacent to each hanger
except at center overlap and ends. Care must be taken to allow
a minimum of 1/4" clearance between cable guide and hanger.
This is especially important at curved areas. NOTE: Do not
place end stops in the center of the track at this time.
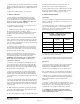
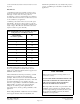
3. Install hangers (506 or 511) evenly along the entire run of the
track starting adjacent to end pulleys. Refer to recommended
spacing provided. Additional hangers should be installed on
curves and others may be required due to site conditions.
4. Attach hangers to the track. CAUTION! Open end of
hanger must face the arm extension of the master carrier.
This is required as the 500 Series master carrier attaches to the
operating line above the track. If the track is in multiple
sections, it may be beneficial to raise the track in sections before
installing the track splices. Holes have been punched at the
factory to insure proper alignment, however, make sure that the
track is free from burrs and deformation. Continue until the
entire track is hung and level. Install two overlap clamps (505),
approximately 4" from each end of the overlap.
5. If a batten is used to stiffen the track, attach the pipe clamp
(435) to the batten. Before raising the track sections, place the
clamp hangers loosely on the track. Raise the track and attach
to the pipe clamps. The 500 Series may also be suspended from
wire rope or welded link chain.
6. Attach double end (503) and single end (504) pulleys to their
respective tracks. Make sure that they are solidly anchored.
Attach all cable guides (518), if they are not already attached.
CAUTION! Make sure that the number and placement of
cable guides is such that the operating line does not rub
against any of the hangers. Cable guides should be placed in
reference to the master carrier. The inboard guide goes toward
the master carrier extension arm.
7. From the center of the track, insert single carriers (501 or
516) into each side. Next, insert one master (502 or 517) into
each track. Place one end stop (509) on each end of the track.
8. If the track is suspended from a counterweight system,
balance the system now. 643 floor block is recommended for
use with tracks suspended from counterweight systems.
WARNING! After attaching track to a counterweighted
batten, make sure to balance the line set and leave at a
comfortable working level.
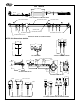
9. Start to reeve the operating line by attaching the end of the
cord to the master carrier on the double end pulley track. The
end of the operating line will attach to the cable clamp that is
closest to the center of the track. The operating line reeves
toward the single end pulley going down the center of the track.
As the cable goes past the overlap, it passes through to the
outboard cable guide. Next, the cable runs around the single
end pulley and back towards the double end pulley. Do not
attach the operating line to the second master carrier at this
time.
10. Reeve the operating line over the return sheave of the
double end pulley and down to the floor block. Next, reeve the
operating line through the floor block and back up to the double
end pulley. The operating line terminates at the first master
carrier.
11. Make sure that there is sufficient line remaining to reach the
required finished height. At this time, make sure that all the end
stops are firmly in place.
12. Slide each of the master carriers to the center stops and
tighten all the rope clamps. Move the operating line to make
sure that the track operates smoothly and the track does not flex
at any time. If problems exist, correct now before hanging
curtain.
13. Hang the curtain on to the carriers. When the track is
working properly, the carriers should move around the track
smoothly and the track should not deflect at any point of travel.
14. For ease of operation, the 500 Series track should be factory
curved to a radius of not less than 4'-0". Consult factory for a
radius less than 4'-0".
15. If track is installed on a counterweight system, make sure to
balance the line set before operating track. WARNING! After
attaching the curtain to tracks mounted on a
counterweighted batten, the line set must be balanced.
Always use caution when working with an out-of-balance
line set.
B. CEILING MOUNT INSTALLATION
Ceiling mounting the 500 Series track is very similar to the
batten mounting procedures. The following considerations
should be followed when ceiling mounting:
1. After laying out the track, use a plumb bob to locate
positions of the ceiling hangers relative to the track. Use
appropriate attachment methods for the individual job
conditions. Before installing ceiling hangers (511), make sure
that the ceiling is parallel to the floor. Shims may be needed to
compensate for irregularities.