
F4U Corsair Gyro Replacement Instructions

F4U‘s Gyro assembly steps
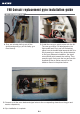
1. First, use a hobby knife to cut off the
zip-ties and gently pry off the faulty gyro
from the tray.
3. Connect up all the servo leads and signal wires to the corresponding channels on the gyro and
receiver respectively.
4. Gyro installation is complete.
2. Install the new gyro which comes with the kit .
The new gyro has a F4U label taped on the
flight mode lead. First, peel off the backing
paper from the double sided tape and stick it to
the plywood gyro mount. Pay careful attention
to the gyro placement orientation, the signal
wires should point towards the cowling. Then,
press the gyro firmly onto the tray and use the
supplied zip-ties to further secure it to the
board as shown in the picture below.
F4U Corsair replacement gyro installation guide
P.1