MANUAL TO USE MANUEL D'UTILISATION BEDIENUNGSANLEITUNG GEBRUIKSAANWIJZING MANUAL DE USARIO MANUALE D’USO ICE CREAM MAKER MACHINE À GLAÇONS EISMASCHINE IJS MACHINE MÁQUINA DE HIELO MACCHINA PER GHIACCIO
ENGLISH Your safety and the safety of others are very important. We have provided many important safety messages manual and your appliance. Always read and obey all safety massages. This is the safety alert symbol: ! All safety messages will follow the safety alert symbol and the word “DANGER” or “WARNING”. ! DANGER ! WARNING These words mean: You can be killed or seriously injured if you don’t immediate follow instructions.
CAUTION: Do not touch the evaporator when the product of the ice machine. It may burn your skin. CAUTION: Unplug the unit before to ensure maintenance, electrical shock. In the case where the power supply of the device would be cut off unintentionally during the ice production cycle or warning lights flash on the control panel and the machine produces more ice, Turn off the power and unplug the device. Wait a few minutes and then gently remove the cubes.
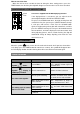
A 7 1 B 3 C 2 6 D E 5 4 A 1 2 5 3 6 4 7
UNPACKING YOUR ICE MAKER 1. Remove the exterior and interior packaging. Check that ice basket and ice scoop is included. If any parts are missing, please contact our customer service. 2. Clean the interior with lukewarm water and a soft cloth. Take out the ice basket and clean it OPERATING PROCEDURES & MAINTENANCE 3. Find a location for your ice maker that is protected from direct sunlight and other sources of heat (i.e.: stove, furnace, radiator). Place the ice maker on a level surface.
USING YOUR ICE MAKER START TO MAKE THE ICE-CUBE 1. Open the cover, remove the ice basket and pour water into water reservoir. Keep water level below the level mark. 2. Press “ON/OFF” button on the control panel to turn on the unit to begin the ice making cycle. 3. Select the size of the ice cube by pressing the “Select” button.
How to cancel the timer When the unit has been set with the timer or during the timer setting process, press the TIMER button, then the delay time digit will disappear, mean the timer set has been cancelled. CLOCK DISPLAY & THE CORRECT TIME Clock Time 1 2 5 3 6 4 7 This unit is supplied with CLOCK dipalying function. If the displayed time is not correct, you can adjust it to the correct digit through the CLOCK and SELECT button.
TECHNICAL SPECIFICATION Model Protection Type Power K B 15 KB15 I 220-240V/50Hz I 220-240V/50Hz Ice Making Current 0.9A 0.9A Ice Harvest Current 1.4A 1.4A Refrigerant R134a/75g R134a/75g Net Weight 12.5Kg 13.0Kg Enclosure Plastic stainless steel Manufactured for and imported by ADEVA SAS 8 rue Marc Seguin – 77290 MITRY-MORY – FRANCE Tél. (+ 33) 1.64.67.00.01 – Fax : (+ 33) 1.64.67.00.05 contact@hkoenig.com- www.hkoenig.
FRANCAIS INSTRUCTIONS DE SÉCURITÉ IMPORTANTES De nombreux messages importants de sécurité figurent dans ce manuel et sur votre appareil. Lisez-les et observez toujours leurs instructions. Voici un symbole d'alerte de sécurité : ! Ce symbole d'alerte de sécurité précède tous les messages de sécurité avec le mot “DANGER” ou “ATTENTION”. ! DANGER ! ATTENTION Ces mots signifient que vous risquez d'être tué ou sérieusement blessé si vous ne suivez pas immédiatement ces instructions.
assurez-vous qu'il y a au moins 10 centimètres entre le dos de l'appareil et le mur. Maintenez un espace d'au moins 10 centimètres libre de chaque côté de l'appareil. N'utilisez que de l'eau pou fabriquer vos cubes de glace, et aucun autre liquide. Ne nettoyez pas votre machine à glace avec un liquide inflammable. Les émanations peuvent créer un risque d'incendie ou d'explosion. Ne renversez pas l'appareil.
APPRENEZ À CONNAÎTRE VOTRE APPAREIL 1. Couvercle : 2. Cuillère à glaçons 3. Pelle à glaçons 4. Panneau de commande : avec une fenêtre transparente pour voir à l'intérieur fonctions visibles et faciles d'emploi, et affichage des réglages sur écran à cristaux liquides A. Fenêtre d'affichage à cristaux liquides (LCD) 1. Heure actuelle 2. Affichage d'absence d'eau : quand il clignote, cela signifie qu'il n'y a pas d'eau dans l'appareil et qu'il faut en verser dedans 3.
DÉBALLAGE 1. Enlevez l'emballage extérieur et intérieur. Vérifiez que le panier à glaçons et la cuillère à glaçons sont bien là. S'il manque une pièce, contactez le service après-vente. PROCÉDURES OPÉRATOIRES & MAINTENANCE 2. Nettoyez l'intérieur à l'eau tiède avec un linge doux. Sortez le panier à glaçons et nettoyez-le. 3. Disposez votre machine à glace à l'abri de la lumière du soleil et de toute autre source de chaleur (ex. cuisinière, four, radiateur).
UTILISATION COMMENCER À FABRIQUER DES GLAÇONS 1. Ouvrez le couvercle, enlevez le panier à glaçons et versez de l'eau dans le réservoir. Le niveau de l'eau doit rester sous la ligne de repère. 2. Appuyez sur le bouton “ON/OFF” du panneau de commande pour allumer l'appareil et lancer le cycle de fabrication de la glace. 3. Sélectionnez la taille des glaçons en appuyant sur le bouton “Select”.
Comment régler la minuterie D'abord, appuyez sur le bouton TIMER : le délai par défaut “3.0H” clignote sur l'écran LCD. Ensuite, appuyez sur le bouton SELECT pour choisir le délai que vous désirez. Chaque fois que vous appuyez sur le bouton SELECT, le délai augmente de 0,5 heure. Si vous appuyez sur le bouton SELECT en continu pendant plus de 3 secondes, le délai changera très vite.
Le cycle de production de glace est normal, mais aucun glaçon n'est produit La température de l'eau dans le réservoir est trop basse Changez l'eau dans le réservoir.
DEUTSCH VORBEREITUNG DER EISMASCHINE VOR DEM GEBRAUCH Ihre Sicherheit und die der anderen ist sehr wichtig. Viele wichtige Sicherheitshinweise werden in diesem Handbuch und dem Gerät enthalten sind. Lesen Sie sie und sehen Sie den Anweisungen. Sehen Sie hier ein Warndreieck: ! Dieses Warndreieck, vor allen Sicherheits Nachrichten mit dem Wort "GEFAHR" oder "WARNUNG". GEFAHR ! WARNUNG Diese Worte bedeuten, dass man das Risiko, einen Unfall führen, wenn Sie sich nicht an diese Anweisungen.
Ziehen Sie die Eismaschine vor der Reinigung oder der Durchführung von Reparatur-oder Wartungsarbeiten. Seien Sie vorsichtig, wenn Sie das Gerät in der Nähe Kinder und vergessen Sie nicht, sie zu beobachten. Verwenden Sie nicht die Eismaschine in offenen Räumen. Setzen Sie auf Sonnenlicht und stellen Sie sicher, gibt es mindestens 10 cm zwischen der Rückseite des Gerätes und der Wand. Lassen Sie einen Abstand von mindestens 10 cm frei auf jeder Seite des Gerätes.
BETRIEBS UND WARTUNGSARBEITEN Um jegliches Risiko der Instabilität des Geräts, muss es auf einer horizontalen Fläche und regelmäßige platziert werden. 1. Kappe: 2. Löffel für eis 3. Ice Catcher 4. Control Panel: mit einem klaren Fenster nach innen zu sehen. sichtbaren Merkmale und einfach zu bedienen und Setup-Bildschirm LCD. A. Flüssigkristallanzeige (LCD) 1. Aktuelle Zeit 2. Unsere Mangel an Wasser: Wenn sie blinkt, es gibt kein Wasser in das Gerät und befüllt werden. 3.
NUTZUNG AUSPACKEN 1. Entfernen Sie die äußeren und inneren Verpackung. Prüfen Sie, ob Eis legen und Eis Schaufel ist. Wenn fehlende Teil, kontaktieren Sie bitte Kundenservice. 2. Reinigen Sie das Innere mit warmem Wasser und einem weichen Tuch. Entfernen Sie das Eis legen und reinigen. 3. Legen Sie die Eismaschine weg vom Sonnenlicht oder anderen Wärmequellen (zB Herd, Backofen, Heizung). Legen Sie die Eismaschine auf eine horizontale Fläche.
geschnitten werden der dritte Stift (Masse) Netzkabel. Für Fragen im Zusammenhang mit der Energieversorgung und / oder geerdet, kontaktieren Sie einen Elektriker. 3. Dieses Gerät benötigt eine Standard-Steckdose 220-240v, 50 Hz dreipoligen geerdet. Bevor Sie Ihr Eismaschine, empfehlen wir eine gründliche Reinigung. 1. Entfernen Sie das Eis Basket. REINIGUNG UND PFLEGE 2. Saubere Innen mit verdünntem Spülmittel, warmem Wasser und einem weichen Tuch. 3.
EINSTELLUNG DES TIMERS Minute Dauer Bereich: 0,5 bis 19,5 Stunden. Standard Dauer: 3 Stunden. Wenn das Gerät läuft, können Sie die OFF-TIMER-Taste, um nach Ablauf der Frist zu stoppen. Und wenn das Gerät gestoppt ist, können Sie die ON-TIMER-Taste, um automatisch nach einer voreingestellten Zeit neu zu starten. Also, wenn Sie nach Hause kommen oder bei der Vorbereitung zu essen genießen Sie, was diese Eismaschine zu bieten hat. Wie stellen Sie den Timer Drücken Sie zuerst die TIMER: Der Standard "3.
PROBLEM Das Symbol MÖGLICHE URSACHE LÖSUNG Nicht genug Wasser Stoppen Sie die Eiswürfel, Wasser hinzufügen und drücken Sie die Taste "ON / OFF", um das Gerät zurückzusetzen Viele Eiswürfel Entfernen Sie Eiswürfel von Eis Basket blinkt Das Symbol auf dem LCD erscheint Die Eisproduktion Zyklus ist sehr lang Die Eiswürfel halten zusammen Die Umgebungstemperatur oder das Wasser ist sehr gering Die Umgebungstemperatur oder Wassertank ist sehr hoch Die Eisproduktion Zyklus ist normal ist, aber es kommt
NEDERLANDS Uw veiligheids en die van de mensen om u heen is zeer belangrijk. In dit handboek komen talrijke veiligheidsberichten over dit apparaat voor. Lees de instructies zorgvuldig en houd dit handboek bij. Hier ziet u het symbol van veiligheids waarschuwingen : Dit symbol gaat vooraf alle veiligheidsberichten zoals « GEVAAR » en « ATTENTIE » ! GEVAAR ! ATTENTIE Deze symbolen betekenen dat u gevaar van dood of ernstige verwondingen op loopt als u niet onmiddelijk de instructies volgt.
Laat het apparaat nooit vallen. Als u het apparaat in koud weer heeft ontvangen, laat het eerst op kamertemperatuur komen voordat u het aansluit. Het apparaat mag nooit in water of andere vloeistoffen ondergedompelt worden. Als u vaststelt dat het apparaat het niet goed doet, schakel het onmiddelijk uit om risico te vermijden. Probeer nooit zelf het apparaat uit elkaar te halen. Stuur het op naar een erkend centrum voor reparatie.
HET KENNIS MAKEN MET UW APPARAAT 1. Deksel : 2. Lepel Ijsblokjes 3. Schep 4. Contrôle Paneel : met een transparent venster om naar binnen te kunnen kijken makkelijke functies voor het aanpassen van de display A. Scherm display en vloeibare kristallen (LCD) 8. Huidig Uur 9. Gebrek aan water : als er niet genoeg water is, steekt een licht op en is het noodzakkelijk om water bij te vullen. 10. Met ijs gevult : als het lichtje opsteekt betekent dat dat de ijs bak vol zit met klontjes. 11.
PROCEDURES OPERATIE & ONDERHOUD UITPAKKEN 1. Verwijder de verpakking van binnen en van buiten. Controleer dat het ijs bak en de lepel en degelijk er bij zitten. Zo niet neem contact op met u verkoop service. 2. Maak het apparaat schoon gebruikend lauw water en een zacht doek. Haal de ijs bak weg en maak deze ook schoon. 3. Houd uw machine uit de buurt van de zon of andere warmtebronnen (fornuis, oven, radiator).
UTILISATION BEGIN IJSBLOKJES TE FABRECEREN Open het deksel en verwijder het ijs bak. Vul de water tank met water bij, het niveau moet onder het limit blijven. 1. Druk de AAN /UIT knop van het contrôle paneel in om het apparaat aan te maken. Het gaat beginnen met het fabreceren van ijs.. 2. Selecteer de grote van u ijsklontjes door oop de « Select » knop te drukken.
Na het uitschakelen, druk de TIMER knop in. De display geeft « 3.0H »aan. Druk de SELECT knop in om de termijn te kiezed die u wilt. Telkens als u de SELECT knop indrukt, stijgt het termin met 0,05 uur. Als u gedurende meer dan 3 tweede de SELECT indrukt, zal de termijn sneller veranderen. Als u gedurende meer dan 5 tweede de SELECT indrukt, houdt het display op te flikkeren en dat geeft aan dat de termijn geregelt wordt.
HET OPLOSSEN VAN PROBLEMEN PROBLEMEN OORZAAK Het symbool op steekt Het symbool Display van het Niet genoeg water Stop de Ijs Machine en vul het met water bij. Druk « AAN/UIT »om op nieuw te starten Te veel Ijs Verwijder het ijs van de bak.
ESPANOL PRÉPARACIÓN DE LA MAQUINA DE HIELO ANTES DE SU USO Su seguridad y la de los demás es muy importante. Este manual y el dispositivo contienen muchos mensajes de seguridad importantes. Léalos y vea siempre las instrucciones. Vea aquí un símbolo de alerta de seguridad: Este símbolo de alerta de seguridad precede todos los mensajes de seguridad con la palabra "PELIGRO" o "ADVERTENCIA".
No utilizar la máquina de hielo en espacios abiertos. No exponerlo a la luz del sol y asegurarse de que hay al menos 10 centímetros entre la parte posterior de la unidad y la pared. Deje un espacio de al menos 10 cm libres a cada lado de la unidad. Utilice sólo agua para hacer los cubos de hielo, y ningún otro líquido. No limpie su máquina de hielo con un líquido inflamable. Los vapores pueden crear un riesgo de incendio o explosión. No deje caer el dispositivo.
PROCÉDIMIENTOS OPERACIONALES & MANTENIMIENTO IMPORTANTE: Los cables en el cable de alimentación están coloreados de acuerdo con el siguiente código: Verde o verde con franja amarilla: Tierra Blanco: Neutral Negro: Bajo tensión Para evitar todo riesgo por la inestabilidad del dispositivo, este debe ser colocado sobre una superficie horizontal y regular. 1. Tapa: con una abertura transparente para ver el interior 2. Cuchara de hielo 3. Recogedor para hielo 4.
DESEMBALAJE 1. Remueva el embalaje exterior e interior. Compruebe que la cesta de hielo y la cuchara para hielo están. Si falta alguna parte, póngase en contacto con el servicio al cliente. 2. Limpie el interior con agua tibia y un paño suave. Extraiga la cesta de hielo y límpiela. 3. Ponga la máquina de hielo lejos de la luz del sol y otras fuentes de calor (por ejemplo, estufas, hornos, radiadores). Coloque la máquina de hielo en una superficie horizontal.
USO 1. Extraiga la cesta de hielo. 2. Limpie el interior con un detergente diluido, agua tibia y un paño suave. 3. A continuación, utilice agua para limpiar las partes internas y después vacíela quitando el tapón de drenaje ubicado al lado. 4. Periódicamente debe limpiar la máquina de hielo con un detergente suave y agua tibia. 5. Seque el interior y el exterior con un paño suave. 6. Si la máquina no va a ser utilizada durante mucho tiempo, quite el tapón de drenaje para eliminar toda el agua del tanque.
Duración predeterminada: 3 horas. Cuando la unidad está funcionando, puede configurar el botón OFF-TIMER para detenerlo después del plazo establecido. Y cuando la unidad está detenida, usted puede configurar el botón ON-TIMER para reiniciarse automáticamente después del tiempo establecido. Así cuando usted regrese a casa o cuando se prepare para comer podrá disfrutar de lo que esta máquina de hielo tiene para ofrecerle.
PROBLEMA El símbolo CAUSA POSIBLE No hay suficiente agua Detenga la máquina de hielo, agregue agua y vuelva a pulsar el botón "ON / OFF" para reiniciar la unidad Muchos cubos de hielo Quite cubos de hielo de la Cesta de hielo parpadea El símbolo aparece en la pantalla LCD Los cubos de hielo se pegan entre sí El ciclo de producción de hielo es muy largo La temperatura ambiente o la del agua es muy baja El ciclo de producción de hielo es normal, pero no se hace ningún hielo.
ITALIANO ISTRUZIONI IMPORTANTI INDICE PER LA SICUREZZA PREPARAZIONE PRELIMINARIA AL PRIMO UTILIZZO DELLA MACCHINA La vostra sicurezza e quella degli altri è molto importante. Leggere attentamente e osservare sempre le numerose istruzioni presenti su questo manuale e sul vostro apparecchio. Questo è il simbolo di allerta per la sicurezza: Questo triangolo di allerta precede tutti i messaggi di sicurezza insieme a : "PERICOLO" o "ATTENZIONE".
Non utilizzare la macchina per il ghiaccio all’aperto. Tenere la macchina lontano dalla luce del sole e assicurarsi che ci sia almeno 10 cm tra il retro della macchina e il muro. Consentire alla macchina di avere una distanza di almeno 10 cm liberi su ogni. Utilizzare solo acqua per la produzione di cubetti di ghiaccio; mai altri liquidi. Non pulire la macchina per il ghiaccio con liquidi infiammabili in quanto i fumi possono comportare un rischio di incendio o esplosione.
IMPARARE A CONOSCERE L’APPARECCHIO 1. Coperchio: con finestrella trasparente per vedere all’interno 2. Cucchiaio di ghiaccio 3. Paletta per il ghiaccio 4. Pannello di controllo: funzioni visibili e facili da usare, impostazioni visibili sullo schermo a cristalli liquidi A. Display a cristalli liquidi (LCD) 1.Ora esatta 2.Segnale assenza di acqua: quando lampeggia, significa che non c'è acqua nella macchina e che quindi bisogna riempirla 3.
DISIMBALLAGGIO 1. Rimuovere l'imballaggio esterno e interno. Controllare che il contenitore di cubetti di ghiaccio e la paletta ghiaccio siano presenti nella confezione. Se dovessero mancare dei componenti, rivolgersi al servizio clienti. PROCEDURE OPERATIVE & MANUTENZIONE UTILIZZO 1. Pulire l'interno con acqua tiepida con un panno morbido. Estrarre il contenitore di cubetti di ghiaccio e pulirlo. 2.
INIZIARE LA PRODUZIONE DI GHIACCIO 1. Aprire il coperchio, rimuovere il contenitore e versare l’acqua nel serbatoio. Il livello dell'acqua dovrebbe rimanere sotto la linea di riferimento. 2. Premere il tasto "ON/OFF" dal pannello di controllo per accendere e avviare il ciclo di produzione del ghiaccio. 3. Selezionare la dimensione dei cubetti di ghiaccio premendo il tasto "Select". Sono disponibili tre formati: PICCOLO, MEDIO e GRANDE.
lampeggiare e diventa fisso: questo significa che il timer è stato impostato. Come annullare il timer Quando si sta regolando l’ora o durante l'impostazione del timer, premere TIMER: il display del tempo scomparirà, il che significa che l'impostazione del timer è stata annullata. DISPLAY E IMPOSTAZIONE DELL’ORARIO 1 2 3 4 Questa macchina è fornita di una funzione per visualizzare il tempo. Se l'ora visualizzata non è corretta, è possibile reimpostarla Ora esatta tramite i tasti CLOCK e SELECT.
RISOLUZIONE DEI PROBLEMI PROBLEMA Il simbolo lampeggia Il simbolo display appare sul POSSIBILE CAUSA SOLUZIONE Non c’è abbastanza acqua nel serbatoio Spegnere la macchina per il ghiaccio, aggiungere acqua e premere nuovamente il tasto "ON/OFF" per riavviare Troppo ghiaccio Togliere un po’ di ghiaccio dal cestello Il ciclo di produzione del ghiaccio è troppo lungo I cubetti di ghiaccio si attaccano l’un l’altro La temperatura dell'acqua nel serbatoio è troppo bassa Il ciclo di produzione del ghi
PARAMETRI TECNICI SPECIFICHE TECNICHE Modello KB15 Tipo di protezione I Potenza elettrica 220-240V/50Hz Corrente di produzione del ghiaccio 0,9A Corrente di raccolta del ghiaccio 1,4A Refrigerante R134a/75g Peso netto 13,0 kg Struttura della macchina i nox Ambiente ATTENZIONE: Non gettare quest’ apparecchio tra i rifiuti domestici.