ELECTROGLIDE™ ELECTRIC POWERHEAD OWNER’S MANUAL Review this manual before operating your Electroglide Electric Powerhead
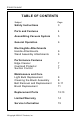
ELECTROGLIDE TABLE OF CONTENTS Subject Page Safety Instructions 3 Parts and Features 4 Assembling Vacuum System 5 General Operation 6 Electroglide Attachments Handle Attachments Wand Assembly Attachments 6 6 Performance Features Edge Cleaner Overload Protector Suction Control 7 7 7 Maintenance and Care Light Bulb Replacement Cleaning the Brush Assembly Belt Removal and Replacement Brush Replacement 8 8 9-11 11 Replacement Parts 12-13 Limited Warranty 14 Service Information 15 ©Copy
ELECTROGLIDE 3 IMPORTANT SAFETY INSTRUCTIONS Read all instructions before using this vacuum system. When using an electrical appliance, basic precautions should always be followed, including the following: WARNING To reduce the risk of fire, electrical shock or injury: · Unplug and disconnect power before servicing. · Do not use on wet surfaces. · Do not allow to be used as a toy. Close attention is necessary when used by or near children. · Use only as directed in this manual.
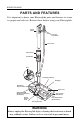
ELECTROGLIDE PARTS AND FEATURES It is important to know your Electroglide parts and features to assure its proper and safe use. Review these before using your Electroglide.
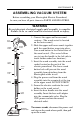
ELECTROGLIDE 5 ASSEMBLING VACUUM SYSTEM Before assembling your Electroglide Electric Powerhead, be sure you have all parts shown in PARTS AND FEATURES. WARNING Do not plug into electrical supply until assembly is complete. Failure to do so could result in electrical shock or injury. Hose Handle Handle Button Suction Control Plug Holder Upper Wand Power Cord Button Lock Wand Swivel Cord Holder Lower Wand Wand Button Wand Easy Release Pedal 1. Connect the upper and lower wand sections.
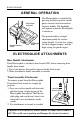
ELECTROGLIDE GENERAL OPERATION Pile Height Indicator Handle Release Pedal Pile Height Pedal The Electroglide is controlled by pressing the three-position on/off power control switch located on the hose handle. The headlight will operate when the Electroglide is turned on. The powerhead has a height adjustment pedal for various carpet heights. Use the low setting for short napped carpets, and the high setting for plush carpets.
ELECTROGLIDE PERFORMANCE FEATURES Edge Cleaner Active brush edge cleaners are on both sides of the Electroglide. Therefore, guide either side of the Electroglide along baseboards or next to furniture to help remove dirt trapped at carpet edges. Overload Protector The Electroglide has built-in protection against motor and belt damage should the brush jam.
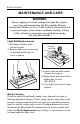
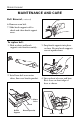
ELECTROGLIDE MAINTENANCE AND CARE WARNING Always unplug electrical cord and vacuum hose before servicing and maintaining the Electroglide Electric Powerhead. Failure to do so could result in electrical shock or personal injury from cleaner suddenly starting. Always follow all safety precautions specified when caring for your Electroglide. Light Bulb Replacemnent 1. Disconnect cleaner from electrical outlet. 2. Remove light cover by pressing in and lifting both sides of cover as shown.
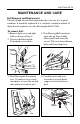
ELECTROGLIDE 9 MAINTENANCE AND CARE Belt Removal and Replacement The belt should also be checked periodically to be sure it is in good condition. It should be replaced if it is stretched, cracked or broken. If the belt needs replaced, use only Electroglide Belt # 7960. To remove belt: 1. Remove light cover and light bulb as shown on Page 8. 2. Unscrew the Electroglide Powerhead cover screws. 4. Turn Electroglide Powerhead right side up. Press handle release pedal and lower the swivel.
ELECTROGLIDE MAINTENANCE AND CARE Belt Removal (continued) 6. Remove worn belt. 7. Slide brush supports off to check and clean brush support areas. To replace belt: 1. Slide washers and brush supports onto brush assembly. 2. Install new belt over motor drive, then over brush sprocket. 3. Snap brush supports into place on base. Be sure brush supports are not upside-down. 4. Line up front of cover and base. Rest cover on front edge of base as shown.
ELECTROGLIDE 11 MAINTENANCE AND CARE Belt Replacement (continued) 5. Tilt cover to back. Press cover firmly until side tabs snap into place. Replace cover screws, light bulb and light cover. Brush Replacement 1. Remove the Electroglide Powerhead cover, belt and brush assembly. 2. Remove brush supports, washers, screws, end brush, and brush sprocket pieces from ends of brush assembly. 3. Reassemble brush assembly as shown below. 4.
ELECTROGLIDE ELECTROGLIDE REPLACEMENT PARTS
ELECTROGLIDE 13 ELECTROGLIDE REPLACEMENT PARTS Illus. No. 1 3 4 5 6 7 8 9 10 11 12 13 14 15 16 17 18 19 20 21 22 23 24 25 26 Part No.
ELECTROGLIDE LIMITED WARRANTY H-P PRODUCTS, INC. warrants that the Electroglide Electric Powerhead, when used for household purposes, pursuant to Seller’s instructions, will be free from defects in materials and workmanship for a period of one year from the date of the initial consumer purchase. H-P PRODUCTS, INC.
ELECTROGLIDE 15 SERVICE INFORMATION The instructions in this booklet serve as a guide to routine maintenance. If additional service or repairs are required, please call 1-800-822-8356 for your nearest authorized service dealer. H-P PRODUCTS, INC. 512 W.
® H-P Products, Inc. 512 W.