
Operation Manual


4.4. Installation of the fireplace stove within the room
Before any installation work is started, you need to verify the floor (ceiling) load capacity.
The load conditions for the particular type of the device must be met (depending on the
particular weight). The fireplace stove must be installed on a heat insulating base that
overlaps the fireplace stove ground plan dimensions on the sides and in the rear by at least
100 mm; the overlap in the front (the direction of the feeding opening) is 300 mm. If a metal
base is used, the thickness must be at least 2 mm. Kindly pay attention to the information
provided in Supplement 1.
Caution! Make sure you provide space enough for easy approach to the device, smoke
flue and chimney for the purpose of cleaning.
4.5. Cleaning the heating device and chimney
In the course of the installation of the fireplace stove and connection to the chimney vent,
approach in the chimney for occasional cleaning of chimney pipes and the chimney as well
is required. By regular cleaning of the smoke pipes and the firing space in the fireplace
stove, you may optimise the performance of the heating system. By regular chimney
cleaning, you avoid inflammation of fouling solid particles caught on the chimney walling.
4.6 Fire in the chimney
In case of fire in the chimney, put out the fire in the stove immediately: remove the
burning fuel remnants with a shovel (put them aside in a suitable non-flammable
container) and call the fire brigade immediately: Call the fire brigade or the integrated
rescue system centre.
4.7. External combustion air supply system
For the firing process, enough fresh air supply is needed. While firing wood, the device
needs up to 15 m3 of fresh air per hour. In case of newly built houses, the insulating
materials used in the house result in low airiness coefficient for the house, due to plastic
windows, etc.). Another issue may be exhaust devices or other heat installations in
operation in the room or within the space where the fireplace is installed.
In such well-insulated houses, the quality of the firing process is lower, being accompanied
with tarring and smoke path clogging (and/or smoke penetration and spread in the room).
Make sure that the air supply in the room is sufficient, by open windows or door in the next,
better ventilated room. It is more convenient if you – along with the installation of the
heating device – install a ventilation hole to provide air supply, equipped with a regulating
grate (protected against clogging).
5. OPERATING INSTRUCTIONS
5.1. Before first operation
Before the first putting into operation, you have to remove labels from the glass,
accessories found in the ashpan or inside the hearth, including transport clamps etc.
Following the illustration in the Technical Card, check that the movable partitions designed
for directing the flue gases, fireclay brick shapes or the barrier are located properly (they
may have moved out of the position during the transportation or installation work). If you
find any wrong position, correct it; otherwise, the heating device might not work properly.
The fireplace stove surface layer is provided with fire-resistant paint being softened to
become harder after the first fire made in the fireplace stove. During the soft phase, pay
special attention to danger of damage on the surface by touching it with fingers, tools, etc.
For the very first use, the initial fire should be very small, to “warm up” the device gradually:
it is recommended to load smaller quantities to establish lower temperature. All materials
need the initial lower- temperature phase in order to “get used to” the thermal stress. By
such slow heating up, you avoid cracks in fireclay bricks, likely damage on surface paint or
material deformation in general. The odour generated during the paint hardening process at
the first putting into operation is just temporary – however, it is recommended to ventilate
the room intensively. If pets are present, move them to another room for a while.
With the models equipped with the glass door comprising of three parts, check the
segments for gaps (which may be formed during the transport or the first use).
What to do if you find a gap between the glass segments:
Partially release the holder
nuts. Move the glass segments (carefully!) closer to each other: the edges should touch
slightly. Slowly and carefully, tighten up the holder nuts.
5.2. Setting the fire
To set the fire easily, follow this procedure: Put 2 or 3 smaller wooden logs onto the bottom
or on the grate. Add paper or permitted fire lighters, then brushwood, small firewood and
thicker logs (the last layer). You should always load a bigger quantity (i.e. enough wood,
which means up to approx. 2/3 of the height of the fireclay (vermiculite) lining. By loading
such bigger quantity, you establish time long enough in order to heat the chimney thus set
the proper conditions for the chimney function. Open the primary air regulator wide
(maximum). Sometimes it is good to reduce the secondary air supply at this moment – the
fuel catches the fire better. After setting the fire, keep the door shut all the time. As soon as
the wood flares up properly, use the air supply regulators to set not very intensive, rather
slow burning. To adjust the flame and the burning, you may apply the information specified
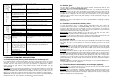
in the Technical Card or Chart 1.
You may poke the fire when needed, using the fire hook or the poking lever (if installed).
Caution! The stoking door (the firing chamber) and the ashpan door (if installed with
your particular model) must be kept shut all the time, except setting the fire, fuel
reload or ash removal.
Caution! After every standby for a longer time, before you set the fire again, check
the fireplace stove for clearness and cleanness of the smoke flue, chimney and firing
area.
5.3. Feeding the fire
To prevent the smoke spreading throughout the room during the fire feeding, the following
is recommended: Approx. 5 to 10 seconds before you open the stoking door, open the
primary air regulator wide. Then, open the stoking door a bit only, wait for a couple of
seconds to allow the smoke exhausting through the chimney. After that, open the door
wide. Pay attention to the door any time you open it: do not allow live cinder fall out. When
you reloaded the wood, shut the stoking door. When the fuel burns up (no carbon black
flame), bring the regulating system back in the previous position (or close the regulator,
respectively). While feeding the fire, make sure the wood does not exceed the level of the
fireclay (vermiculite) lining in the firing area. The quantity of the fuel reloaded should be
more or less the same as specified in the information provided about the hourly
consumption for the particular model of the heating device (see the Technical Card). If you
overload the fireplace stove with excessive fuel, you may cause permanent damage to the
fireplace stove construction.
Caution! If you want to avoid unnecessary smoke spreading throughout the room
during the feeding, reload the wood after the previous load has burnt up to cinders.
5.4. Glass cleanness
The cleanness of the transparent glass depends on the type of the fuel, proper combustion
air supply (this is applied especially to the secondary air), the chimney effect and – last
but not least – on the way how the fireplace stove is operated. It is recommended to load
one layer of the wood only: the logs should be laid evenly, farther from the glass (as far as
possible). The rule is the same for coal cakes as well (keep the distance 5 to 10 mm
10
11