
Installation Guide


Installation Guide - v1.0 Page 7
©HAB Home Intelligence, LLC. 05/2019
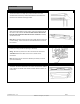
7. Install the iblinds Motor
Once all connections to the iblinds motor have been made, and the
proper adapters have been installed, place the iblinds motor in the
headrail. The motor should be as close to the center of the window blind
headrail as possible.
8. Reinsert the Tilt Rod
Make sure the tilt drums are all in the same orientation that they were in
during step 2, before the tilt rod was removed. Carefully insert the tilt
rod. Take care to align the tilt rod so it will slide through the adapter (if
used) and the iblinds motor.
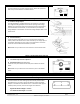
Note: You may need to rotate the twist rod slightly to have it slide
through the adapter (if used) and the iblinds motor.
9. Route Cables
Carefully place all the excess cables in the headrail. Take care to route the
cables where they will not interfere with the tilt rod or any of the moving
mechanisms in the headrail.
10. Window Blind Installation
1. Attach Solar Panel (if using the solar panel option)
Lock solar panel into clear clips and use hooks to hang onto headrail. Plug
into the solar charging port SLR.
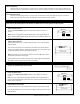
2. Mount Window Blind
Carefully place the window blinds back in the headrail mounting brackets
and lower the window blind. Make sure all cables are tucked away in the
headrail and are not interfering the movement of any moving parts of the
headrail.
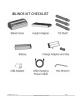
Charging Battery using the Charge Adapter, USB Cable and USB Adapter
1. Attach USB Cable to Headrail Charge Adapter
Attach the Micro USB end of the supplied USB Cable into the Charge
Adapter of the headrail. Leave connected for at least 8 hours.
NOTE: USB is used for charging only.
2. Attach USB and Plug in Power Adapter
Attach the other end of the USB cable into the USB power adapter and
plug the power adapter into the wall outlet.