
Assembly Instructions


Assembly Instructions
10
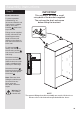
Step 13
Top of Unit
WALL
WALL
Back of Unit
Fit the 2 brackets
To prevent possible
overbalancing, we
recommend that this unit
is secured to a suitable
wall by use of the 2
brackets fitted to the
top of the unit.
Fixings are not supplied,
as they will need to suit
the wall type and the
length of screws will
depend on the distance
from the back of the unit
to the wall.
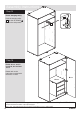
Fix the brackets
loosely onto the top of
the unit using screws
and mark the wall for the
wall fixing.
Swivel the brackets
away from the wall and
drill the holes in the wall
using a suitable drill bit
and fit your wall fixings.
Swivel the brackets
back and fix the brackets
to the wall, then tighten
the screws .
Note: Take care when
drilling the wall that you
do not drill into any
pipes, wires etc.
If in doubt, consult an
expert.
Warning: The
unit is heavy.
Lift with care.
L
L
I
L
L
I
L
L
I
L
L
NOTE
The unused fittings from this assembly are used to fit the doors.
Please refer to the instructions packed with the doors.
IMPORTANT
This unit MUST be fixed to a wall
using both of the brackets supplied.
The unit must be level and square
before fitting the brackets.
Add to the leaflet extra emphasis that the unit must be level and square and MUST be fixed to the wall with the overbalance protectors