
Assembly Instructions
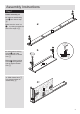


See page 1 for link
to instruction video!
b:
Q
Q
P
11
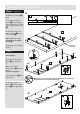
Assembly Instructions
a:
SNAP!
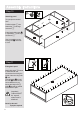
Step 16
Hanging doors
a: With help, slot hinge
door Q onto hinge back
P.
b: Tighten screw shown
to lock hinges in position.
Repeat a and b for other
door.
See ‘Hinge adjustment’
in step 17 if the doors
need adjusting.
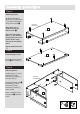
c: Before adjusting the
doors, use a spirit level to
check if the base of this
unit is level front-to-back
and side-to-side in the
three positions shown.
Use pegs S to square
your unit. Knock peg S in,
as far as you require,
under the ends of the unit
and then snap off flush
with the panel.
c:
Q
P
S
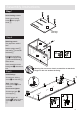
Q
P
Q
P
Q
P