
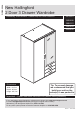
Assembly Instructions


7
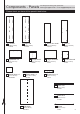
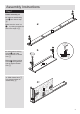
Assembly Instructions
Step 4
Attaching panels
Attaching plinths
a: Allign the sides of
plinth front # with bottom
5 as shown and attach
using 40mm screw A.
Note: there are no
predrilled holes for
40mm screw A.
Note: top and bottom
panels 5 are identical.
Only prepare one of the
panels at this satge.
This will be the bottom
panel
Repeat with plinth back
$.
A
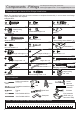
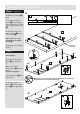
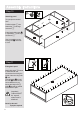
Step 6
Position bottom 5, small
horizontal 8, large
horizontal 7 and top 5
onto right side 2.
Insert large locking nuts I
into bottom 5, small
horizontal 5, large
horizontal 7 and top 5
where shown.
Use a screwdriver to turn
locking nuts I clockwise
to lock.
Top side
A
A
A
5
Step 5
Insert locking screws
a: Screw 24mm locking
screw H into bottom 5.
Top side
5
M
M
Unfinished
back edge
H
H
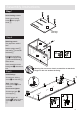
I
I
I
I
I
I
I
I
I
I
I
I
2
5
7
5
14
13
Unfinished
back edge
8