
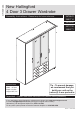
Assembly Instructions


10
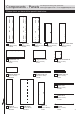
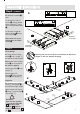
Assembly Instructions
Step 10
Attaching panels
Position small horizontals
8 onto uprights 3.
Insert three large locking
nuts I into small
horizontals 8 as shown.
Use a screwdriver to turn
locking nuts I clockwise
to lock.
H
H
H
H
H
H
H
H
H
H
H
H
I
I
I
I
I
I
M
M
P
3
3
2
2
1
1
8
8
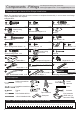
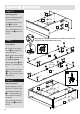
Step 11
H
1
P
M
1
F
F
F
P
P
P
P
P
H
H
Finished
front edge
Insert fittings
a: Screw 24mm locking
screw H into left side 1
and right side 2.
Note: Insert 24mm locking
screw H as far as shown.
Do not over tighten.
Attach hinge back P onto
left side 1 and right side
2.
Attach hanger rail support
M using 12.5mm screw
F�onto left side 1 and
right side 2.
1
2
Step 12
Attaching panels
Position left side 1 and
right side 2 onto the unit.
Insert large locking nuts
I�into top/bottoms 6
and small horizontals 8
as shown.
Use a screwdriver to turn
locking nuts I clockwise
to lock.
I
I
I
I
I
I
I
I
I
I
I
I
I
I
I
Warning: Do not use an electric screwdriver to attach the
hinges as this can weaken the fixing.