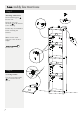
Half Width Tall Extra Deep Bookcase Assembly Instructions - Please keep for future reference 609/2218 609/2249 609/2232 609/2225 Dimensions Width - 42cm Depth - 29cm Height - 180cm Important - Please read these instructions fully before starting assembly If you need help or have damaged or missing parts, call the Customer Helpline: 08456 400 800 Date : 01/11/10
Safety and Care Advice Important – Please read these instructions fully before starting assembly • Check you have all the components and tools listed on pages 2 and 3. • Do not stand or put weight on the product, this could cause damage. • Remove all fittings from the plastic bags and separate them into their groups. • Assemble the item as close to its final position (in the same room) as possible. • Keep children and animals away from the work area, small parts could choke if swallowed.
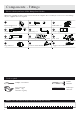
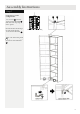
onents - Panels If you have damaged or missing components, call the Customer Helpline: 08456 400 800 Please check you have all the panels listed below 2 3 Fixed Horizontal x 2 (389x289mm) 6 Shelf x 4 (389x289mm) 4 Bottom (389x289mm) 5 Front (389x59mm) Left side (1800x290mm) 7 1 Right side (1800x290mm) Back (1737x417mm) 2
Components - Fittings Please check you have all the fittings listed below Note: The quantities below are the correct amount to complete the assembly. In some cases more fittings may be supplied than are required.
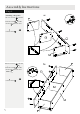
Assembly Instructions Step 1 a: Use Screws B a: Attaching bottom panel to fix Plastic Support A onto the Bottom Panel 4 . B A 4 B B A A 4 b: Use Screws to connect the Front Panel 5 onto the Bottom Panel 4 .
Assembly Instructions Step 2 a: Attaching side panel a: Use Screws D to fix the 2 onto the Left Side Panel Bottom Panel 4 and the two Panels (Bottom and Middle) 3 . E D 3 D Note: Use Allen Key E to fix Screws D . D 3 2 D D 4 b: Use Screws D to fix the Right Side Panel 1 onto Bottom Panel 4 and the two Panels (Bottom and Middle) 3 . b: 3 D D E 1 Note: Use Allen Key E to fix Screws D .
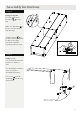
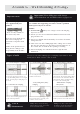
Assembly Instructions Step 3 Fixing back panel Use Nails I to fix the Back Panel 7 onto the unit. 7 Note: Use Nail Guide C to keep a constant distance from the edge. Mark Back Panel 7 for position of fixed Horizontal. Do this left and right. Join marks with ruler to guide position for nails I C Step 4 Fixing to wall It is recommended that the bookcase is fixed to a wall. See Wall Fixing Guidelines at the end of these Assembly Instructions Use Screw B to fix the Wall Strap G onto the Top of the panel.
embly Instructions Step 5 B Attaching Shelf Panel Insert Shelf Supports F into the unit. G Insert the two stop elements J on the shelves as the drawing. F Ensure they are well fitted before inserting the Shelves. 6 Note: Set the shelf supports to the desired height. F F 6 6 F into the unit. F F J 6 F F Step 6 J 6 Covering Sticker Use the Covering Sticker H to cover the Screw Heads.
Assembly Instructions Step 7 Construct a corner configuration B B Use Screws B to fix the Upper Corner Bracket L onto the front top edge of the panel. L Slot the front bottom edge of side panel into the Lawer Corner Bracket K . Make sure the Front panel 5 is positioned in the gap of Lawer Corner Bracket K.
A Guide to - Wall Mounting & Fixings Important note: If plastic wall plugs are supplied with your product: Important: When drilling into walls always check that there are no hidden wires or pipes etc. Make sure that the screws and wall plugs being used are suitable for supporting your unit. Consult a qualified tradesperson if you are unsure. Hints: - there are only suitable for use in masonry walls. If you are in any doubt about the correct wall plugs for your wall, seek professional advice.